In this article, I will show you how to enable SSH server on Ubuntu 18.04 LTS. Let's get started.
Installing SSH Server on Ubuntu 18.04 LTS:
SSH server program must be installed on the computer that you want connect and control remotely. Since the SSH server or OpenSSH server package is available in the official package repository of Ubuntu 18.04 LTS, you can easily install it.
First update the package repository cache of your Ubuntu 18.04 LTS operating system with the following command:
$ sudo apt-get update
The package repository cache should be updated.

Now you can install the OpenSSH SSH server program on the remote computer that you want to connect to with the following command:
$ sudo apt-get install openssh-server
Now press y and then press
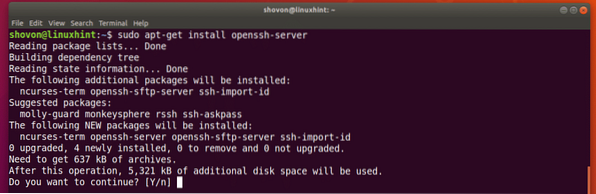
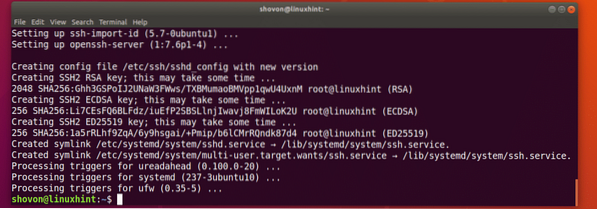
The OpenSSH SSH server program should be installed.
Installing SSH Client:
You must have SSH client program installed on the computer from which you want to connect to your remote computer using SSH. It should be installed by default on most Linux operating systems these days. But in case you don't have it installed, I will show you how in this section.
Ubuntu/Debian:
On Ubuntu or Debian operating systems, the SSH client program is available in the official package repository.
You can install SSH client program with the following command:
$ sudo apt-get install openssh-client
It should be installed.

CentOS 7/RHEL 7:
On CentOS 7 and Red Hat Enterprise Linux 7 (RHEL 7), the SSH client package is available in the official package repository as well.
Run the following command to install SSH client program on CentOS 7/RHEL 7:
$ sudo yum install openssh
SSH client program should be installed.

Connecting to the Remote Computer using SSH:
Now that we have SSH server program installed on our remote Ubuntu 18.04 LTS computer, and SSH client program installed on our local computer, we can connect to our remote Ubuntu 18.04 LTS computer from our local computer using SSH.
To connect to your remote computer, you have to know the hostname/domain name or IP address of your remote computer. If your remote computer is on a public network and it has DNS or domain name configured, the hostname should also be set to your domain name. If that's the case, you can find the hostname of your remote computer with the following command:
$ hostnameIf your remote computer is on the local network or you have a public dedicated IP address that you can connect to, then all you need is the IP address of your remote computer in order to connect to it using SSH.
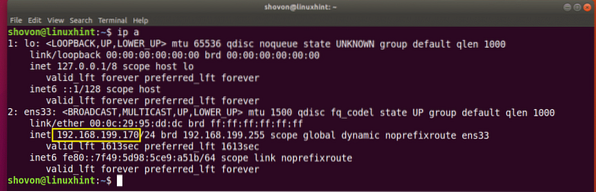
You can find out the IP address of your remote computer with the following command:
$ ip a
As you can see from the marked section of the screenshot below, the IP address of my Ubuntu 18.04 LTS remote computer is 192.168.199.170. It's on my local network. Take a note of it.
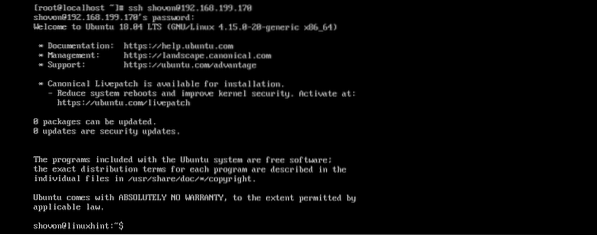
Now from your local computer, run the following command to connect to your remote computer using SSH:
$ ssh USERNAME@IP_OR_HOSTNAMENOTE: Here USERNAME is your login user name of your remote computer and IP_OR_HOSTNAME is the IP address or DNS/domain name of your remote computer.

You should see the following prompt if you're connecting to your remote server for the first time using SSH. Just type in yes and press

Now type in your password for the login USERNAME of your remote computer and then press

You should be connected as you can see from the screenshot below.
Now you can run any command you want on your remote computer from your local computer as you can see from the screenshot below.
$ lsb_release -a
Once you're done, run the following command to exit out of the remote computer.
$ exitAs you can see, I am disconnected from the remote computer.

Opening SSH Server Port on Ubuntu 18.04 LTS Remote Computer:
The firewall program of Ubuntu 18.04 LTS is called UFW. At times, UFW may be configured on your remote computer to block SSH server connection from other machines.
You can run the following command to open the SSH server port using UFW:
$ sudo ufw allow ssh
The SSH server port should be opened.

Starting SSH Server on System Boot:
Most of the time, you will want your SSH server to start when your computer boots. In that case, the SSH server service must be added to the system startup of Ubuntu 18.04 LTS.
To add SSH server service to your system startup, run the following command:
$ sudo systemctl enable sshd
The SSH server service should be added to the system startup.

That's how you enable SSH server on Ubuntu 18.04 LTS. Thanks for reading this article.


