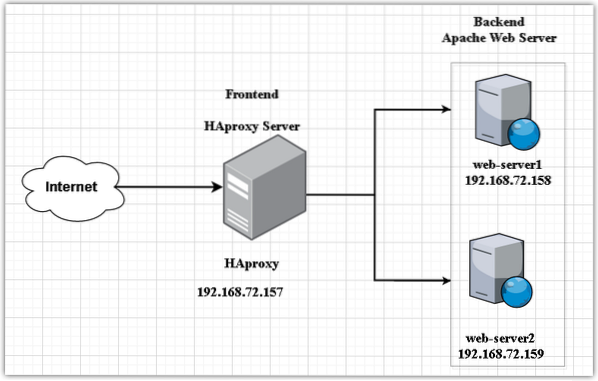
We have setup three machines. We will install HAproxy on one server and the Apache web servers on two servers. Our HAproxy server will then act as a load balancer and will distribute the load among Apache web servers.
Note: The procedure and commands mentioned in this post has been tested on Ubuntu 20.04 LTS (Focal Fossa). The same procedure is also valid for Debian and Mint distributions.
Network Details
We will be using three Ubuntu servers; all on the same network. The details of our servers are as follows:
Hostname: HAproxy, IP address: 192.168.72.157 (Frontend server)Hostname: web-server1, IP address: 192.168.72.158 (Backend servers)
Hostname: web-server2, IP address: 192.168.72.159 (Backend servers)
Note: You must have sudo privileges on all the servers.
We will configure one machine as a load balancer and the other two as web servers. The HAproxy server will be our front-end server that will receive the requests from the users and forward them to the two web servers. The web servers will be our Backend servers that will receive those forwarded requests.
This is how our setup looks like:
Setting up web servers-Backend servers
In this section, we will setup two web servers (web-server1 and web-server2) as our backend servers.
On web-server1(192.168.72.158)
Perform the below steps in your web server. Make sure to replace the hostnames and IP addresses with the relevant IP addresses and hostnames of your web servers.
1. Configure hosts file
On web-server1, edit the /etc/hosts file:
$ sudo nano /etc/hostsThen add the hostname entry for HAproxy server as follows:
hostname-of-HAproxy IP-address-of-HAproxyIn our scenario, it would be:
HAproxy 192.168.72.1572. Setup Apache webserver
Now install Apache web server using the below command in Terminal. You can also visit our post on How to install the Apache web server on Linux.
$ sudo apt install apache2Then enable and start the Apache service using the below commands in Terminal:
$ sudo systemctl enable apache2$ sudo systemctl start apache2
Create an index file for web-server1 using the below command in Terminal:
$ echo "Hello! This is webserver1: 192.168.72.158
" | sudo tee /var/www/html/index.htmlIf a firewall is running on your system, you will need to allow Apache traffic through it:
$ sudo ufw allow 80/tcpThen reload the firewall configurations:
$ ufw reloadNow try accessing the site in your web browser by typing http:// followed by either the IP address or the hostname of your web server.
http:// hostname-or-IP-address
Alternatively, you can also use the curl command to test the webpage.
$ curlOn web server-2 192.168.72.159)
Perform the below steps in your second web server. Make sure to replace the hostnames and IP addresses with the relevant IP addresses and hostnames of your web servers.
1. Configure hosts file
In web-server2, edit the /etc/hosts file:
$ sudo nano /etc/hostsThen add the hostname entry for HAproxy server as follows:
HAproxy 192.168.72.1572. Install Apache webserver
Now install Apache web server using the below command in Terminal.
$ sudo apt install apache2Then enable and start the Apache service using the below commands in Terminal:
$ sudo systemctl enable apache2$ sudo systemctl start apache2
Create an index file for web-server2 using the below command in Terminal:
$ echo "Hello! This is webserver2: 192.168.72.159
" | sudo tee /var/www/html/index.htmlAllow Apache in the firewall:
$ sudo ufw allow 80/tcpand then reload firewall configurations:
$ ufw reloadNow try accessing the site in your web browser by typing http:// followed by either the IP address or the hostname.
http:// hostname-or-IP-address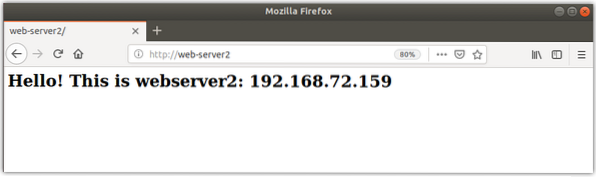
Alternatively, you can use the curl command to test the webpage.
$ curlNow our Apache web servers are ready.
Setting up HAproxy load balancer-Frontend server
In this section, we will set up an HAproxy load balancer for our web servers. This HAproxy server will act as a frontend server and accepts incoming requests from clients.
On the HAproxy server (192.168.72.157), perform the below steps to setup load balancer.
1. Configure hosts file
Edit the /etc/hosts file using the below command in Terminal:
$ sudo nano /etc/hostsAdd the following hostname entries for both Apache web servers along with its own hostname:
192.168.72.157 HAproxy192.168.72.158 web-server1
192.168.72.159 web-server2

Now save and close the /etc/hosts file.
Installing HAproxy load balancer
Now in this step, we will be installing the HAproxy on one of our Ubuntu server (192.168.72.157). To do so, update apt using the following command in Terminal:
$ sudo apt-get updateThen update packages using the below command:
$ sudo apt-get upgradeNow install HAproxy using the following command in Terminal:
$ sudo sudo apt install haproxy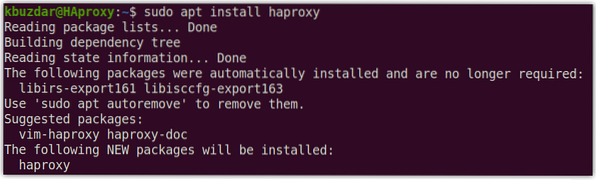
Once the installation of the HAproxy server is finished, you can confirm it using the below command in Terminal:
$ haproxy -vIt will show you the installed version of HAproxy on your system which verifies that the HAproxy has been successfully installed.

Configuring HAproxy as a load balancer
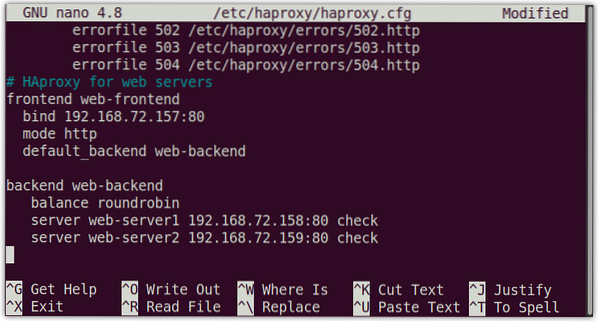
In the following section, we will configure HAproxy as a load balancer. To do so, edit the /etc/haproxy/haproxy.cfg file:
$ sudo nano /etc/haproxy/haproxy.cfgAppend the following lines in the haproxy.cfg file replacing the IP addresses with your own IP addresses.
The frontend web-frontend in the above configuration lines tells HAproxy to listen to incoming requests on port 80 of 192.168.72.157 and then forward them to backend servers configured under the backend web-backend. While configuring, replace the IP addresses with the relevant IP addresses of your web servers.
Configuring HAproxy Monitoring
With HAproxy monitoring, you can view a lot of information including server status, data transferred, uptime, session rate, etc. To configure HAproxy monitoring, append the following lines in the configuration file located at /etc/haproxy/haproxy.cfg:
listen statsbind 192.168.72.157:8080
mode http
option forwardfor
option httpclose
stats enable
stats show-legends
stats refresh 5s
stats uri /stats
stats realm Haproxy\ Statistics
stats auth kbuzdar:kbuzdar #Login User and Password for the monitoring
stats admin if TRUE
default_backend web-backend
The above configuration enables the HAproxy “stats” page using the stats directive and secures it with http basic authentication using the username and password defined by the stats auth directive.

Once you are done with the configurations, save and close the haproxy.cfg file.
Now verify the configuration file using the below command in Terminal:
$ haproxy -c -f /etc/haproxy/haproxy.cfgThe following output shows that the configurations are correct.

Now to apply the configurations, restart the HAproxy service:
$ sudo systemctl restart haproxy.serviceIt will stop and then start the HAproxy service.
To check the status of the HAproxy service, the command would be:
$ sudo systemctl status haproxy.serviceThe active (running) status in the following output shows that the HAproxy server is enabled and running fine.

Here are some other commands for managing the HAproxy server:
In order to start the HAproxy server, the command would be:
$ sudo systemctl start haproxy.serviceIn order to stop the HAproxy server, the command would be:
$ sudo systemctl stop haproxy.serviceIn case you want to temporarily disable the HAproxy server, the command would be:
$ sudo systemctl disable haproxy.serviceTo re-enable the HAproxy server, the command would be:
$ sudo systemctl enable haproxy.serviceTest HAproxy
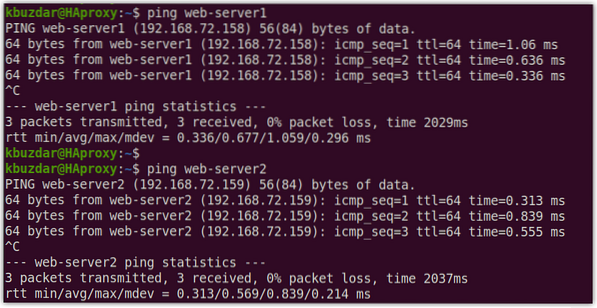
Before testing the HAproxy setup, make sure you have connectivity to web servers. From your HAproxy server, ping both web servers either by their IP addresses or hostnames.
$ ping hostname-or-ip-addressThe following output shows that the HAproxy server can reach both web servers.
Test HA Proxy using a web browser
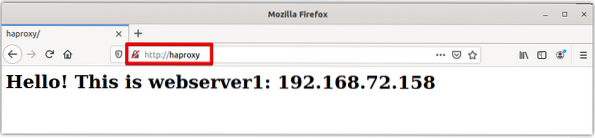
Now in your HAproxy server, open any web browser and type http:// followed by the HAproxy server IP address which in our case is 192.168.72.157.
http://192.168.72.157The HAproxy server will alternatively send the request to both web servers in a round-robin method. You can test this by reloading the webpage a few times.
This is the response we received when we visited the http://192.168.72.157 for the first time: 
This is the response we received when we reloaded the webpage: 
You can also use the hostname in place of the HAproxy server IP address.
Test HA Proxy using curl
You can also use the curl command in Linux to test the HAproxy setup. Open the Terminal and type curl followed by the IP address or the hostname of the HAproxy server.
$ curl 192.168.72.157or
$ curl HAproxyRun the curl command a few times and you will see the response alternating between both web servers.
Instead of running the commands several times, you can also run the following one-line script to test the HAproxy server:
$ while true; do curl 192.168.72.157; sleep 1; done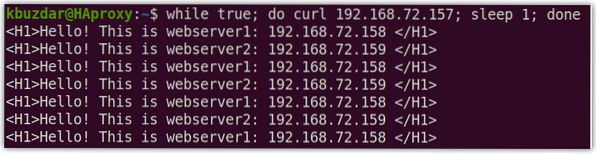
Testing HAproxy Monitoring
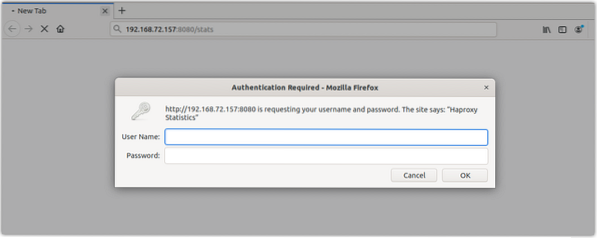
To access the HAproxy monitoring page, type http:// followed by the IP address/hostname of HAproxy server and port 8080/stats:
http://192.168.72.157:8080/statsor
http://HAproxy:8080/statsThe following authentication box will appear. Enter the username and password you have configured earlier in the configurations and then press OK.
This is the statistics report for our HAproxy server.

There you have the installation and configuration of HAproxy load balancer on the Linux system. We have just discussed the basic setup and configuration of HAproxy as a load balancer for Apache web servers. We also looked at some commands for managing the HAproxy server. In the end, we tested the load balancing through the browser and the curl command. For more information, visit HAproxy official documentation


