If you work from home or hold meetings with other people remotely, then you have probably heard of Zoom. It is one of the popular video conferencing software app available today.
Zoom is a cloud-based video conferencing service that you can use to meet people from other parts of the world virtually. That can be both by video or audio. A fantastic feature of this web conferencing app is that you can record your virtual session to watch or listen to later. In 2019, more than half of Fortune 500 companies reported having used the app to handle several virtual meetings.
Zoom Meeting Vs. Zoom Room
If you have used Zoom before or you are planning on using it, there are two terms you will come across: Zoom Meeting and Zoom Room, which might leave you wondering about the difference between the two.
Zoom Meeting is a video conference that is hosted using Zoom. Participants can join via webcam or phone.
Zoom Room, on the other hand, is a physical hardware setup. It is mainly implemented by large organizations to schedule and have Zoom Meeting in their conference rooms. Zoom Room is included in the paid plan.
Installing Zoom on Ubuntu
In this post, you will learn how to install and run Zoom on your Ubuntu system. Our Ubuntu distribution of choice will be Ubuntu 20.04 LTS; however, I was still able to install it on Ubuntu 18.04 LTS with this same procedure.
Step 1 - Download Zoom DEB File
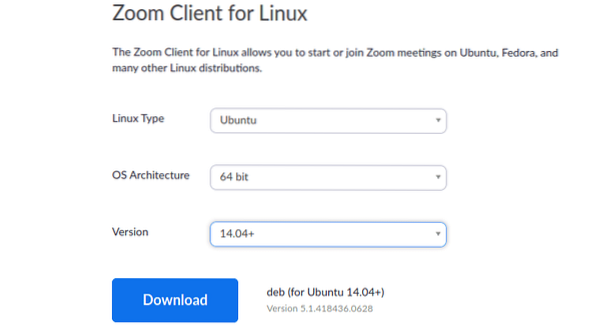
Luckily, there is a Zoom DEB setup file available for Linux distribution like Ubuntu and Debian. Please navigate to the download page with the link below to download it. I like using DEB files since the installation process is easy and fast.
Download Zoom Setup
You will be required to choose your Linux distribution of choice. In this case, select Ubuntu. Under the OS Architecture, select the option that is compatible with your system. That is either 64bit or 32 bit. You will also need to select the Zoom version you wish to download. If you have no idea about this, just chose the first option, which is the latest.
Step 2 - Install Zoom (2 Methods)
Once we have downloaded the file, the next step is the installation process. Like stated above, DEB files are easy to install. In this tutorial, I will show you two ways -The Graphical way using “Software Install” and via the Command-line.
-
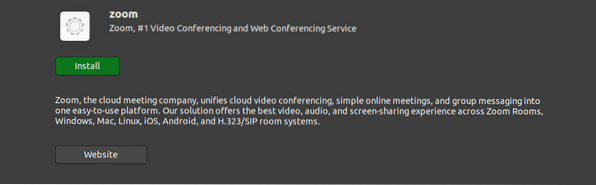
Using the Software Center
It is the easiest way if you don't want to start typing Linux commands on the terminal. Navigate to the directory where you downloaded the setup file. Right-click on it and select the option “Open with Software Install.”
That will open the Ubuntu Software application. From here, all you need to do is click the 'Install' button.
-
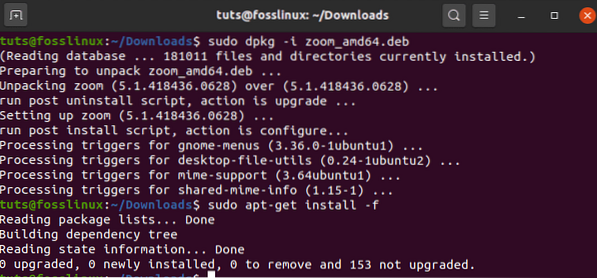
Use the Command-line
To those who find installing applications via the command-line fascinating, this method is for you. Launch the terminal and navigate to the directory where you downloaded your setup file. Execute the following series of commands.
sudo dpkg -i [file-name/path-to-file] e.g sudo dpkg -i zoom_file.deb sudo apt-get install -f
or
sudo apt install ./name.deb e.g sudo apt install zoom_file.deb
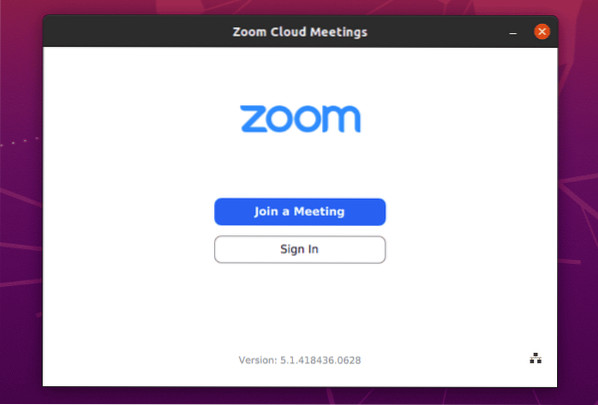
Zoom should now be installed in your Ubuntu system. To launch it, navigate to the Ubuntu Applications menu. Alternatively, you can start it from the Command-line by executing the 'zoom' command.

The Zoom application Window will open. You should see the 'Sign In' and 'Join Meeting' buttons.
Getting Started with Zoom
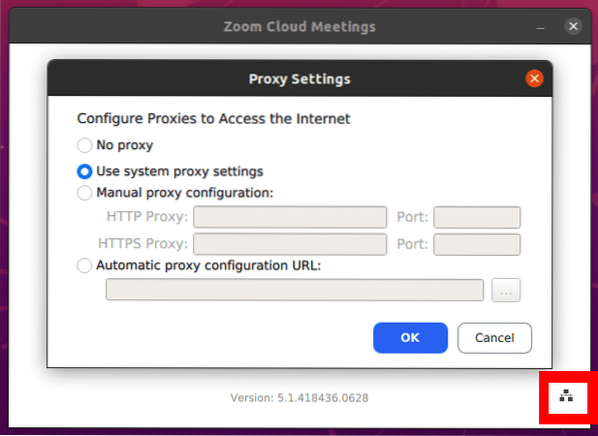
From the main Zoom Window, you can do three things - Join a meeting, Sign In, and Setup proxy.
To setup, a proxy, click on the Ethernet icon at the bottom-right of the window, as shown below.
-
Join a meeting
This option enables you to join a Zoom meeting without creating an account. You will be required to enter the Meeting ID or a Personal Link Name sent to you by the meeting admin (one who created the Zoom meeting).

You will also be required to enter a Screen Name that will be public to everyone in the meeting. Note, the screen name can be anything you wish. However, be sure not to use an offending word.

You will be listed with Audio and Video settings, as shown in the image above. From experience, I prefer turning both my video and audio OFF when joining a meeting and activating them later while inside the session. You don't want to join a meeting unprepared with your webcam ON or your microphone making all kinds of sounds.
-
Sign In
This option enables you to log in to your Zoom account and create a Zoom meeting. You will have several options to sign. If you already have a Zoom account, use your Email and Password. Alternatively, you can sign in using Google, SSO, or Facebook.
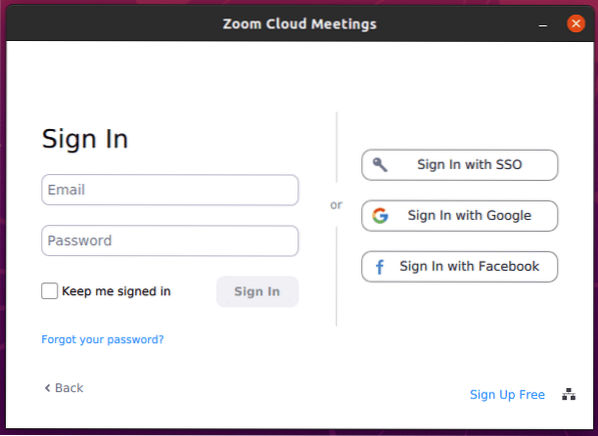
If you don't have a Zoom account, create one on your browser with the link below. Once done, you will have a free Zoom account with basic features. You can upgrade to the Zoom premium plan, which is a paid version but comes with a lot more amazing features.
Free Sign up - Zoom
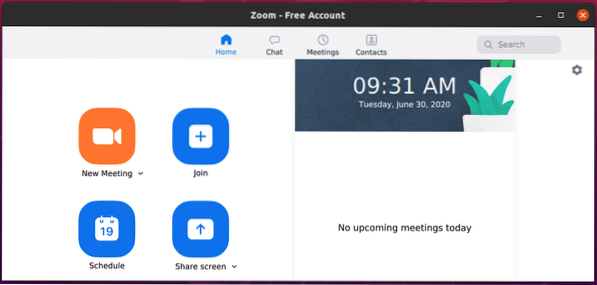
Once logged in, you should see the Zoom free account window where you can perform several actions like start a meeting, chat with friends and colleagues, join a session, and much more.
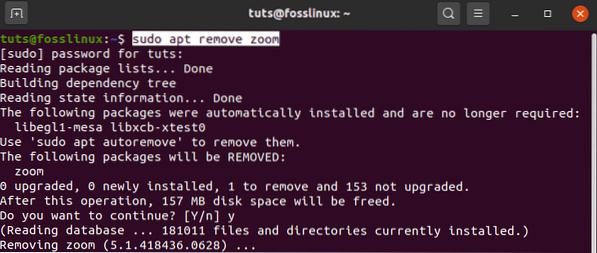
Uninstall Zoom on Ubuntu
To remove Zoom from your Ubuntu system is quite easy. Execute the command below. Note, you will need administrative privileges to perform this process.
sudo apt-get [remove package_name] e.g sudo apt remove zoom
That's all! I believe this post gave you clear guidelines on installing and getting started with Zoom on your Ubuntu system. If you have any queries regarding the entire process, feel free to leave a comment below.