
Network File System or NFS is a protocol for file systems. Using NFS protocol allows you to share files and directories on your machine with other users machines across the network.
The NFS is built on a client-server model, where the NFS server is responsible for handling the authentication and managing the data shared over the network.
In this article, we will cover installing NFS on both server and client computers, allowing you to share your files or directories from one Ubuntu machine to another.
Here is a summary of what we are going to do:
- Install the NFS Server on a machine, and we will call it the server machine.
- Create an export directory which we will use to share with the clients.
- Install the NFS client on a second machine, and we will call it the client machine.
- Make a simple test to ensure that everything is running successfully.
It's highly recommended that you follow those steps in order and this to ensure everything will run smoothly.
Installing NFS Server
Step 1. Before starting the installation of the NFS server, you have to make sure that your system is up-to-date using the following commands:
sudo apt-get update sudo apt-get upgrade
Step 2. Check if the NFS kernel server package is installed on your Ubuntu using the following command.
dpkg -l | grep nfs-kernel-server

As you can see in the above screenshot, if there is no output, then the NFS kernel server package is not installed on your machine.
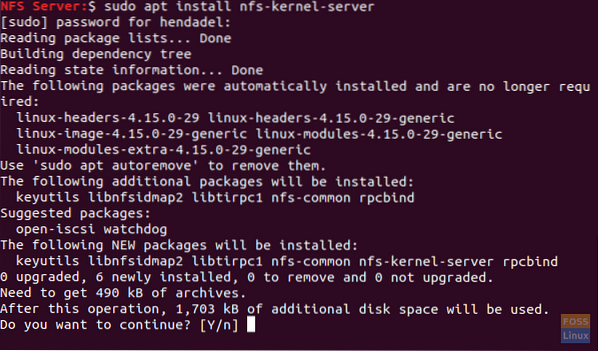
Step 3. Now let's install the latest available NFS kernel server package using the following command.
sudo apt install nfs-kernel-server
Create The Export Directory
This export directory will be shared with the clients' machines over the network.
Step 1. Create an export directory in the NFS server that will be shared over the network.
sudo mkdir -p /mnt/nfsdir
Step 2. To allow access to all the clients to the previous export directory, remove the current restrictive permissions on the directory.
sudo chown nobody:nogroup /mnt/nfsdir
Step 3. Assign new permissions to the export directory.
sudo chown nobody:nogroup /mnt/nfsdir
The output of the previous commands should be like below:

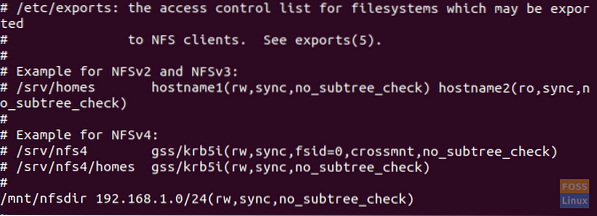
Step 4. Using your favorite editor, edit in the export configuration file to allow clients access to the NFS server export directory.
sudo vi /etc/exports
Now choose one of the following options to allow access to the server export directory:
- Allow access to a single client by specifying the client's machine IP.
/mnt/nfsdir client_IP(rw,sync,no_subtree_check)
The (rw, sync,no_subtree_check) permissions are defined as follows:
-
- rw -> The client is allowed to perform a read and write operations.
- sync -> The client can perform writing any change to the disc.
- no_subtree_check -> The client has no permission to check the subtree.
- Allow access to multiple clients by specifying the clients' machines IPs.
/mnt/nfsdir client_IP_1(rw,sync,no_subtree_check) /mnt/nfsdir client_IP_2(rw,sync,no_subtree_check) /mnt/nfsdir client_IP_3(rw,sync,no_subtree_check)
- Allow access to multiple clients by specifying the entire subnet.
/mnt/nfsdir subnetIP/24(rw,sync,no_subtree_check)
Here in our tutorial, we will use the last option to allow access to multiple clients by specifying the entire subnet.
Step 5. Next, we will apply the previous changes using the following command.
sudo exportfs -a

Step 6. Restart the NFS kernel server service.
sudo systemctl restart nfs-kernel-server

Step 7. Configure NFS server machine firewall to allow clients to access the export directory content.
sudo ufw allow from 192.168.1.0/24 to any port nfs

Step 8. Enable NFS server firewall to start automatically with the system startup.
sudo ufw enable

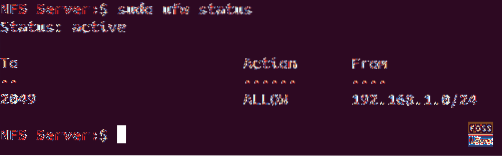
Step 9. Now check the status of the firewall to view the added rule from previous steps.
sudo ufw status
Install The NFS Client On a Second Machine
Next, we need to perform some configurations on the clients' machines so they can easily access the NFS server export directory. But before we start our configurations, we need first ensure that the clients' machines are up-to-date using the commands below.
sudo apt-get update sudo apt-get upgrade
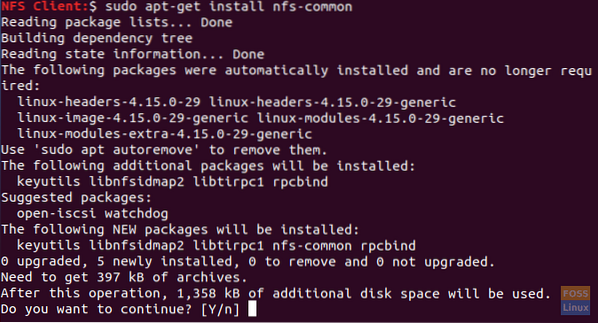
Step 1. Install the NFS client package using the following command.
sudo apt-get install nfs-common
Step 2. Create a mount point for the NFS server export directory.
sudo mkdir -p /mnt/nfsdirclient

Step 3. Now let's mount the shared NFS directory on the client.
sudo mount 192.168.1.4:/mnt/nfsdir /mnt/nfsdirclient

Test Your Installation
Step 1. On the server machine, create a test file in the export directory.
touch /mnt/nfsdir/nfstestfile

From the client machine, check the newly created file.
ls /mnt/nfsdirclient
The output should be like below:

Step 2. On the client machine, create a new file.
touch /mnt/nfsdirclient/clienttestflie

From the server machine, check for the previously created file.
ls /mnt/nfsdir
The output should be something like the below:

That's all about how to install the NFS server and client, and also testing your configurations.


