This article will post a list of useful command line and graphical utilities that allow you to compress image files to save local or remote disk space. Some of these applications provide “lossless” options that reduce size of image files with no or minimal loss of quality. Note that image compression is not the same as resizing, rescaling or altering geometry of images to reduce size. Image compression involves manipulating quality of images using various compression algorithms. Usually, quality of colors, individual pixels and transparency is manipulated to compress images and save disk space.
Convert Command
Convert command is a part of the “imagemagick” command line tool. Imagemagick features numerous commands and utilities to convert and modify image files in many formats.
To install Imagemagick in Ubuntu, use the following command:
$ sudo apt install imagemagickImagemagick and its “convert” command can be installed from package manager in any other Linux distribution. You can also get installable packages and source code from its official website.
You can run convert command in the following format:
$ convert image.png -quality 70 converted_image.pngReplace “image.png” with your input file and “converted_image.png” with the name of output file. The “-quality” switch is used to specify the quality of resultant image. You can give it any value in the range of 1-100 to set the quality of the output file. When you reduce image quality, it affects image size so reducing quality is an effective way to compress images. Note that image quality is not directly proportional to file size. Using a quality value of 70 doesn't necessarily mean that file size will reduce by 30%. Imagemagick uses a variety of compression algorithms and methodology depending on the file format of the output file. You can read more about “-quality” switch and compression algorithms from here.
The screenshot below shows how an image was compressed on my system after running the “convert” command:
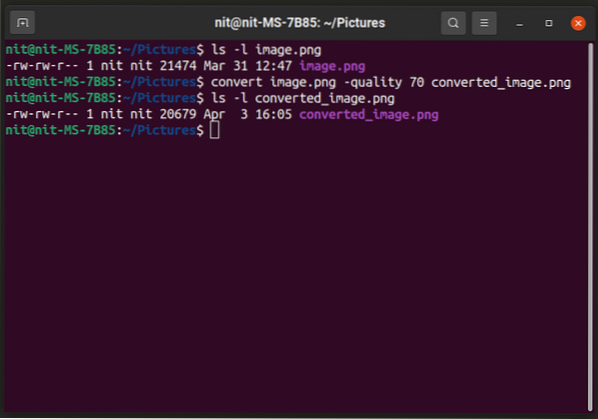
The image size was reduced from 21474 bytes to 20697 bytes. You can also change file format to get better compression (just change the extension of output file):
$ convert image.png -quality 70 converted_image.jpg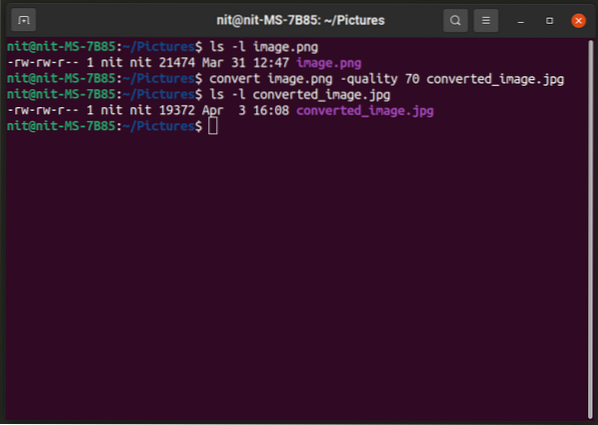
To know more about “convert” command, use these commands:
$ man convert$ convert --help
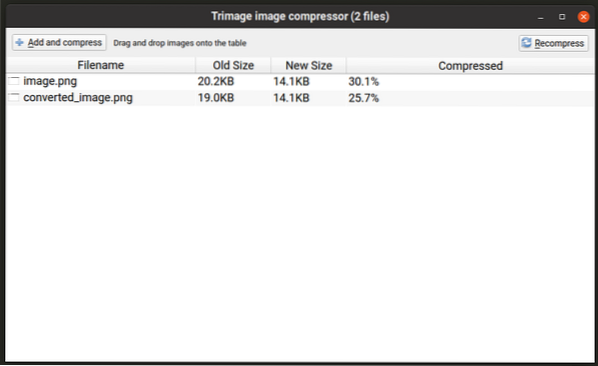
Trimage
Triage is a graphical application that supports batch compression of images. You can just drag and drop image files on the application window or add them from the file manager and they will convert automatically. Do note that Trimage compresses the original image file in-place without making a copy of it. So be careful if you want to retain the original file.
To install Trimage in Ubuntu, execute the command mentioned below:
$ sudo apt install trimageTrimage can be installed in other Linux distributions from various repositories available in the package manager. You can also get installable packages and source code from its official website.
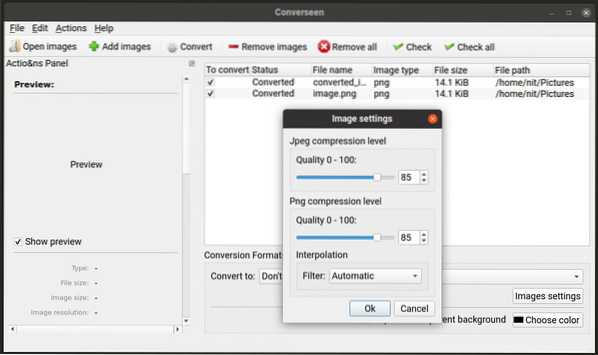
Converseen
Converseen is another batch image manipulation tool that works similar to the Trimage app mentioned above. It allows you to batch compress image files and provides options to control compression level of individual file formats. It also preserves original files and prompts you before overwriting them. By default, it saves converted images in the home folder but you can change the default output path. You can change compression levels by clicking on the “Images settings” button in the bottom right corner.
To install Converseen in Ubuntu, execute the command mentioned below:
$ sudo apt install converseenConverseen can be installed in other Linux distributions from various repositories available in the package manager. You can also get installable packages and source code from its official website.
OptiPNG
OptiPNG is a command line utility to modify “PNG” files. It is specially designed to do lossless compression of PNG files with little or no loss of quality. By default, OptiPNG uses lossless algorithms.
To install OptiPNG in Ubuntu, use the following command:
$ sudo apt install optipngOptiPNG can be installed from package manager in any other Linux distribution. You can also get installable packages and source code from its official website.
To compress a PNG file using OptiPNG's default lossless algorithm, use a command in the following format:
$ optipng image.png -out converted_image.png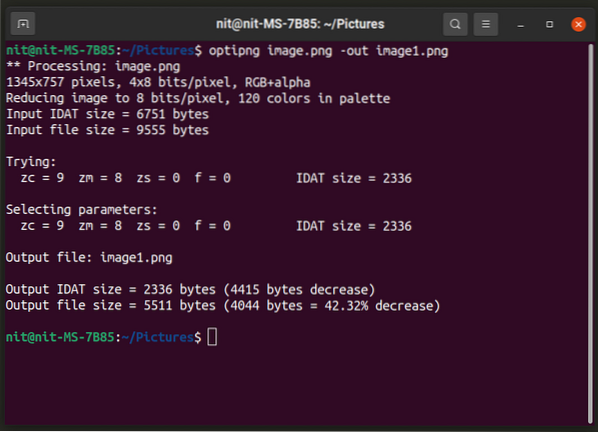
OptiPNG doesn't allow you to choose the quality of the output image using command line options. However, it allows you to change “optimization levels” from a range of 8 levels. Run the a command in the following format to use an optimization level:
$ optipng -o7 image.png -out converted_image.pngReplace the “-o7” part with your own choice of optimization level. You can know more about these optimization levels and which appropriate option to choose by running the command below:
$ optipng --helpFor further information on OptiPNG, use the following command:
$ man optipngJpegoptim
Jpegoptim works similarly to OptiPNG, but it works with “JPEG” file format only. By default, it tries to do best lossless compression, but you can choose various quality levels using command line options.
To install Jpegoptim in Ubuntu, use the following command:
$ sudo apt install jpegoptimJpegoptim can be installed from package manager in any other Linux distribution. You can also get installable packages and source code from its official repository.
To compress a JPEG / JPG file using its default compression algorithm, execute the following two commands:
$ mkdir -p compressed_files$ jpegoptim -d compressed_files image.jpg
Strangely enough, jpegoptim doesn't allow you to specify an output file but does allow you to specify a directory where compressed files will be saved. So the first command here creates a directory named “compressed_files” while the second command compresses “image.jpg” file and stores it in “compressed_files” directory.

You can specify quality of output file by using a command in following format:
$ jpegoptim -d compressed_files -m20 image.jpgTo change quality level, replace “20” with any number from 0-100.
Jpegoptim also features a “size” option that allows you to specify the target size of compressed file in percentages / kilobytes. To do so, you can use following two commands:
$ jpegoptim -d compressed_files --size=5k image.jpg$ jpegoptim -d compressed_files --size=30 image.jpg
Replace “5k” with target file size in kilobytes and replace “30” with target file size in percentages of original file.
Conclusion
These are some of the most useful command line and graphical applications that you can use to compress image files. Image compression is most commonly used for media used in websites and web applications to save disk space and bandwidth.


