Features
Below is a description of the features of the Burp Suite:
- Scanner: Scans for vulnerabilities.
- Application-aware spider: Utilized for slithering a given extent of pages.
- Intruder: Used to perform assaults and brute forces on pages in an adaptable way.
- Repeater: Used to control and divert all requests.
- Sequencer: Used to test session tokens.
- Extender: Permits you to handily compose your plugins to get custom functionality
- Comparer and decoder: Both are utilized for misc purposes.
Burp Spider
The Burp Suite also has a bug known as the Burp Spider. The Burp Spider is a program that crawls over all the objective pages indicated in the scope. Before beginning a Burp bug, the Burp Suite must be arranged to capture HTTP traffic.
What is Web Application Entrance Testing?
Web application entrance testing performs a digital assault to assemble data about your framework, discover weaknesses in it, and find how those deficiencies could eventually compromise your application or system.
Interface
Like other tools, the Burp Suite contains rows, menu bars, and various sets of panels.
The table below shows you the various options that are described below.
- Tool & Options Selector Tabs: Select the tools and settings.
- Sitemap View: Shows the sitemap.
- Requests Queue: Shows when requests are being made.
- Request/Response Details: Shows requests and responses from the server.

Spidering a website is a significant function of performing web security tests. This helps to identify the degree of web-application. As mentioned above, the Burp Suite has its own spider, called the Burp Spider, which can slither into a website. It mainly includes four steps.
Steps
Step 1: Set up a Proxy
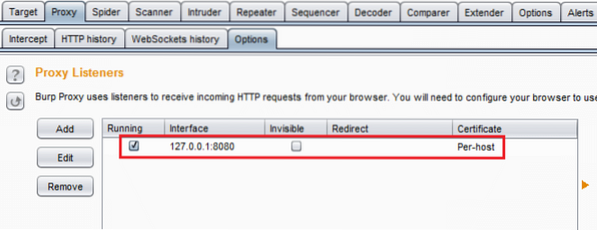
First, start the Burp Suite and check the options under the Options sub-tab.
Detect IP is localhost IP and the port is 8080.
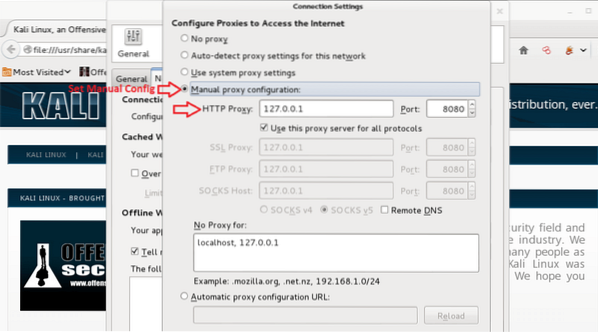
Also, detect to ensure that the Intercept is ON. Open Firefox and go to the Options tab. Click Preferences, then Network, then Connection Settings, and after that, choose the Manual proxy configuration selection.
To install proxy, you can install the proxy selector from the Add-Ons page and click Preferences.
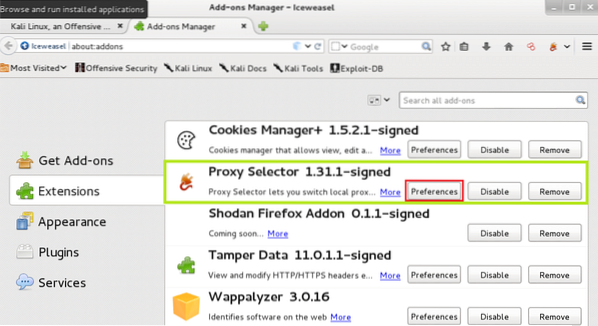
Go to Manage Proxies and include another intermediary, rounding out the applicable data.
Click on the Proxy Selector button at the top right and select the proxy you just made.
Step 2: Getting Content
After you set up the proxy, go to the objective by entering the URL in the location bar. You can see that the page will not load up. This occurs because the Burp Suite is capturing the association.

In the Burp Suite, you can see request options. Click forward to advance the association. At this point, you can see that the page has stacked up in the program.

Coming back to the Burp Suite, you can see that all areas are populated.
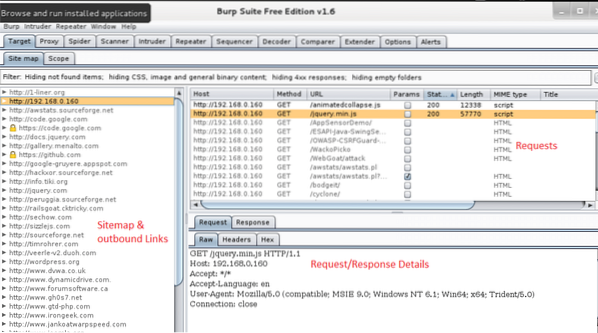
Step 3: Selection and Starting Spider
Here, the objective mutillidae is chosen. Right-click on the mutillidae objective from the sitemap and select the Spider From Here option.

When the Spider begins, you will get a brief detail, as shown in the accompanying figure. This is a login structure. The Spider will be able to crawl based on the provided info. You can skip this process by clicking the 'Ignore Form' button.

Step 4: Manipulating Details
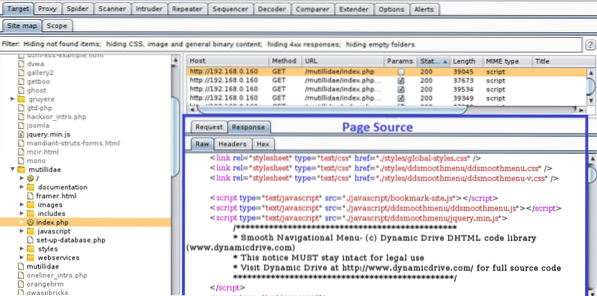
As the bug runs, the tree within the mutillidae branch gets populated. Likewise, the requests made appear in the line, and the details are listed in the Request tab.
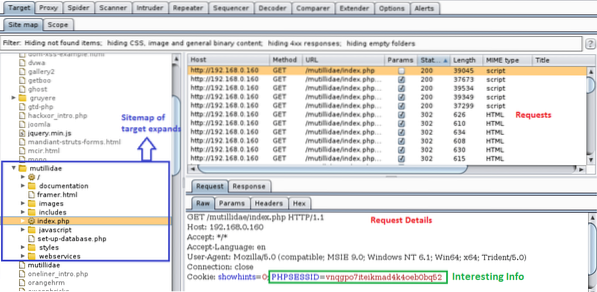
Proceed onward to various tabs and see all the basic data.
Finally, check if the Spider is done by reviewing the Spider tab.

These are the very essentials and beginning stages of a web security test using the Burp Suite. Spidering is a significant piece of the recon during the test, and by executing this, you can better understand the engineering of the objective site. In upcoming instructional exercises, we will stretch this out to different tools in the set of devices in the Burp Suite.
Conclusion
The Burp Suite can be utilized as a fundamental http intermediary to block traffic for investigation and playback, a web application security scanner, an instrument to perform mechanized assaults against a web application, a device to inspect a whole site to recognize assault surface, and a module API with many accessible outsider add-ons. I hope this article has helped you learn more about this amazing pen-testing tool.


