The Check Disk Utility or Chkdsk.exe in Windows 10/8/7 and Windows Vista is used to check for errors in the disk media and in the file system. If you face problems ranging from blue screens to inability to open, save files, or folders, you should run chkdsk.exe.
Check Disk can run automatically, in the case of an abrupt shutdown or if it finds the file system to be 'dirty'. There may be times, when you may find that this Check Disk Utility runs automatically every time your Windows starts. You may have scheduled its run, or your Windows may have decided to schedule its run. But instead of running just once, it continues to run every time your Windows computer boots.
Check Disk runs automatically at every startup
If your Check Disk or chkdsk tool in Windows runs on every boot, here are a few things you may want to try to cancel the ChkDsk operation:
- Let it runs once completely
- Edit the Windows Registry
- Cancel ChkDsk using Command Prompt.
Let us see these steps in detail.
1] Let it runs once completely
First of all, let it run once completely.
2] Edit the Windows Registry
Open the Registry Editor and navigate to the following registry key:
HKEY_LOCAL_MACHINE\SYSTEM\CurrentControlSet\Control\Session Manager
In the right pane, you will see BootExecute. Change its value from:
autocheck autochk * /.
to
autocheck autochk *
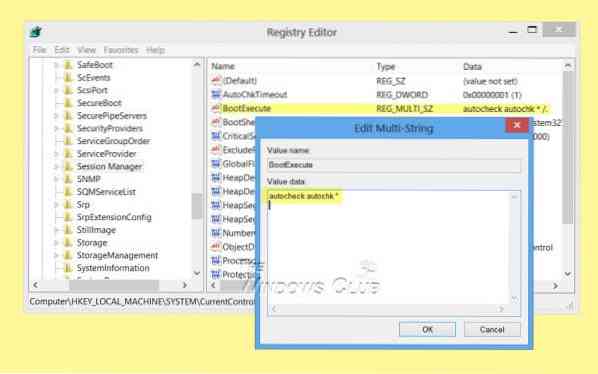
Click OK and exit.
If this works for you great, else try the next step.
3] Cancel ChkDsk using Command Prompt
Open a command prompt window, type the following and hit Enter:
fsutil dirty query g:
This command will query the drive, and more than likely it will tell you that it is dirty.
Next, execute the following command:
CHKNTFS /X G:
The X tells Windows to NOT check that particular drive (G) on the next reboot.
At this time, manually reboot your computer, it should not run Chkdsk now, but take you directly to Windows.
Once Windows has fully loaded, bring up another command prompt and execute the following command:
Chkdsk /f /r g:
This should take you through five stages of the scan and will unset that dirty bit. Finally, type the following and hit Enter:
fsutil dirty query g:
Windows will confirm that the dirty bit is not set on that drive.
You can run the chkdsk /r command or the chkdsk /f command to check a hard disk for errors.
Hope this helps.
If you need more inputs you can always take a look at the ChkDsk log files.
Related reads:
- How to reduce ChkDsk countdown time
- Check Disk will not run at startup in Windows
- ChkDsk is stuck or hangs.


