Requirements
This guide uses Ubuntu 16.04 as the operating system on which the web server is running. However, the same steps can be used for any other Ubuntu versions as well as long as there is no difference in the settings. This guide assumes the user already has a web-server installed, and it's Nginx. As the SSH client, Putty is used, and as the file editor Nano is recommended.
Solution
- The web-server created on the Droplets can be accessed via SSH protocol. Download and install Putty from its official website. The application is completely free of charge.
- After downloading Putty, go ahead and download the Nano. The purpose of Putty is accessing the Linux console to type shell commands, whereas Nano is used for editing internal files such as the Nginx default file.
- Launch the Putty and navigate to Session tab.
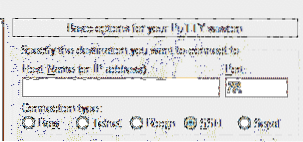
- In the Host Name field, type the IP address of the DigitalOcean's droplet where the web-server is installed. The IP address of the Droplets can be found in https://cloud.digitalocean.com/droplets. In the port field, type 22.
- After submitting all the required fields as seen above, press okay to apply the changes and login to the Droplet. When logging to the system, it will ask the username, and the password of the Droplet. Both username, and the password are emailed to the registered email in DigitalOcean when creating the Droplet.
- This guide uses Certbot, a third-party tool to automate the entire process of fetching and renewing the digital certificates. Certbot has its own website from where the commands to be used can be generated with ease. As per Certbot, the right commands to install Certbot on Ubuntu are these. First it updates the package information in the local repository, then it installs software properties common package that provides some useful scripts in handling personal package achieves (PPA), then it installs certbot, then it updates again the local repository, then it finally installs the python certbot nginx package. Make sure all of these packages are installed properly before heading to the next step.
$ sudo apt-get install software-properties-common
$ sudo add-apt-repository ppa:certbot/certbot
$ sudo apt-get update
$ sudo apt-get install python-certbot-nginx
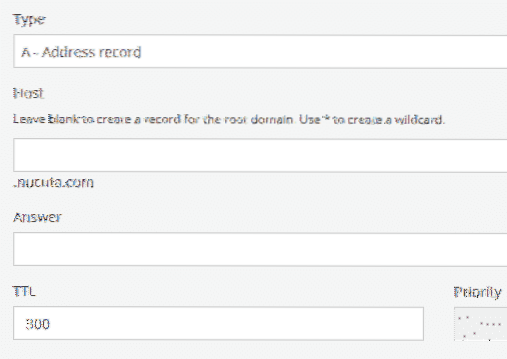
- Navigate to the website from where the domain was purchased. This guide uses Porkbun as the domain registrar, then add the A record to the domain. Type is A record, host is blank if the IP is associated with the root domain, otherwise use the subdomain name without the root domain, for instance if it's nucuta.com, just use www. As the answer type the IP address of the Droplet.
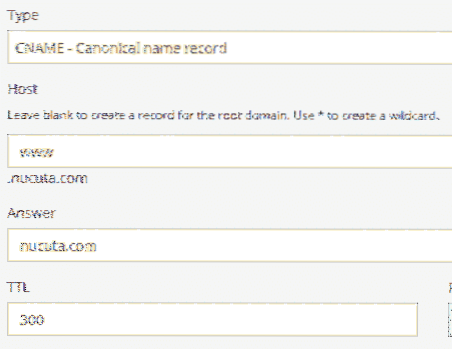
- In the same way, redirect WWW traffic to root domain as following. Type is “CNAME”, host is “WWW”, answer is “nucuta.com” or your domain. This step is important as it redirects all the www traffic to root domain.
- Use the following command on Putty to access the default File of Nginx. The default file by default uses one Server block where the primary domain is located. Nano Editor is highly recommended as it's quite convenient to use compared to others.
- In the default file, navigate to server block and redirect HTTP traffic to HTTPs, and in the other server block where secured traffic is handled, change the server_name to domain name, for instance
- Type the following command to restart the Nginx web server. Whenever a change was made in the default file, the whole Nginx server has to be restarted for new changes to have any effect.
- By default, the Firewall blocks all the traffic except to port 80 and 22. The HTTPS uses the port 443; hence it has to be manually opened to access the web server from client side. Opening the port depends on the Firewall.
In CSF (configured server firewall)
- Opens the CSF configure file by typing the following command.
- Add the following ports to TCP In and Out.
TCP_OUT = "20,21,22,25,53,80,443"- Restart the CSF by typing
csf -r
In USF (Uncomplicated Firewall)
- Type the following two commands to add HTTPS to exception list. “Nginx Full” package has both HTTP and HTTPS ports; hence adding the full package allows both traffic in and out.
sudo ufw delete allow 'Nginx HTTP'- Type the following command to see the status
ufw status
- Check the 443 port from an external website to make sure it opens for sure. If the port is open, it will say “443 port is open”

- Now use the Certbot to retrieve the SSL certificate to the domain. D parameter is required to specify the domain. Let's encrypt releases one certificate for both root and the www subdomain. Having just one for either version will issue a warning in the browser if a visitor accesses the other version; hence it's important to get the certificate for both versions. sudo certbot --nginx -d nucuta.com -d www.nucuta.com
- Certbot will ask to redirect all HTTP traffic to HTTPS, but it's not required as it's already done in one of the previous steps.
- Now navigate to the SSL Lab website and check the quality or any other problems of the certificate and its configuration. https://www.ssllabs.com/ssltest/
- If the current configuration isn't secured enough, navigate to Mozilla SSL configuration generator, and generate the settings for your web server. https://mozilla.github.io/server-side-tls/ssl-config-generator/. Since here uses Nginx, make sure to use Nginx as the web server. It offers three options, intermediate, old, and modern. Old option makes the website compatible with virtually every browser, including super old browsers like IE 6, whereas the intermediate option makes it ideal for average users, modern option generates configuration required for maximum security, but as a trade off the website won't function properly on older browsers. So, it's highly recommended for websites where the security is a major concern.
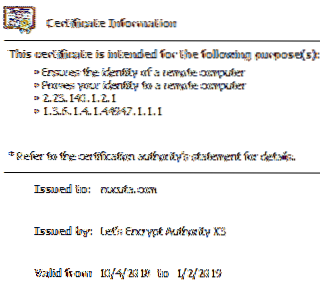
- Navigate to your website, and right click on the lock icon, then “Certificate” option to see the certificate.
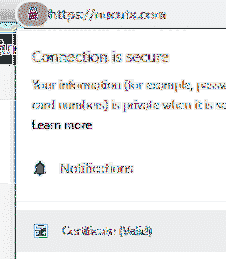
- If it shows a future date after TO in valid from option, which means the certificate acquiring process was completed. However, it's important to redirect traffic to the relevant version of the domain, for instance HTTP and WWW traffic can be redirected HTTPS root domain as seen in this guide. The certificate will automatically be renewed by certbot; hence it's forever available to the website owner for free of charge.