If you don't know what a container registry is, don't worry. It will become clear once you actually push your first container image into a GitLab instance. For now, think of them as repositories for your container images. These are not running containers but just images (plain data) sitting in the remote GitLab instance.
Why would you want a GitLab container registry?
Chances are that your application is packaged either as a single Docker image or a collection of such images. This means different versions will be associated with different images and container registry will help you keep track of them individually as well as see which ones are to be bundled together in a particular release.
Registry is to containers, what repository is to source code and GitLab is one place to handle them all.
Prerequisites
- A working GitLab instance over HTTPS
- Root access to the instance
- Access to modify your domain name's DNS records
We are going to assume our GitLab is running on gitlab.example.com .
Registry DNS and TLS certificates
You must be the root user to enable the container registry feature across the GitLab instance. Individual users can then choose to use this feature in their respective projects, if they wish so. There are two ways to do so:
- Reuse the existing domain name and TLS certificates for gitlab.example.com and run the registry on a different port.
- Point another domain name, let's say, registry.gitlab.example.com to the same IP address where GitLab is running and configure the registry there.
Let's go with the second option as it is much more professional.
Step 1: Add an A record for registry.gitlab.example.com pointing to the same IP where your GitLab instance is running.
Step 2: Stop the gitlab services running in your server.
$ sudo gitlab-ctl stopStep 3: Add ACME client certbot's PPA to your system and install certbot.
$ sudo add-apt-repository ppa:certbot/certbot$ sudo apt update
$ sudo apt install certbot
Step 4: Obtain certificates from Let's Encrypt.
$ certbot certonlyYou will see a message like:
“'
How would you like to authenticate with the ACME CA?
--
1: Spin up a temporary webserver (standalone)
2: Place files in webroot directory (webroot)
--
Select the appropriate number [1-2] then [enter] (press 'c' to cancel): 1
“'
This will then ask for your email, ask you to agree to their terms of service, and, most importantly, ask you for your domain name which would be registry.gitlab.example.com in our example case. You will get a message saying whether or not the certificates were obtained. If they were, move on to Step 5
Step 5: Now that we have our certs, it's time to place them under GitLab related directories.
$ cp /etc/letsencrypt/live/registry.gitlab.example.com/fullchain.pem/etc/gitlab/ssl/registry.gitlab.example.crt
$ cp /etc/letsencrypt/live/registry.gitlab.example.com/privkey.pem
/etc/gitlab/ssl/registry.gitlab.example.key
Secure the permissions on them:
$ chmod 600 /etc/gitlab/ssl/registry.gitlab.example.com.*Like the rest of the tutorial, make sure that you replace example.com with your existing domain name. Since that's what the name of the directory is going to be, where certbot has stored the certificate.
Step 6: Edit GitLab configuration. Open up the file /etc/gitlab/gitlab.rb and add the following lines to the bottom of it:
registry_external_url 'https://registry.gitlab.example.com'If you have done everything carefully, the most complicated part of the setup is over! You will now have a Container registry up and running, just run:
$ sudo gitlab-ctl reconfigure$ sudo gitlab-ctl start
Enabling Registry and Pushing Images
Now that we have to ourselves a Container Registry, let's create a new project using the GitLab web UI and verify that it works.

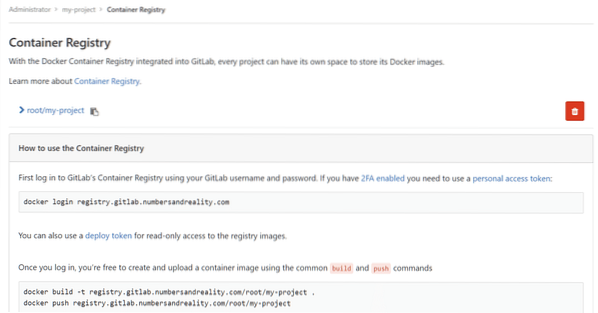
On the left-hand column you can see a Registry section. You can click on it to see detailed instructions on how to login and push images into it. Let's go back to our local desktop, which should have Docker installed on it.
We can use it to build a simple hello-world container and push it to this registry. In your local system, create a new folder:
$ cd ~$ mkdir sample_container
Inside it let's create a file named Dockerfile and add the following contents to it:
FROM ubuntu:latest## Your custom commands here
You can keep your Dockerfile with just the first line. It will be a plain ubuntu container. Now you build it with a meaningful tag (we will use the tag my-project which is same as our GitLab project name, this is important). In the same directory run:
$ docker build -t registry.gitlab.example.com/Remember to substitute your GitLab username instead of the
It just creates a Ubuntu container along with fetching the image. This image is what gets pushed. If you modify the container and create a new image with it (using docker commit command it will be a new image ). Let's push the vanilla ubuntu image to our registry.
First we need to login using our Gitlab username and password:
$ docker login registry.gitlab.example.comThen run:
$ docker build -t registry.gitlab.example.com/root/my-project .$ docker push registry.gitlab.example.com/root/my-project
If you are unsure what your container's tag should be, visit your project's registry page and there will be clear instructions for it. If the docker push command has worked properly, you can see a new docker image getting uploaded (or pushed) in your GitLab instance. Like it was shown in my case:
Conclusion
Version control is so much more than just source code management. It is constantly improving to accommodate a versatile array of demands that any software project may need unexpectedly. Container registry is just the tip of the iceberg. You can have CD/CI pipelines, advanced configuration management, authorization via tokens and a multitude of other functionalities enabled in GitLab. Hope you learned something new about this wonderful technology in this tutorial.
Let us know if there's something that you want us to cover!


