What is Continuous Integration (CI)?
Continuous Integration is the next logical step after have a version control system like Git and a remote version control system like GitLab or GitHub for collaborative endeavours. The problem that large projects face is this - As new pull requests come, they need to be tested and then integrated to the master branch and this effort can easily take anywhere from a few hours to a few weeks depending on the size of the project, the location of team members, etc.
Like any such problem, the logical step is to automate the entire rigmarole of testing. We do so by setting up a trigger such that whenever newer commits are merged into a branch an agent (GitLab Runner, for example) automatically builds the environment and the code, runs all the unit tests and integration tests against it. If there's any error encountered then it gives a warning and a crash report otherwise you get a green signal saying everything works.
Of course, taken to its logical extreme you can also then automate the deployment, setup automated A/B testing and wholey remove human intervention from the process. That is termed as Continuous Delivery and/or Continuous Deployment depending on the level of automation. But we would just focus on Continuous Integration in this tutorial.
Prerequisites
We are going to focus on setting up a simple CI flow in the tutorial using a GitLab instance over HTTPS which we covered in a previous post.
Additionally, we also assume you have set up a user account in this GitLab instance and have a repository (cloned on your local machine) managed under your username. It is this repository that we will be using to demonstrate CI workflow. In the tutorial, its name is going to be my-project.
To list it all:
- GitLab instance
- Blank repository, called my-project
- Local clone of this repository
- Your local Git instance configured to push changes into remote.
Creating a Simple app
In this repository, let's create a simple Node.js app. This app is a simple Express.js server which is meant to be deployed in a Docker container. The server gives an HTTP payload saying “Hello World” in your browser.
In the root of your local repository, create a file app.js and add the following lines:
'use strict';const express = require('express');
// Constants
const PORT = 8080;
const HOST = '0.0.0.0';
// App
const app = express();
app.get('/', (req, res) =>
res.send('Hello world\n');
);
app.listen(PORT, HOST);
console.log('Running on http://$HOST:$PORT');
Then create another file package.json and add the following to it:
"name": "docker_web_app",
"version": "1.0.0",
"description": "Node.js on Docker",
"author": "John Doe",
"main": "server.js",
"scripts":
"start": "node server.js"
,
"dependencies":
"express": "^4.16.1"
Lastly, create a Dockerfile and add the following contents to it:
FROM node:8# Create app directory
WORKDIR /usr/src/app
# Install app dependencies
# A wildcard is used to ensure both package.json AND package-lock.json are copied
COPY package*.json ./
RUN npm install
# If you are building your code for production
# RUN npm install --only=production
# Bundle app source
COPY…
EXPOSE 8080
CMD [ "node", "app"]
The build process for this app would involve creating a node container and installing the dependencies (like Express.js module). This process should happen without any errors. For simplicity's sake, we are not going to discuss any testing in this tutorial.
GitLab Runner Pipeline
Now we would add another file to our repository which would be called .gitlab-ci.yml . This file would contain the instructions to build our project. Now, everytime we push a commit to the our GitLab instance, GitLab would invoke a Runner to build and test the project.
We assign this pipeline various jobs which can run all run independently of each other, making the build process more flexible. For the above repo, this is a valid .gitlab-ci.yml create this file in the root of your repository:
image: node:lateststages:
- build
cache:
paths:
- node_modules/
install_dependencies:
stage: build
script:
- npm install
We have just one stage build and it has just npm install as a script. This is a command you would have to manually run every time a change comes to your project. The GitLab runner would do this for you. Runner could be installed in a Kubernetes cluster, a VPS in the cloud or in your local workstation and if it's active, it will be waiting for instructions from the GitLab server to execute a build.
We would install and configure a Runner locally to automate it.
Getting the Runner Token
Open up your repository on GitLab, and visit it's CD/CI settings. That's Settings → CD/CI inside your test repository.
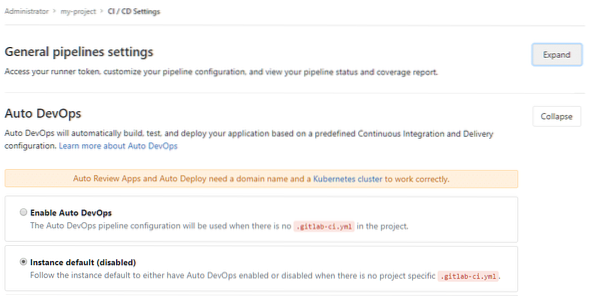
Leave the Auto DevOps setting to its default and click on EXPAND to expand the General Pipeline settings and you will be shown a Runner Token. Copy its value and, of course, keep it private if you value your project.
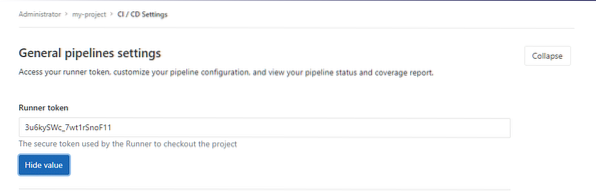
Using this token, your local GitLab Runner executable will be able to register securely with your GitLab instance.
Installing GitLab Runner
GitLab-Runner is a small lightweight program written in Go that runs CI related jobs on your local machine and sends the results to GitLab for it to consider the changes. It is a single executable binary that can be installed on any major OS. Follow the instructions here, for your particular Operating System. These installations vary wildly so listing all of them is infeasible.
Alternatively you can use Runner as a Docker service, but let's just stick to traditional install, for the commands are simpler to read and understand for the reader. Once you have it installed on your local workstation, you need to execute the command:
$ gitlab-runner registerThis will ask you several questions beginning with your GitLab-CI coordinator which would be your GitLab instance:
$ gitlab-runner registerPlease enter the gitlab-ci coordinator URL (e.g. https://gitlab.com/):
https://gitlab.example.com
It would then ask for your Runner Token, which we obtained in the previous section:
Please enter the gitlab-ci token for this runner:
Your_Secret_TokenThen for some identifying description and you can just skip adding any tags by hitting
Please enter the gitlab-ci description for this runner:
[Hostname]: Demo for setting up CI using RunnerPlease enter the gitlab-ci tags for this runner (comma separated):
Registering runner… succeededMost importantly, it will ask you for an executor (more on this in a moment), we will choose Docker for the sake of our example.
Please enter the executor: docker-ssh+machine, kubernetes, parallels, shell, ssh, virtualbox, docker+machine, docker, docker-ssh:
dockerThe Base docker image within which the build would take place then needs to be specified, our sample app uses node so we will specify a node image:
Please enter the default Docker image (e.g. ruby:2.1):
node:latestRunner registered successfully. Feel free to start it, but if it's running already the config should be automatically reloaded!
Now something that needs a little explanation here is what exactly are executors? The way CI work flows is that the building of modules, their testing, etc are all known as jobs and executors execute those jobs. If you chose VirtualBox as an executor, then GitLab runner would integrate with the locally installed VirtualBox and run the CI jobs in a VM, if you select kubernetes then it would happen in your Kubernetes cluster, in the cloud, if you select ssh you can delegate the CI tasks to a remote server.
Our sample project is based on Docker, so it makes sense to use Docker as our executor. You need to have Docker installed locally for this.
Having multiple options for executors makes Runner more flexible. You may want to build locally because the project files are too large or you may want to execute in a remote server with 20 cores and half a terabyte of RAM because the build process is computationally intensive, specifying an executor option gives you that flexibility.
Lastly, in your shell you would want to start the Runner service:
$ gitlab-runner startSeeing .gitlab-ci.yml in action
Now we have made all these changes in our local repo created all the app.js, package.json, Dockerfile and .gitlab-ci.yml files. Presumably, you committed the changes to your local repository by running:
$ git stage file_name$ git commit -m “Commit Message”
Let's push the changes to our remote GitLab.
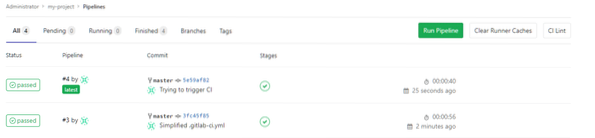
$ git push -u originYou can then open your project in GitLab, go to my-project → Pipeline and you will see this a tag saying “passed” next to the commit you made. Subsequent commits, will also have tags.
So that's the basics of CI using GitLab and Runner. Hope you enjoyed the post and learned something new from it.


