
Postal is a free and open-source mail server used to send and receive emails. It comes loaded with tons of excellent features and functionalities, making it extremely popular among large organizations as well as in the enterprise environment. Some of the notable features that you get with Postal include virus and spam checking, option to manage various IP pools when sending outbound emails, integration with various web applications, and much more.
Installing Postal on your Linux system is pretty simple and straightforward. However, you will need to configure your system correctly and install all the necessary packages and dependencies beforehand.
Creating a Fully-Featured Mail Server using Postal
This is why we have put together a step-by-step tutorial to walk you through the entire setup procedure. By the end, you will know how to create a comprehensive mail server using Postal.
Pre-Requisites
As we discussed earlier, before installing Postal, we need to make sure that our Linux PC has all the necessary software and packages to run the mail server. Here is a list of things you will need to get started:
Postal Pre-Requisites
- A system having 8 GB RAM (Recommended by Postal)
- Access to an updated Linux PC with up-to-date packages and repositories
- A domain name pointed to your server. For this tutorial, we will be using a demo domain name: example.com.
- Ruby - Postal is written in Ruby. As such, your system must have Ruby 2.3 or higher to install it.
- MariaDB - It will function as our database server.
- RabbitMQ - It provides a platform to send, receive, and store messages.
- Git - Necessary for retrieving the installer packages
- Node.js - Required for compiling JavaScript Libraries
- Nginx - We will need it as a Reverse Proxy.
Note: For the sake of this tutorial, we be using Ubuntu 20.04 LTS version. You can use any other Linux distro, but you will need to adjust the installation procedure accordingly.
Also, to follow along with the tutorial, you will need access to root privileges to run all the commands. To get root privileges, all you need to do is log in as a sudo user, and enter the following command:
$ sudo -i
Now that you have a clear understanding of Postal pre-requisites and its use, here is a detailed guide on installing them on your system.
Step 1: Update the System
First things first, we need to update all the packages and repositories on the Ubuntu PC. to do this, enter the following command in the terminal:
# apt update && apt -y upgrade # shutdown -r now
This is going to update and reboot the system. After system startup, move on to the next step.
Step 2: Install Ruby
There are a lot of different methods for installing Ruby on your Ubuntu PC. For the sake of this tutorial, we will be using RVM - Ruby Version Manager.
The installation process can be a little complicated compared to just using apt-get to install Ruby. However, it will help us in the long run, especially when we need to install and configure Postal. To install Ruby using RVM, we first need to add the GPG key of RVM on our server. To do this, enter the following command:
gpg --keyserver hkp://pool.sks-keyservers.net:80 --recv-keys 409B6B1796C275462A1703113804BB82D39DC0E3 7D2BAF1CF37B13E2069D6956105BD0E739499BDB
Next, to install RVM and run it on our system, we will need to enter the following commands:
# curl -sSL https://get.rvm.io | bash -s stable
# source /etc/profile.d/rvm.sh
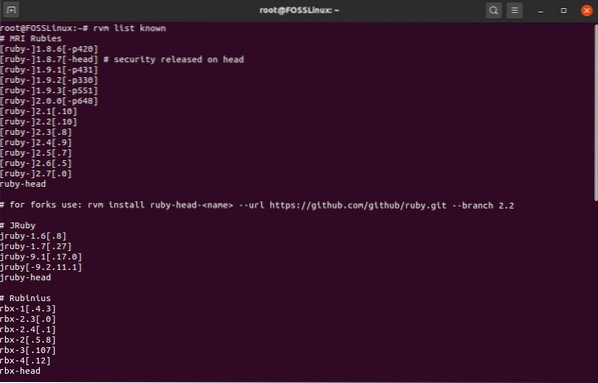
Once done, enter this command to fetch the list of Ruby versions:
# rvm list known
A similar output screen, as shown in the image, will appear.
From here, we will need to select the version of Ruby we want to install on our system. Keep in mind that Postal requires anything above Ruby version 2.3. For this tutorial, we will be installing the latest Ruby version 2.7 from the list. To do this, we enter the following command:
# rvm install 2.7
Once the installation finishes, run this command to start using Ruby on your system.
# rvm use 2.7
Also, to confirm Ruby was successfully installed, enter this command to check the Ruby version.
# ruby -v
If Ruby was successfully installed, an output screen, as shown in the image, should appear indicating the version of Ruby running on your system.

It is time to set up the database for Postal.
Step 3: Install MariaDB and Set Up a Database
For those of you who don't know, MariaDB is a fork of MySQL database server, which is a relational database management system that can store data in tabular format. You can easily install it on your Ubuntu PC by entering the following command:
# apt -y install mariadb-client mariadb-server libmysqlclient-dev
Once the installation procedure is complete, run the following commands to enable MariaDB and autostart it at boot time.
# systemctl start mariadb # systemctl enable mariadb
Next, you will need to secure a fresh installation of MariaDB. To do this, enter the following command:
# mysql_secure_installation
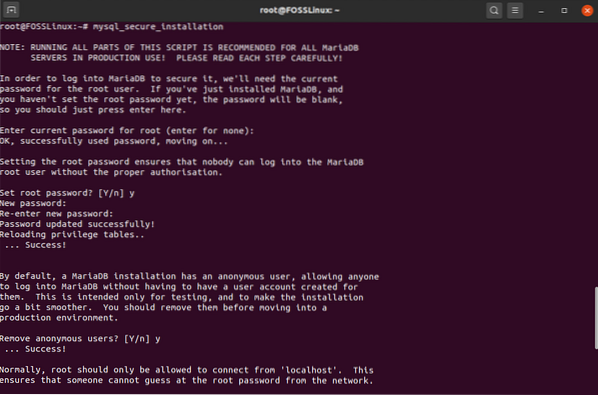
It is going to run a script that will let you set a password for the MariaDB database. First, it will ask you for the current password for root. But since you just installed MariaDB, you only need to press enter, and it will let you set the root password. Pick a strong one!
After that, follow all the questions that come up during the installation process. You should hit 'Y' for yes on all of them. Once done, MariaDB will be installed on your Ubuntu PC. Next, you will have to set up a Database using MariaDB, that's going to be used by Postal.
First, let's log into the MySQL shell of the root user. To do this, enter the following command:
# mysql -u root -p
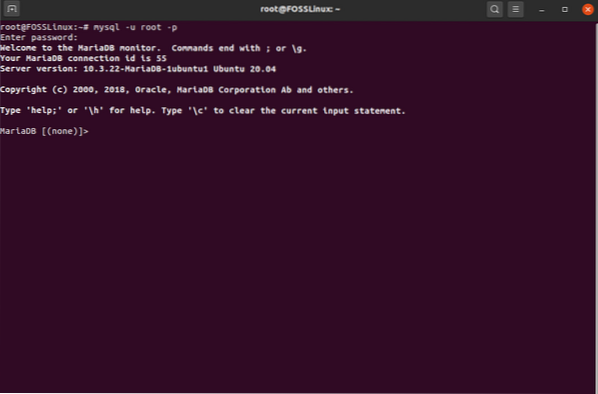
It is going to prompt you for the root password. Enter the password to log in. Once you have logged in to the MySQL shell, enter this query to create a new database for your Postal mail server:
Note: Don't forget to use a semi-colon (;) at the end of each query, as it is a part of the syntax.
CREATE DATABASE postal CHARSET utf8mb4 COLLATE utf8mb4_unicode_ci;
The above command is going to create a new database called 'postal.' Next, you will want to grant all the privileges to your database user over the postal database. To do this, enter this command:
GRANT ALL ON 'postal'.* TO 'postal'@'127.0.0.1' IDENTIFIED BY "PasswordGoesHere";
Note: “PasswordGoesHere” is just a placeholder. Replace it with a strong password of your choice.
Next, we will need to provide the appropriate permissions to the Postal users so that Postal can automatically write the database. To do this, enter the following command:
GRANT ALL PRIVILEGES ON 'postal-%' . * to 'postal'@'127.0.0.1' IDENTIFIED BY "PasswordGoesHere";
Note: “PasswordGoesHere” is just a placeholder. Replace it with a strong password of your choice. The above command provides privileges to all users that start with postal-. Once done, enter these commands to apply the changes on all the database privileges immediately and then exit from the MySQL shell.
FlUSH PRIVILEGES; EXIT;
It time to move on to the next step.
Step 4: Install RabbitMQ
To use RabbitMQ, since it is written in the Erlang language, we will first need to install Erlang by entering the following command:
# apt -y install erlang
Next, you will need to import the GPG key by running this command:
# curl -sL https://www.rabbitmq.com/rabbitmq-release-signing-key.asc | sudo apt-key add -
Once done, add the RabbitMQ repository using this command, and then update the index:
# add-apt-repository 'deb http://www.rabbitmq.com/debian/ testing main' # apt update
After all these setups, you can finally install RabbitMQ using the following command:
# apt -y install rabbitmq-server
After completing the installation, you will need to configure RabbitMQ to work with your Postal mail server. But first, let's start up RabbitMQ and configure it to launch during system bootup automatically. To do this, enter the following commands:
# systemctl start rabbitmq-server # systemctl enable rabbitmq-server
Next, you will need to create a virtual host for Postal in the RabbitMQ server. This can be done using the following command:
# rabbitmqctl add_vhost /postal
Then, add a new RabbitMQ User:
# rabbitmqctl add_user postal PasswordGoesHere
Note: PasswordGoesHere is just a placeholder. Replace it with a strong password of your choice.
And finally, set appropriate permissions for the RabbitMQ users on the RabbitMQ virtual host. To do this, enter this command:
# rabbitmqctl set_permissions -p /postal postal ".*" ".*" ".*"
You have now successfully installed and configured RabbitMQ to work with your Postal mail server. Its time to move on to the next step.
Step 5: Install Git
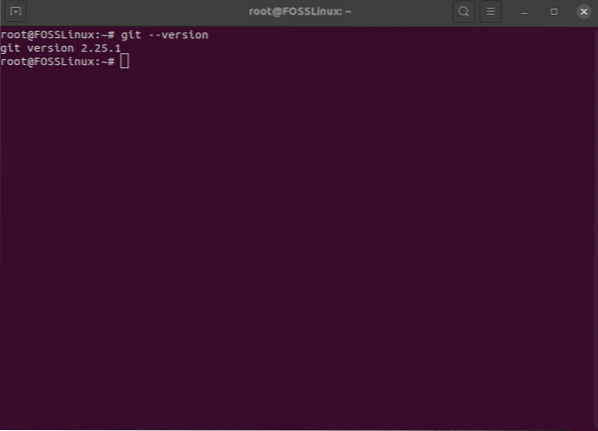
Now, let's get Git installed on our system. This can be quickly done by running the following command on the terminal:
# apt -y install git
Once the installation process gets finished, run this command to check if everything got correctly installed:
# git --version
If installed correctly, it will show the version of GIT running on your system.
Step 6: Install Node.js
You will now have to install Node.js.
# apt -y install nodejs
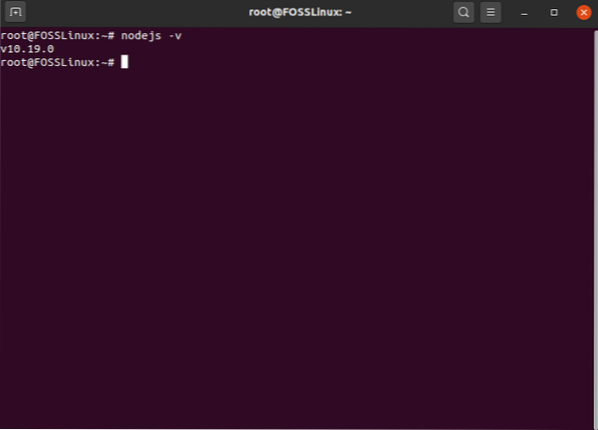
Again, once the installation is complete, enter the following command to check if everything is working correctly:
# nodejs -v
Like before, if successfully installed, you will get an output showing you the version number of Node.js installed on your system.
Install and Set Up Postal
Following the above steps, you have successfully installed all necessary dependencies needed to run Postal. However, there are still a few things you need to set up to prepare your operating system for the installation.
Step 1: Create a Postal User
Postal should run as its isolated user on your system. To do this, first, run the following command:
# useradd -r -m -d /opt/postal -s /bin/bash postal
This is going to create a new user on your system with username postal. Its home directory is set to /opt/postal.
Next, enter the following command to set up a password for the new Postal user.
# passwd postal
And finally, add Postal as a sudo user by entering this command:
# usermod -aG sudo postal
Step 2: Allowing Necessary Privileges
Next, you will need to set up Postal such that it can listen to all the privileged ports. To do this, you will need to allow Ruby to listen to these ports. This can be done using the following command:
# setcap 'cap_net_bind_service=+ep' /usr/local/rvm/rubies/ruby-2.7.0/bin/ruby
Note: On a shared server, granting these privileges would have been risky. However, on a server entirely dedicated Postal, this shouldn't pose a threat.
Step 3: Clone the Repositories
We are ready to get the Postal repositories cloned onto our system. But first, login to your shell as the postal user. This can be done quickly by entering the following command:
# su - postal
Create a new directory /opt/postal/app where you will clone the content of the repository:
$ sudo -i -u postal mkdir -p /opt/postal/app
Once done, you are ready to fetch the download repository. The following command will help you download the latest and most stable version of Postal.
$ wget https://postal.atech.media/packages/stable/latest.tgz -O - | sudo -u postal tar zxpv -C /opt/postal/app
Postal comes with a single binary, which allows you to interact with it from all the other directories on your server. As such, to make /opt/postal/app/bin/postal available everywhere, just create a symlink with it and the /usr/bin/postal directory.
To do this, enter the following command:
$ sudo ln -s /opt/postal/app/bin/postal /usr/bin/postal
Step 4: Install Ruby Dependencies
It is time to install all the necessary Ruby dependencies for Postal. But to do this, we will first need to install a couple of Ruby Gems - Bundler, Procodile, and Nokogiri. Bundler is a dependency manager for Ruby gem applications. You can install it by entering the following command:
$ sudo gem install bundler
Procodile is a process management tool for Ruby applications. It can be installed using this command:
$ sudo gem install procodile
And finally, you will need Nokogiri, an HTML, XML, CSS parser. It can help you with programmatically reading and editing an XML document. To install it, run the following commands:
$ sudo apt-get install build-essential patch ruby-dev zliblg-dev liblzma-dev $ sudo apt-get install libgmp-dev$ sudo gem install nokogiri
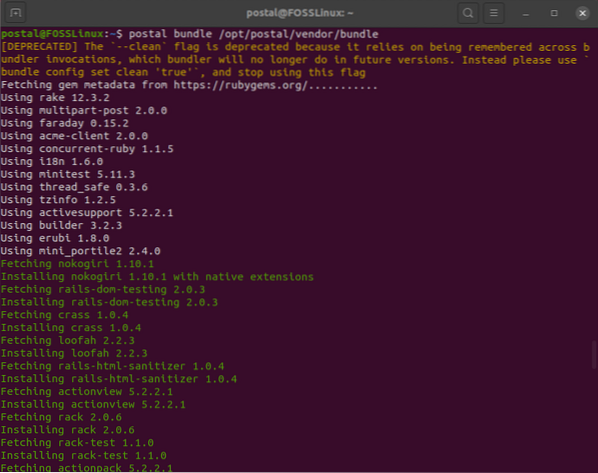
With all necessary Ruby gems successfully installed on your system, you can install the required Ruby dependencies required for Postal. To do this, run the following command:
$ postal bundle /opt/postal/vendor/bundle
Step 5: Set up The Postal Configuration File
With all the necessary dependencies installed, you can finally generate the default configuration file for Postal. To do this, enter the following command:
$ postal initialize-config
You should get a similar output screen, as shown in the image:

As you can see, you have generated a bunch of keys and certificates, including the default postal.yml configuration file.
Next, open the configuration file, and insert your custom settings and configurations. We are going to use the Nano text editor to open it.
$ nano /opt/postal/config/postal.yml
The file should look like the one shown in the image:
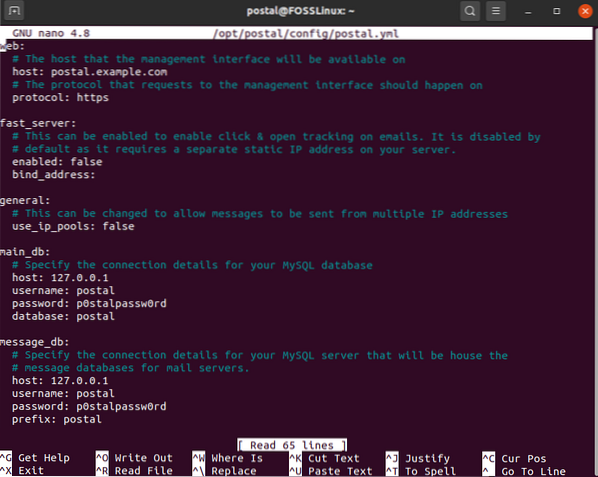
Browse through it section by section, and make changes as highlighted here. First, under the web section, change the hostname to your actual domain name:
web: # The host that the management interface will be available on host: postalmail.example.com
Next, under main_db and message_db, make the appropriate changes to username, password, database, and prefix according to your setup.
main_db: # Specify the connection details for your MySQL database host: 127.0.0.1 username: postal password: p0stalpassw0rd database: postal message_db: # Specify the connection details for your MySQL server that will be house the # message databases for mail servers. host: 127.0.0.1 username: postal password: p0stalpassw0rd prefix: postal
Further scrolling down, you will come across the settings for RabbitMQ. Make changes so that it fits with the user and vhost that you created earlier.
rabbitmq: # Specify the connection details for your RabbitMQ server. host: 127.0.0.1 username: postal password: PasswordGoesHere vhost: /postal
Scroll down to set up your DNS configurations. Change the domain names here to match with the actual domain name you are using.
dns: # Specifies the DNS record that you have configured. Refer to the documentation at # https://github.com/atech/postal/wiki/Domains-&-DNS-Configuration for further # information about these. mx_records: - mx.postalmail.example.com smtp_server_hostname: postalmail.example.com spf_include: spf.postalmail.example.com return_path: rp.postalmail.example.com route_domain: routes.postalmail.example.com track_domain: track.postalmail.example.com
Once done, save the file and exit the editor.
Step 6: Set Up Postal
After setting up the Postal configuration file, it is time to set up the Postal application. To do this, first, initialize the database and other assets required by Postal. To do this, enter the following command:
postal initialize
Next, create a new Postal Administrator user by running this command:
postal make-user
It will ask you to enter a username, email address, and password for the Postal user. The output screen should look like this:
postal@ubuntu:~$ postal make-user Postal User Creator Enter the information required to create a new Postal user. This tool is usually only used to create your initial admin user. E-Mail Address : [email protected] First Name : FOSS Last Name : Linux Initial Password: : ************** User has been created with e-mail address [email protected]
Once you have created your new Postal user, you have completed the command line setup for Postal. It is time to start the Postal server. To do this, just run the following command:
postal start
Next, enter this command to check if the services have started correctly:
postal status
Also, whenever you need to, you can stop Postal using this command:
postal stop
Before we open the Postal mail server, let's quickly set up a proxy server to secure our connection.
Step 7: Set up a Proxy Server
To set up a proxy server, you will first need an SSL certificate.
In case you already have an SSL certificate, you can skip this step ahead to the next part where we set up the proxy server.
Generate a Free SSL Certificate Using Let's Encrypt
Before you can set up your proxy server, it is recommended that you have SSL encryption to access it securely. For this tutorial, we will be using free SSL certificates generated using Let's Encrypt.
To do this, first, we need to install certbot, which is the Let's Encrypt client:
# apt -y install certbot
Once the installation finishes, run the following command:
# certbot certonly --standalone -d postalmail.example.com
This will create SSL certificates for the provided domain name. Make sure that the domain name is pointing towards your server. Certbot will check the domain authority before providing the certificates.
Once the SSL certificates are generated, it will be automatically stored in /etc/letsencrypt/live/postalmail.example.com.
Note: Replace postalmail.email.com with your actual domain name.
Each Let's Encrypt SSL certificates expire in 90 days. Just so you don't have to renew it manually every three months, we will show you how you can set up an automatic SSL certification renewal system. To do this, we will be using Crontab. First, open the crontab file using this command:
# crontab - e
Next, inside your crontab file, enter the following line:
0 0 * * mon /usr/bin/certbot renew >> /var/log/le-renew.log
The above command creates a cron job that will automatically run every week on Mondays at midnight. It will scan to see if your SSL certificates are due to expire. If yes, it will execute /var/log/le-renew.log file, which will automatically renew the SSL certificate.
To know more about Crontab and cron jobs, you can read our detailed guide on how to automate and schedule a task using Crontab.
Now that you have generated your SSL certificates and configured it to auto-renewal, it is time to install our proxy server.
Set Up a Proxy Server Using Nginx
For security reasons, we need the Postal web interface and its APIs to run behind a proxy web server like Nginx or Apache. For the sake of this tutorial, we will show you to do so using Nginx.
The first thing you need to do is install the Nginx web server. To do this, run the following command in your terminal:
# apt -y install nginx
With Nginx installed, create a new server block for your website. To do this, open the /etc/nginx/conf.d/postalmail.example.com.conf file using the text editor of your choice. For this tutorial, we will be using nano editor:
nano /etc/nginx/conf.d/postalmail.example.com.conf
Once the file opens, populate it with the following lines of content:
server listen [::]:80; listen 0.0.0.0:80; server_name postalmail.example.com; return 301 https://$host$request_uri; server listen [::]:443 ssl; listen 0.0.0.0:443 ssl; root /opt/postal/public; server_name postalmail.example.com; ssl_certificate /etc/letsencrypt/live/postalmail.example.com/fullchain.pem; ssl_certificate_key /etc/letsencrypt/live/postalmail.example.com/privkey.pem; ssl_protocols TLSv1.2 TLSv1.1 TLSv1; ssl_prefer_server_ciphers on; ssl_ciphers EECDH+ECDSA+AESGCM:EECDH+aRSA+AESGCM:EECDH+ECDSA+SHA512:EECDH+ECDSA+SHA384:EECDH+ECDSA+SHA256:ECDH+AESGCM:ECDH+AES256:DH+AESGCM:DH+AES256:RSA+AESGCM:!aNULL:!eNULL:!LOW:!RC4:!3DES:!MD5:!EXP:!PSK:!SRP:!DSS; location / client_max_body_size 50M; try_files $uri $uri/index.html $uri.html @puma; location /assets add_header Cache-Control max-age=3600; location @puma proxy_set_header X-Real-IP $remote_addr; proxy_set_header Host $host; proxy_set_header X-Forwarded-For $proxy_add_x_forwarded_for; proxy_set_header X-Forwarded-Proto https; proxy_pass http://127.0.0.1:5000;
Once that's done, save the file and exit from the editor. Next, run the following commands to restart Nginx and enable to start at system bootup automatically:
# systemctl restart nginx # systemctl enable nginx
You have successfully configured Nginx to act as a proxy server for your Postal mail server.
Step 8: Configure the Postal Mail Server
Finally, it is time to set up your Postal Mail Server. Best of all, you can now access it from your browser by entering the domain name that you have set up. In our case, that will be https://postalmail.example.com. It should open up this webpage:
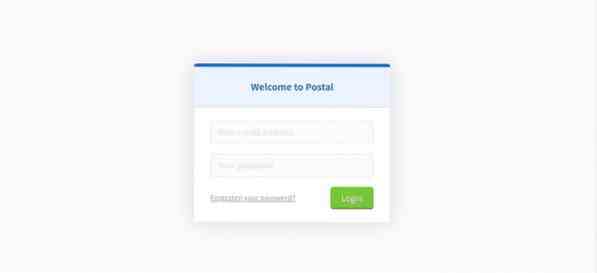
Enter your email address and password of the Postal user you created a while ago. Once logged in, it will ask you to complete the setup procedure for Postal. It is a pretty straightforward process where you only need to follow the instructions given on the screen.
Create a New Organization
First, you will need to create a new organization. It will ask you to enter a name for the organization. If you don't care about any specific name, just go for the auto-generate option.
Then you will need to provide a short name. This is going to be used as the username when authenticating with the SMTP server. The short name only accepts letters, numbers, and hyphens as valid characters. And that's it; you have successfully created a new organization under Postal.
Create a New Mail Server
Next, it will ask you to create a new mail server. Here you will need to enter the name, short name, and mode of the email server. Now, there are two modes for the email server. Under Live Mode, all emails will be routed and delivered as expected. Under the Development Mode, the emails will only be visible in the web interface.
Once done, you will have successfully created a mail server.
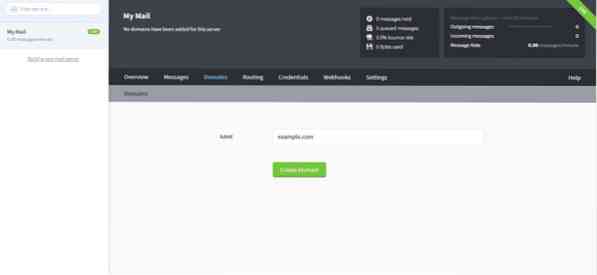
Specify a Domain Name
Next up, you will need to add a new domain in the mail server. To do this, click on the Domains tab and create a new domain name, as shown in the image.
After adding the new domain, you will be asked to configure the DNS for the domain. To do this, you will need to add two TXT records for SPF and DKIM. Once done, enter the CNAME record and MX record for the return path and mail delivery.
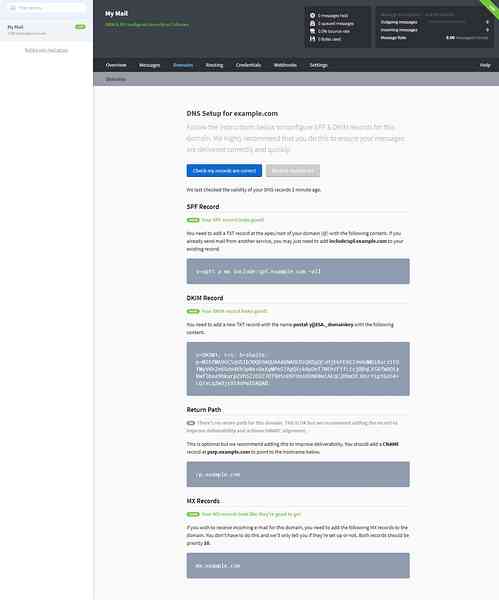
Once done, verify the DNS configuration by hitting the Check my records are correct button.
Specify SMTP Credentials
Finally, you will need to create an SMTP credential that will be used by Postal to send and receive emails.
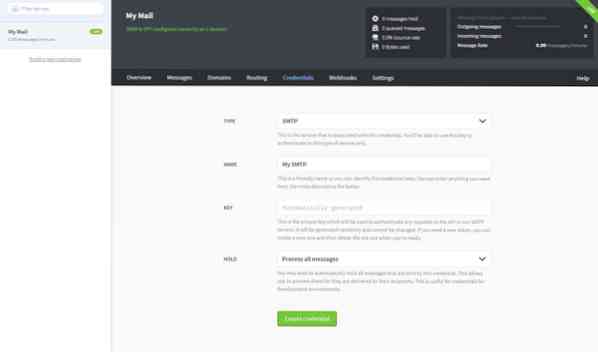
To do this, first head on over to the Credentials tab and select the type as SMTP or API. Next, enter the name for SMTP credentials and choose how you wish to handle the email address. And that's it!
Check the Overview Tab
You have successfully set up your Postal mail server. As a final step, head on over to the Overview tab to check if everything is appropriately set up.
Wrapping Up
This was our full in-depth look at how to install and configure the Postal (mail server) on Ubuntu 20.04. We hope you found this useful and that it has helped you to create your mail server.
As you can see, there are a lot of things you need to install and a lot of tools you need to configure before you can get Postal running. So if you face any sort of issues or error messages during the installation process, then feel free to write it down in the comments as we would love to help you out.
Here is an example of an error you might run into. In this tutorial, we have used RVM to install Ruby. However, if you have used a different installation method (say apt-get) for your Ruby installation, then your system might lack one or two necessary files. These missing files can cause problems when executing Postal. If this happens, then you will need to install the lost data and that too in the right directories before you can run Postal.

