There are many users who often have to switch between Windows and Mac OS X. For instance, some of you might have installed Windows on Mac using Boot Camp Assistant or without Boot Camp software and frequently switch between two operating systems.
As you know, on Mac OS X, we use Command + L hotkey to select address bar in web browsers. After using Mac OS X for a while, when you switch back to your PC, you end up pressing Windows (Command key on Mac) + L keys hoping to select the address bar or URL bar in web browsers. But when you're running Windows, as you know, pressing Windows (Command key on Mac) + L shortcut key locks down the system and takes you to the lock screen (in Windows 10/8) or logon screen (in Windows 7 and previous versions).

If you're addicted to keyboard shortcuts, you probably have been experiencing this annoyance whenever you switch back to PC from Mac. Although it's possible to change the default keyboard shortcut to select the address bar under Keyboard settings in recent versions of Mac OS X, disabling Windows + L keyboard shortcut in Windows is a better option if you spend more time on Mac than PC or if you rarely use the Windows + L hotkey to lock down your PC.
Disabling Windows logo + L keyboard shortcut
In Windows, one can disable Windows logo + L keyboard shortcut by editing Windows Registry. Complete the given below instructions to completely disable Windows logo + L keyboard shortcut in Windows:
NOTE: We advise you create a manual system restore point before proceeding further so that you can quickly revert to original settings with a few mouse clicks.
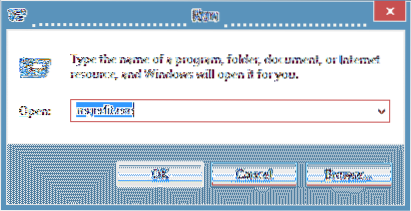
Step 1: Open Run dialog by simultaneously pressing Windows logo and R (Win+R) keys. If you're on a Mac machine, press Command + R to see Run dialog box.
Step 2: In the Run dialog, type Regedit.exe and then press enter key. Click Yes button when you're prompted with the User Account Control (UAC) screen.
Step 3: Once Registry Editor is launched, navigate to the following registry key:
HKEY_CURRENT_USER\Software\Microsoft\Windows\CurrentVersion\Policies\System
Step 4: In the right-side, create a new DWORD 32-bit value and rename it as DisableLockWorkstation.
Step 5: Double-click on the newly created DisableLockWorkstation entry and change its value from 0 (zero) to 1 (one).


Step 6: From now onwards, when you press Windows + L hotkey, Windows neither takes you to the lock/logon screen nor locks down the PC. Good luck!
NOTE: In order to restore Windows + L hotkey functionality, just navigate to the above mentioned registry key and then delete DisableLockWorkstation entry. That's it!
How to install Google Web Fonts in Windows and Mac without using third-party tools guide might also interest you.


