This article shows you how to make the background of an image transparent in GIMP.
Making an Image Transparent in GIMP
How do you make the background of an image transparent? This can be achieved by removing the background of the image and keeping only the necessary elements in the forefront. In image editing, removing the background of an image is one of the most common actions you will perform.
When the background is transparent, it takes the color and details of the new image. For example, putting a transparent image on top of a yellow image will have a yellow background.
Removing a Solid-Color Background
If the target image has a solid-colored background, then removing the background will be easier.
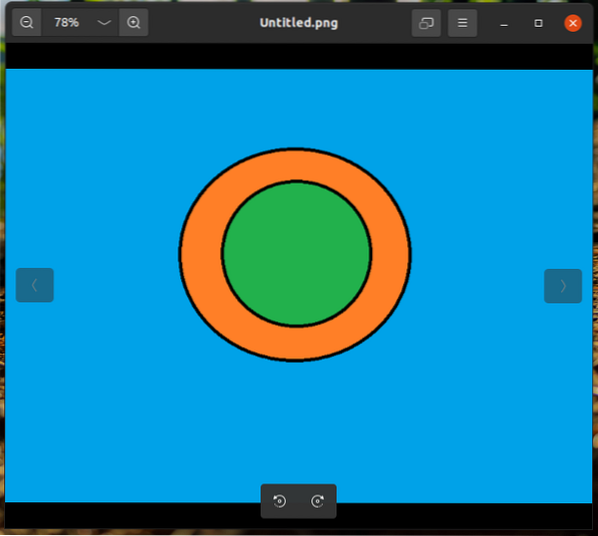
For this demonstration, I have created the following image. The image is quite simplistic. It contains two circles, one inside the other, on top of a flat-colored background.
![]()
Load the image in GIMP.
![]()
Next, add an alpha channel. To add this channel, go to Layer >> Transparency >> Add Alpha Channel.
![]()
The change should be visible under the Layer tab.
![]()
Now, it is time to select the background. GIMP offers two tools for selecting the background: the Color tool and the Fuzzy Select tool. In this method, we will select the Color tool from the left sidebar. Alternatively, you can use the Shift + O keyboard shortcut to open this tool.
![]()
Now, click on the background. GIMP will mark the entire background that matches the selected color. This selection will be highlighted.
Once the background has been highlighted, it is now time to delete it. To delete the selected area, go to Edit >> Clear. Alternatively, use the keyboard shortcut Delete.
![]()
And, voilà! The background has been removed successfully! Finish the process by un-marking the selected area. Go to Select >> None. Alternatively, press the Ctrl + Shift + A keyboard shortcut.
![]()
Removing a Multi-Colored Background
In the previous step, the target image was a simple geometric design with a flat-color background. What if the background were something more complex? For example, when taking a selfie, the background is not a flat color. Removing the background in such an image would not work with the previous method.
In principle, the task of removing the background will be the same. You will identify the area of the image that you want to retain, select the area that you want to remove, and remove the background by deleting it. In this section, however, the selection tools will differ.
Load the target image in GIMP. As in the previous example, I will use the same simple I created for the demonstration.
![]()
Add an alpha channel to the image.
![]()
We will use the Path tool to select the area to retain. Using this tool, you can outline the image portion that will remain intact. While using this tool, you click on the image and drag the cursor to outline the image you want to keep. The clicked point is marked with a dot, and all the dots generated are connected to mark the area. Because of this, the marking may or may not be as smooth as intended. The more vertices that are used, the smoother the marking will be.
![]()
![]()
Once you are finished marking the image, press Enter to end the marking process, and the entire object will be selected.
We have selected the part we want to keep, and now, we must invert the selection. This way, GIMP will select all the remaining portions to delete. In this case, the deleted portion will be the background. To invert the selected portion, go to Select >> Invert. Alternatively, use the Ctrl + I keyboard shortcut.
![]()
Now, we will simply remove the contents of the selection. Go to Edit >> Clear. Alternatively, use the Delete keyboard shortcut.
![]()
Voilà! The background has now been removed successfully!
![]()
Saving the Image
Once the background of the image has been removed, it is now time to save the transparent image. To export the transparent image as a different image, go to File >> Export As. Alternatively, use the Shift + Ctrl + E keyboard shortcut.
![]()
As for the file type, change the extension of the filename (GIMP automatically converts and saves in the format).
Final Thoughts
Removing the background of an image can be a simple task with GIMP. Learning the tools involved in this process does not take much time. The only issue is the time it takes to outline your selection. Any high-quality background removal, especially with a complex background, will require quite a lot of time.
GIMP not your jam? Worry not. There are more awesome alternatives to Photoshop that you can run on Linux. Check out the best Photoshop alternatives on Linux here.
Happy computing!


