Previously, We covered a post on How to dual-boot Windows and Ubuntu on the same PC. We also went further and looked at How to dual-boot two Linux distributions like Fedora and Ubuntu. This post will look at something around the same line but slightly different.
What would you do when you are no longer interested in Ubuntu, which was dual-booted alongside Windows? You can't just assume it as it will be occupying your hard drive space. This article will guide A step-by-step guide on Uninstall Ubuntu in a Windows Dual-boot Safely.
What you need to know
When you want to perform a dual-boot, we recommend installing Windows, then Ubuntu. That will save you the hassle of installing Grub manually. In case you first install Ubuntu then Windows, the Windows installer will overwrite the Ubuntu Grub preventing Ubuntu from booting.
GRUB (which stands for GRand Unified Bootloader) is a bootloader package from the GNU project that takes over from the BIOS at boot time. If you have two or more operating systems installed, it will list them on boot, and you can choose which one you wish to start. If you have no other operating system, it will load the Linux kernel into memory (RAM) and pass the whole execution process to the Kernel, thus starting your Linux OS.
In our case here, when we delete/remove Ubuntu, we will also lose the GRUB boot loader. As a result, our Windows operating system will not boot. Luckily, we can fix this without losing any data. Once we have deleted the Ubuntu partition, we will need to have a bootable disk of Windows that we will use to repair the Windows Master Boot Record.
Uninstalling Ubuntu in a Windows Dual-boot PC
IMPORTANTPlease read the article entirely before proceeding to ensure that you don't lose any data. We test all our guides and make sure it works 100% before publishing, but several parameters come into play due to various system configurations and conflicts. Hence, always take a backup of your important data before following any guides on the internet. And remember not to skip any steps!
Requirements
- A Bootable USB drive for your Windows version - That will be used to repair the Master Boot Record once we have uninstalled Ubuntu from our PC.
- Backup any important files from your Ubuntu system
Now that we understand the Grub boot loader and the Master Boot Record, we can now remove Ubuntu from our dual-boot. We will divide the whole process into two major steps.
- Deleting the Ubuntu Partition
- Repair the Windows Boot Loader
Step 1. Create a Bootable USB drive
Go to the Microsoft website, create bootable installation media, and make sure it works. You can make sure it works just by booting it and checking if all the features load successfully. Once you are done with it, proceed to Step 2.
Step 2. Delete/Remove the Ubuntu Partition
To delete the Ubuntu partition, you will first need to boot and login into your Windows operating system. An alternative way would be to use the Gparted Live Boot option and delete the Ubuntu partition. However, that's a little complex and longer method.
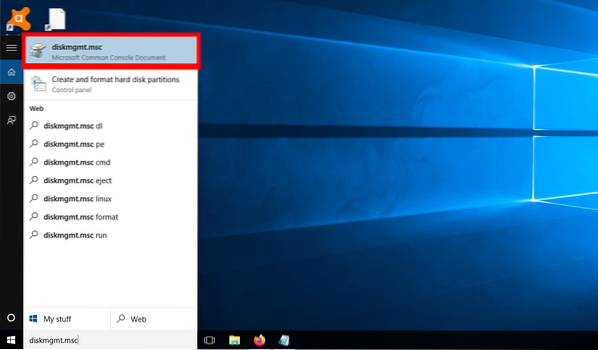
On your windows operating system, hit the start button (Windows key) and type the word “diskmgmt.msc” into the search menu. Hit enter to launch the Disk management application.
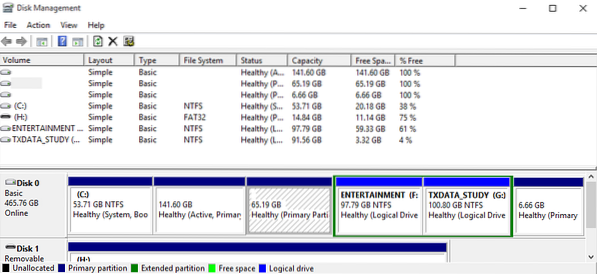
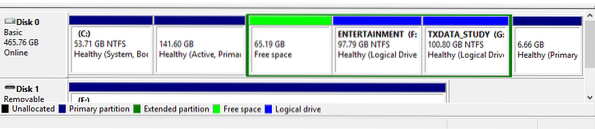
Once you launch the Disk manager, the next step is to locate your Ubuntu/Linux partitions. That will be easy since your Linux partition won't have any label under the File system option, unlike Windows partitions labeled as NTFS. If you had more than one Linux operating systems installed (multi-boot), you would need to distinguish them by their sizes.
As an example, the image below shows the number of partitions I have on my hard drive. Currently, I have three operating systems installed - Windows, Ubuntu, and Parrot. Now, please focus on the partitions 53.71 GB (Windows), 141.60 GB (Parrot), 65.19 GB (Ubuntu), and 6.66 GB (Swap Space). The last three are all my Linux partitions, and as you can see, there is no file system label.
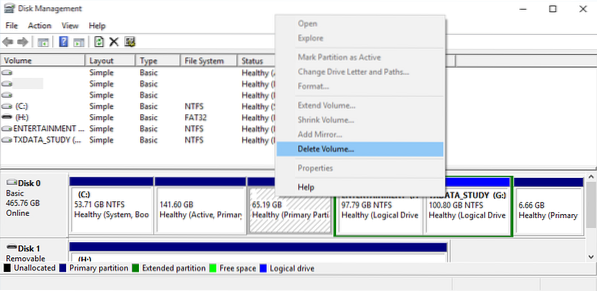
Now, all you need to do is right click your Linux/Ubuntu partitions and select the option “Delete Volume.”
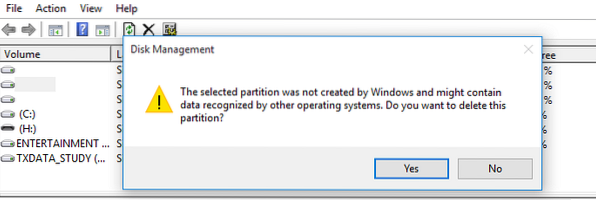
You will get the warning, ” The selected partition was not created by Windows and might contain data recognized by other operating systems. Do you want to delete the partition ?” If you are sure it is the right partition, click “Yes.”
Once you delete the volume, you will get free space, as shown in the image below. You can now decide to use this partition to hold another operating system or store files by formatting the NTFS filesystem format. Alternatively, you can extend the adjacent partition to occupy the left space.
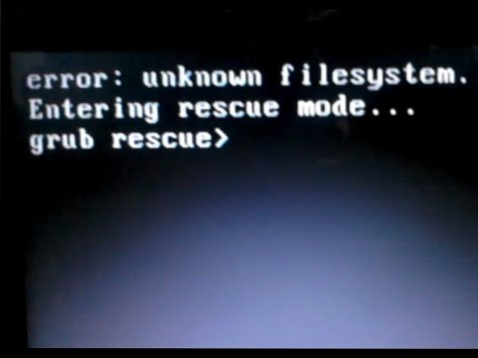
Once you have deleted the Ubuntu partition, we will also lose the Grub Boot Loader. In case you reboot your PC at this point, you will get the error “unknown filesystem,” and you will get a grub rescue prompt. See the image below:
Step 3. Repair the Windows Boot Loader
This is where the bootable USB drive of Windows comes in to solve the Grub Rescue error. You will need to boot your PC from this USB drive. You might be required to change the normal boot order by pressing different function keys depending on the laptop brand. We have an article - How to Boot your Windows or Linux PC from a USB Drive that gives you detailed information about the whole process. It also has a detailed table with the keys to launching popular laptop brands' boot menu.
After booting your PC from the USB, the Windows installer will start. After selecting the language to use during the installation process, you should see the screen below. You will have two options to select from: Install Now and Repair your computer.
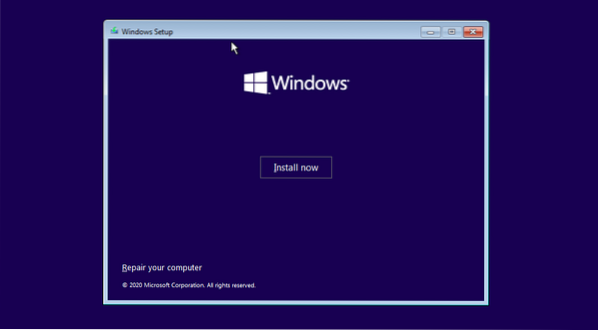
Select the option Repair your Computer. You will see a screen where you will need to select between the option Troubleshoot and Turn Off your PC, as shown in the image below.
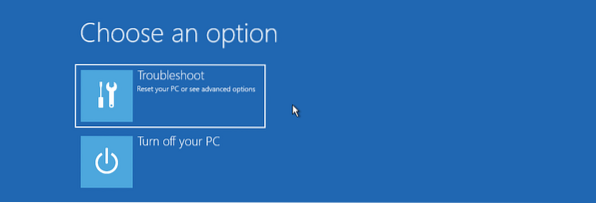
Click on the Troubleshoot option to open the Advanced Options screen. You will see several options like Start-up Repair, Command prompt, Uninstall Updates, System Restore, and System Image Recovery.
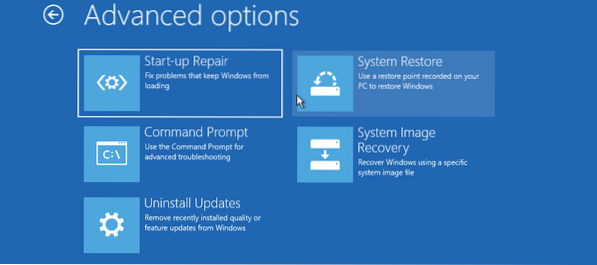
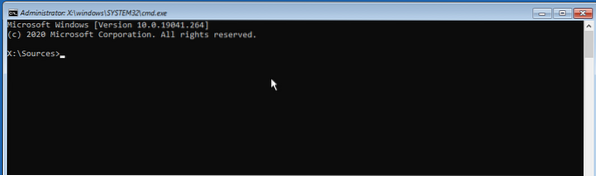
Click on the Command Prompt option. That will open the Windows command-line where you can execute various commands to repair your Master Boot Record. You can also access the DiskPart utility from here and even partition or format your hard drive for advanced users.
To repair the Master Boot Record, execute the commands below one by one.
bootrec/FixMbr bootrec/RebuildBCD bootrec/FixBoot exit
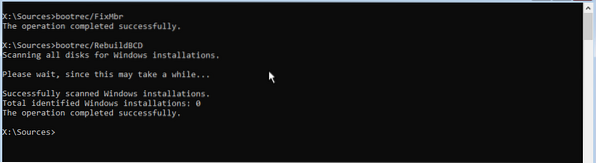
After you have successfully executed the commands, type exit, and reboot your PC. Remember to eject the bootable USB drive. Your Windows operating systems will boot successfully without facing the Grub rescue error.
Conclusion
That's' our complete guide on how to successfully uninstall Ubuntu from a dual-boot with Windows. Lucky enough, it works even for other Linux distributions. For example, if you have dual-booted Windows and Fedora, you can still uninstall Fedora with the steps above. Do you have any questions or additional information you wish to share with our readers? Please feel free to hit the comments below.


