The Btrfs filesystem keeps the filesystem metadata and data separately. You can use different RAID levels for the data and metadata at the same time. This is a major advantage of the Btrfs filesystem.
This article shows you how to set up Btrfs RAIDs in the RAID-0, RAID-1, RAID-1C3, RAID-1C4, RAID-10, RAID-5, and RAID-6 configurations.
Abbreviations
- Btrfs - B-tree Filesystem
- RAID - Redundant Array of Inexpensive Disks/Redundant Array of Independent Disks
- GB - Gigabyte
- TB - Terabyte
- HDD - Hard Disk Drive
- SSD - Solid-State Drive
Prerequisites
To try out the examples included in this article:
- You must have the Btrfs filesystem installed on your computer.
- You will need at least four same-capacity HDDs/SSDs to try out the different RAID configurations.
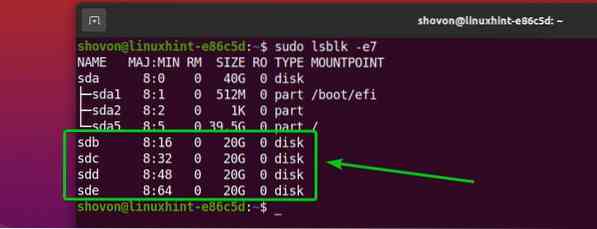
In my Ubuntu machine, I have added four HDDs (sdb, sdc, sdd, sde). Each of them is 20 GB in size.
$ sudo lsblk -e7Note: Your HDDs/SSDs may have different names than mine. So, be sure to replace them with yours from now on.
For assistance with installing the Btrfs filesystem in Ubuntu, check out the article Install and Use Btrfs on Ubuntu 20.04 LTS.
For assistance with installing the Btrfs filesystem in Fedora, check out the article Install and Use Btrfs on Fedora 33.
Btrfs Profiles
A Btrfs profile is used to tell the Btrfs filesystem how many copies of the data/metadata to keep and what RAID levels to use for the data/metadata. The Btrfs filesystem contains many profiles. Understanding them will help you to configure a Btrfs RAID just the way you want.
The available Btrfs profiles are as follows:
single: If the single profile is used for the data/metadata, only one copy of the data/metadata will be stored in the filesystem, even if you add multiple storage devices to the filesystem. So, 100% of the disk space of each of the storage devices added to the filesystem can be utilized.
dup: If the dup profile is used for the data/metadata, each of the storage devices added to the filesystem will keep two copies of the data/metadata. So, 50% of the disk space of each of the storage devices added to the filesystem can be utilized.
raid0: In the raid0 profile, the data/metadata will be split evenly across all the storage devices added to the filesystem. In this setup, there will be no redundant (duplicate) data/metadata. So, 100% of the disk space of each of the storage devices added to the filesystem can be used. If in any case one of the storage devices fails, the entire filesystem will be corrupted. You will need at least two storage devices to set up the Btrfs filesystem in the raid0 profile.
raid1: In the raid1 profile, two copies of the data/metadata will be stored in the storage devices added to the filesystem. In this setup, the RAID array can survive one drive failure. But, you can use only 50% of the total disk space. You will need at least two storage devices to set up the Btrfs filesystem in the raid1 profile.
raid1c3: In the raid1c3 profile, three copies of the data/metadata will be stored in the storage devices added to the filesystem. In this setup, the RAID array can survive two drive failures, but you can use only 33% of the total disk space. You will need at least three storage devices to set up the Btrfs filesystem in the raid1c3 profile.
raid1c4: In the raid1c4 profile, four copies of the data/metadata will be stored in the storage devices added to the filesystem. In this setup, the RAID array can survive three drive failures, but you can use only 25% of the total disk space. You will need at least four storage devices to set up the Btrfs filesystem in the raid1c4 profile.
raid10: In the raid10 profile, two copies of the data/metadata will be stored in the storage devices added to the filesystem, as in the raid1 profile. Also, the data/metadata will be split across the storage devices, as in the raid0 profile.
The raid10 profile is a hybrid of the raid1 and raid0 profiles. Some of the storage devices form raid1 arrays and some of these raid1 arrays are used to form a raid0 array. In a raid10 setup, the filesystem can survive a single drive failure in each of the raid1 arrays.
You can use 50% of the total disk space in the raid10 configuration. You will need at least four storage devices to set up the Btrfs filesystem in the raid10 profile.
raid5: In the raid5 profile, one copy of the data/metadata will be split across the storage devices. A single parity will be calculated and distributed among the storage devices of the RAID array.
In a raid5 configuration, the filesystem can survive a single drive failure. If a drive fails, you can add a new drive to the filesystem and the lost data will be calculated from the distributed parity of the running drives.
You can use 100x(N-1)/N % of the total disk spaces in the raid5 configuration. Here, N is the number of storage devices added to the filesystem. You will need at least three storage devices to set up the Btrfs filesystem in the raid5 profile.
raid6: In the raid6 profile, one copy of the data/metadata will be split across the storage devices. Two parities will be calculated and distributed among the storage devices of the RAID array.
In a raid6 configuration, the filesystem can survive two drive failures at once. If a drive fails, you can add a new drive to the filesystem, and the lost data will be calculated from the two distributed parities of the running drives.
You can use 100x(N-2)/N % of the total disk space in the raid6 configuration. Here, N is the number of storage devices added to the filesystem. You will need at least four storage devices to set up the Btrfs filesystem in the raid6 profile.
Creating a Mount Point
You need to create a directory to mount the Btrfs filesystem that you will create in the next sections of this article.
To create the directory/mount point /data, run the following command:
$ sudo mkdir -v /data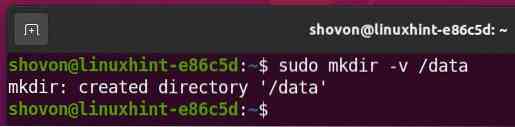
Setting Up RAID-0
In this section, you will learn how to set up a Btrfs RAID in the RAID-0 configuration using four HDDs (sdb, sdc, sdd, and sde). The HDDs are 20 GB in size.
$ sudo lsblk -e7
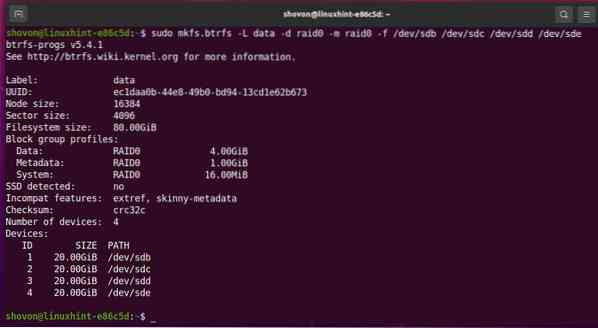
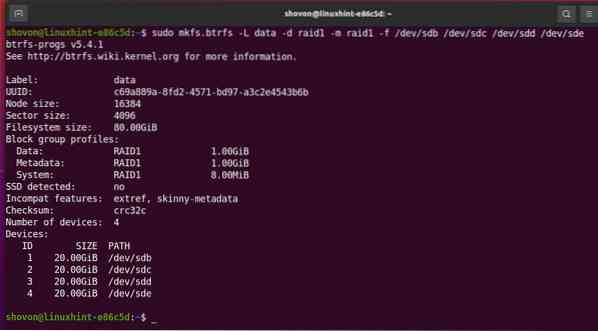
To create a Btrfs RAID in the RAID-0 configuration using four HDDs (sdb, sdc, sdd, and sde) run the following command:
$ sudo mkfs.btrfs -L data -d raid0 -m raid0 -f /dev/sdb /dev/sdc /dev/sdd /dev/sde
Here,
- The -L option is used to set the filesystem label data.
- The -d option is used to set the RAID profile raid0 for the filesystem data.
- The -m option is used to set the RAID profile raid0 for the filesystem metadata.
- The -f option is used to force the creation of the Btrfs filesystem, even if any of the HDDs have an existing filesystem.
The Btrfs filesystem data in the RAID-0 configuration should now be created, as you can see in the screenshot below.
You can mount the Btrfs RAID using any HDD/SSD you used to create the RAID.
For example, I used the HDDs sdb, sdc, sdd, and sde to create the Btrfs RAID in the RAID-0 configuration.
So, I can mount the Btrfs filesystem data in the /data directory using the HDD sdb, as follows:
$ sudo mount /dev/sdb /data
As you can see, the Btrfs RAID is mounted in the /data directory.
$ sudo df -h /data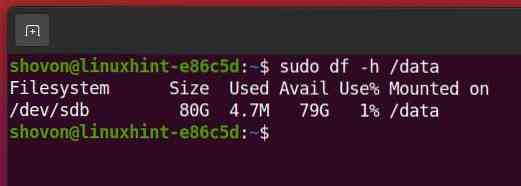
To find the filesystem usage information of the data Btrfs filesystem mounted in the /data directory, run the following command:
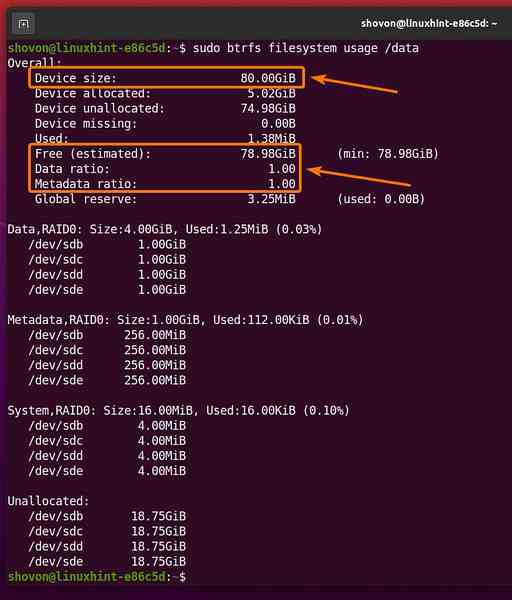
$ sudo btrfs filesystem usage /data
As you can see,
The RAID size (Device size) is 80 GB (4×20 GB per HDD).
About 78.98 GB (Free (estimated)) of 80 GB of disk space can be used in the RAID-0 configuration.
Only one copy of the data (Data ratio) and one copy of the metadata (Metadata ratio) will be stored in the Btrfs filesystem in the RAID-0 configuration.
As the Btrfs RAID is working, you can unmount it from the /data directory, as follows:
$ sudo umount /data
Setting Up RAID-1
In this section, you will learn how to set up a Btrfs RAID in the RAID-1 configuration using four HDDs (sdb, sdc, sdd, and sde). The HDDs are 20 GB in size.
$ sudo lsblk -e7
To create a Btrfs RAID in the RAID-1 configuration using four HDDs (sdb, sdc, sdd, and sde), run the following command:
$ sudo mkfs.btrfs -L data -d raid1 -m raid1 -f /dev/sdb /dev/sdc /dev/sdd /dev/sde
Here,
- The -L option is used to set the filesystem label data.
- The -d option is used to set the RAID profile raid1 for the filesystem data.
- The -m option is used to set the RAID profile raid1 for the filesystem metadata.
- The -f option is used to force the creation of the Btrfs filesystem, even if any of the HDDs have an existing filesystem.
The Btrfs filesystem data in the RAID-1 configuration should now be created, as you can see in the screenshot below.
You can mount the Btrfs RAID using any HDD/SSD you used to create the RAID.
For example, I used the HDDs sdb, sdc, sdd, and sde to create the Btrfs RAID in the RAID-1 configuration.
I can mount the Btrfs filesystem data in the /data directory using the HDD sdb, as follows:
$ sudo mount /dev/sdb /data
As you can see, the Btrfs RAID is mounted in the /data directory.
$ sudo df -h /data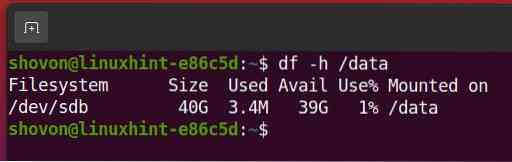
To find the filesystem usage information of the data Btrfs filesystem mounted in the /data directory, run the following command:
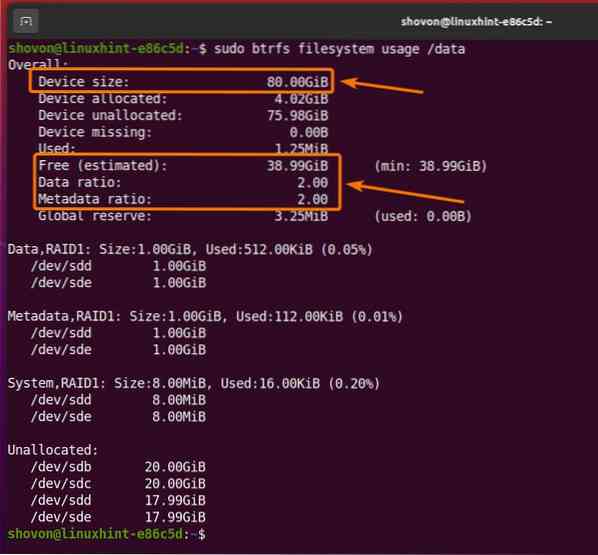
$ sudo btrfs filesystem usage /data
As you can see,
The RAID size (Device size) is 80 GB (4×20 GB per HDD).
About 38.99 GB (Free (estimated)) of 80 GB of disk space can be used in the RAID-1 configuration.
In the RAID-1 configuration, two copies of the data (Data ratio) and two copies of the metadata (Metadata ratio) will be stored in the Btrfs filesystem.
As the Btrfs RAID is working, you can unmount it from the /data directory, as follows:
$ sudo umount /data
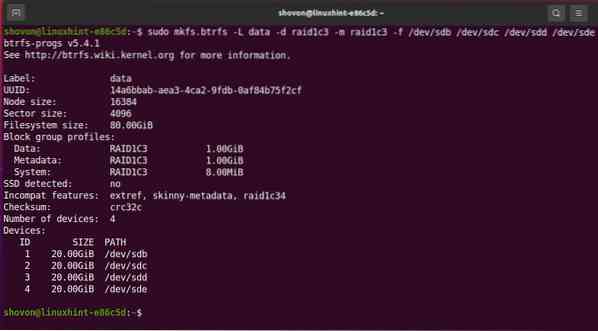
Setting Up RAID-1C3
In this section, you will learn how to set up a Btrfs RAID in the RAID-1C3 configuration using four HDDs (sdb, sdc, sdd, and sde). The HDDs are 20 GB in size
$ sudo lsblk -e7
To create a Btrfs RAID in the RAID-1C3 configuration using the four HDDs sdb, sdc, sdd, and sde, run the following command:
$ sudo mkfs.btrfs -L data -d raid1c3 -m raid1c3 -f /dev/sdb /dev/sdc /dev/sdd /dev/sde
Here,
- The -L option is used to set the filesystem label data.
- The -d option is used to set the RAID profile raid1c3 for the filesystem data.
- The -m option is used to set the RAID profile raid1c3 for the filesystem metadata.
- The -f option is used to force the creation of the Btrfs filesystem, even if any of the HDDs have an existing filesystem.
The Btrfs filesystem data in the RAID-1C3 configuration should now be created, as you can see in the screenshot below.
You can mount the Btrfs RAID using any HDD/SSD you used to create the RAID.
For example, I used the HDDs sdb, sdc, sdd, and sde to create the Btrfs RAID in the RAID-1C3 configuration.
So, I can mount the Btrfs filesystem data in the /data directory using the HDD sdb, as follows:
$ sudo mount /dev/sdb /data
As you can see, the Btrfs RAID is mounted in the /data directory.
$ sudo df -h /data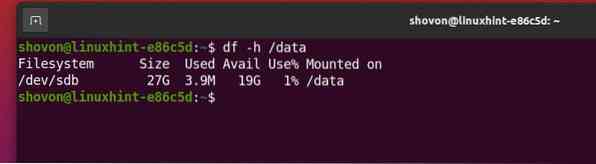
To find the filesystem usage information of the data Btrfs filesystem mounted in the /data directory, run the following command:
$ sudo btrfs filesystem usage /data
As you can see,
The RAID size (Device size) is 80 GB (4×20 GB per HDD).
About 25.66 GB (Free (estimated)) of 80 GB of disk space can be used in the RAID-1C3 configuration.
In the RAID-1C3 configuration, three copies of the data (Data ratio) and three copies of the metadata (Metadata ratio) will be stored in the Btrfs filesystem.

As the Btrfs RAID is working, you can unmount it from the /data directory, as follows:
$ sudo umount /data
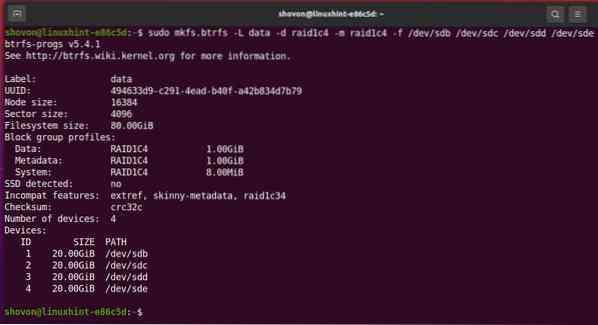
Setting Up RAID-1C4
In this section, you will learn how to set up a Btrfs RAID in the RAID-1C4 configuration using the four HDDs sdb, sdc, sdd, and sde. The HDDs are 20 GB in size.
$ sudo lsblk -e7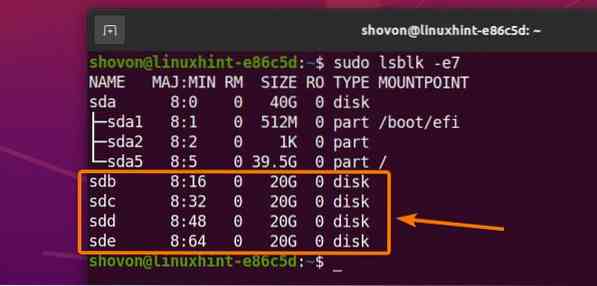
To create a Btrfs RAID in the RAID-1C4 configuration using the four HDDs sdb, sdc, sdd, and sde, run the following command:
$ sudo mkfs.btrfs -L data -d raid1c4 -m raid1c4 -f /dev/sdb /dev/sdc /dev/sdd /dev/sde
Here,
- The -L option is used to set the filesystem label data.
- The -d option is used to set the RAID profile raid1c4 for the filesystem data.
- The -m option is used to set the RAID profile raid1c4 for the filesystem metadata.
- The -f option is used to force the creation of the Btrfs filesystem, even if any of the HDDs have an existing filesystem.
The Btrfs filesystem data in the RAID-1C4 configuration should now be created, as you can see in the screenshot below.
You can mount the Btrfs RAID using any HDD/SSD you used to create the RAID.
For example, I used the HDDs sdb, sdc, sdd, and sde to create the Btrfs RAID in the RAID-1C4 configuration.
So, I can mount the Btrfs filesystem data in the /data directory using the HDD sdb, as follows:
$ sudo mount /dev/sdb /data
As you can see, the Btrfs RAID is mounted in the /data
$ sudo df -h /data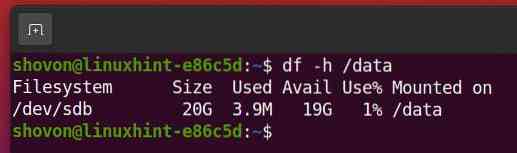
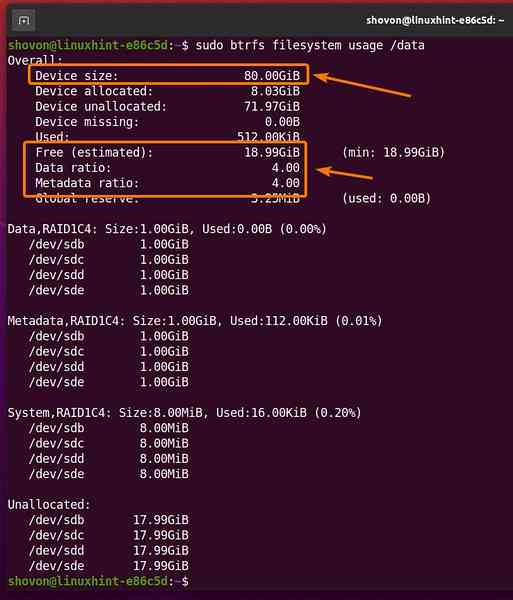
To find the filesystem usage information of the data Btrfs filesystem mounted in the /data
$ sudo btrfs filesystem usage /data
As you can see,
The RAID size (Device size) is 80 GB (4×20 GB per HDD).
About 18.99 GB (Free (estimated)) of 80 GB of disk space can be used in the RAID-1C4 configuration.
In the RAID-1C4 configuration, four copies of the data (Data ratio) and four copies of the metadata (Metadata ratio) will be stored in the Btrfs filesystem.
As the Btrfs RAID is working, you can unmount it from the /data directory, as follows:
$ sudo umount /data
Setting Up RAID-10
In this section, you will learn how to set up a Btrfs RAID in the RAID-10 configuration using the four HDDs sdb, sdc, sdd, and sde. The HDDs are 20 GB in size.
$ sudo lsblk -e7
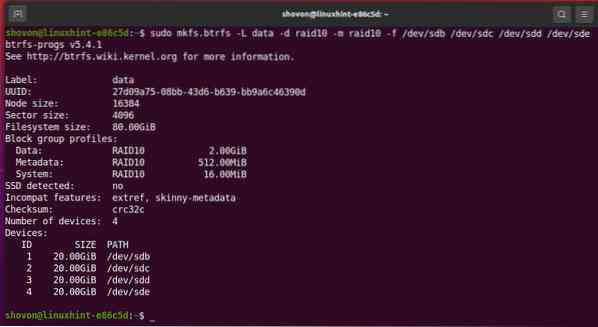
To create a Btrfs RAID in the RAID-10 configuration using the four HDDs sdb, sdc, sdd, and sde, run the following command:
$ sudo mkfs.btrfs -L data -d raid10 -m raid10 -f /dev/sdb /dev/sdc /dev/sdd /dev/sde
Here,
- The -L option is used to set the filesystem label data.
- The -d option is used to set the RAID profile raid10 for the filesystem data.
- The -m option is used to set the RAID profile raid10 for the filesystem metadata.
- The -f option is used to force the creation of the Btrfs filesystem, even if any of the HDDs have an existing filesystem.
The Btrfs filesystem data in the RAID-10 configuration should now be created, as you can see in the screenshot below.
You can mount the Btrfs RAID using any HDD/SSD you used to create the RAID.
For example, I used the HDDs sdb, sdc, sdd, and sde to create the Btrfs RAID in the RAID-10 configuration.
So, I can mount the Btrfs filesystem data in the /data directory using the HDD sdb, as follows:
$ sudo mount /dev/sdb /data
As you can see, the Btrfs RAID is mounted in the /data directory.
$ sudo df -h /data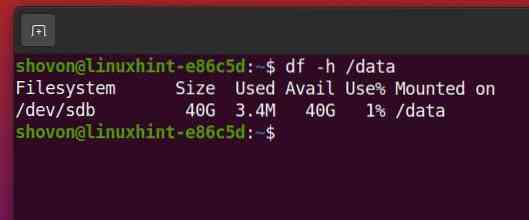
To find the filesystem usage information of the data Btrfs filesystem mounted in the /data directory, run the following command:
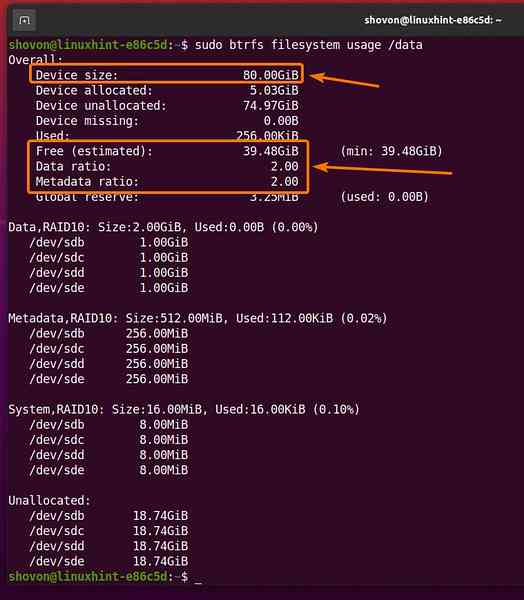
$ sudo btrfs filesystem usage /data
As you can see,
The RAID size (Device size) is 80 GB (4×20 GB per HDD).
About 39.48 GB (Free (estimated)) of 80 GB of disk space can be used in the RAID-10 configuration.
In the RAID-10 configuration, two copies of the data (Data ratio) and two copies of the metadata (Metadata ratio) will be stored in the Btrfs filesystem.
As the Btrfs RAID is working, you can unmount it from the /data directory, as follows:
$ sudo umount /data
Setting Up RAID-5
In this section, you will learn how to set up a Btrfs RAID in the RAID-5 configuration using the four HDDs sdb, sdc, sdd, and sde. The HDDs are 20 GB in size.
$ sudo lsblk -e7
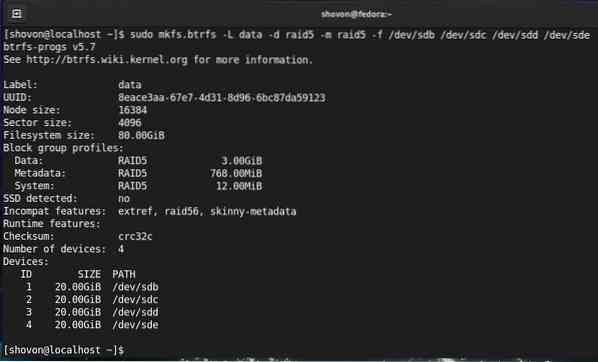
To create a Btrfs RAID in the RAID-5 configuration using the four HDDs sdb, sdc, sdd, and sde, run the following command:
$ sudo mkfs.btrfs -L data -d raid5 -m raid5 -f /dev/sdb /dev/sdc /dev/sdd /dev/sde
Here,
- The -L option is used to set the filesystem label data.
- The -d option is used to set the RAID profile raid5 for the filesystem data.
- The -m option is used to set the RAID profile raid5 for the filesystem metadata.
- The -f option is used to force the creation of the Btrfs filesystem, even if any of the HDDs have an existing filesystem.
The Btrfs filesystem data in the RAID-5 configuration should now be created, as you can see in the screenshot below.
You can mount the Btrfs RAID using any HDD/SSD you used to create the RAID.
For example, I used the HDDs sdb, sdc, sdd, and sde to create the Btrfs RAID in the RAID-5 configuration.
So, I can mount the Btrfs filesystem data in the /data directory using the HDD sdb, as follows:
$ sudo mount /dev/sdb /data
As you can see, the Btrfs RAID is mounted in the /data directory.
$ sudo df -h /data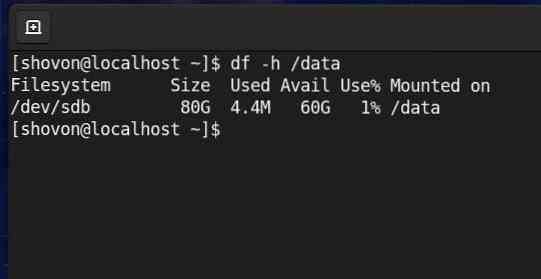
To find the filesystem usage information of the data Btrfs filesystem mounted in the /data directory, run the following command:
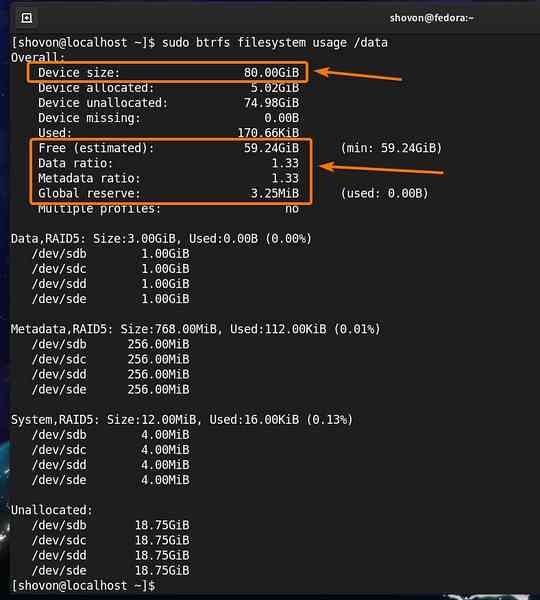
$ sudo btrfs filesystem usage /data
As you can see,
The RAID size (Device size) is 80 GB (4×20 GB per HDD).
About 59.24 GB (Free (estimated)) of 80 GB of disk space can be used in the RAID-5 configuration.
In the RAID-5 configuration, 1.33 copies of the data (Data ratio) and 1.33 copies of the metadata (Metadata ratio) will be stored in the Btrfs filesystem.
As the Btrfs RAID is working, you can unmount it from the /data directory, as follows:
$ sudo umount /data
Setting Up RAID-6
In this section, you will learn how to set up a Btrfs RAID in the RAID-6 configuration using the four HDDs sdb, sdc, sdd, and sde. The HDDs are 20 GB in size.
$ sudo lsblk -e7
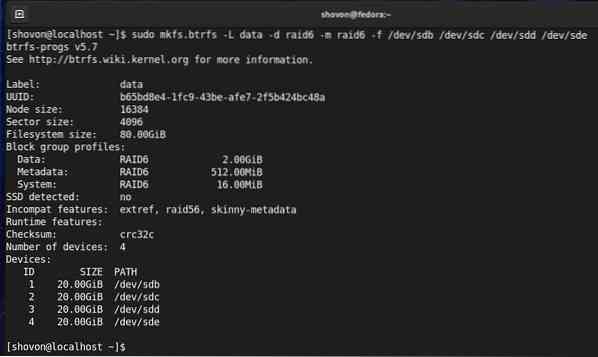
To create a Btrfs RAID in the RAID-6 configuration using the four HDDs sdb, sdc, sdd, and sde, run the following command:
$ sudo mkfs.btrfs -L data -d raid6 -m raid6 -f /dev/sdb /dev/sdc /dev/sdd /dev/sde
Here,
- The -L option is used to set the filesystem label data.
- The -d option is used to set the RAID profile raid6 for the filesystem data.
- The -m option is used to set the RAID profile raid6 for the filesystem metadata.
- The -f option is used to force the creation of the Btrfs filesystem, even if any of the HDDs have an existing filesystem.
The Btrfs filesystem data in the RAID-6 configuration should now be created, as you can see in the screenshot below.
You can mount the Btrfs RAID using any HDD/SSD you used to create the RAID.
For example, I used the HDDs sdb, sdc, sdd, and sde to create the Btrfs RAID in the RAID-6 configuration.
So, I can mount the Btrfs filesystem data in the /data directory using the HDD sdb, as follows:
$ sudo mount /dev/sdb /data
As you can see, the Btrfs RAID is mounted in the /data directory.
$ sudo df -h /data
To find the filesystem usage information of the data Btrfs filesystem mounted in the /data directory, run the following command:
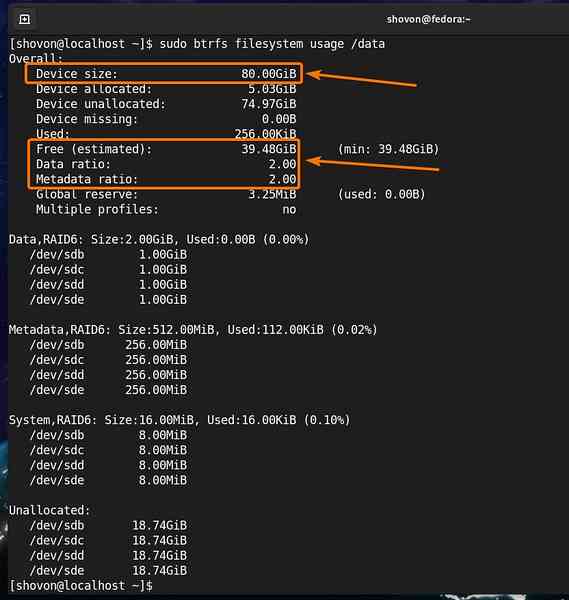
$ sudo btrfs filesystem usage /data
As you can see,
The RAID size (Device size) is 80 GB (4×20 GB per HDD).
About 39.48 GB (Free (estimated)) of 80 GB of disk space can be used in the RAID-6 configuration.
In the RAID-6 configuration, two copies of the data (Data ratio) and two copies of the metadata (Metadata ratio) will be stored in the Btrfs filesystem.
As the Btrfs RAID is working, you can unmount it from the /data directory, as follows:
$ sudo umount /data
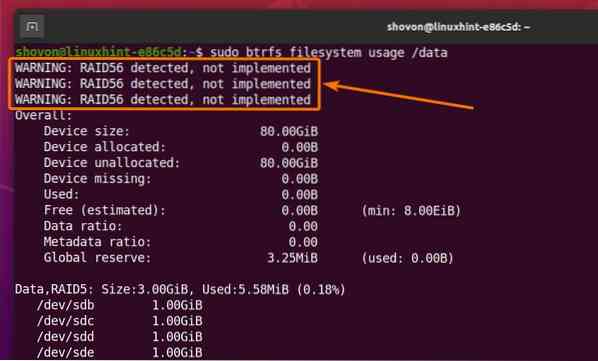
Problems with Btrfs RAID-5 and RAID-6
The built-in Btrfs RAID-5 and RAID-6 configurations are still experimental. These configurations are very unstable and you should not use them in production.
To prevent data corruption, the Ubuntu operating system did not implement RAID-5 and RAID-6 for the Btrfs filesystem. So, you will not be able to create a Btrfs RAID in the RAID-5 and RAID-6 configurations using the built-in RAID feature of the Btrfs filesystem on Ubuntu. That is why I have shown you how to create a Btrfs RAID in the RAID-5 and RAID-6 configurations in Fedora 33, instead of Ubuntu 20.04 LTS.
Mounting a Btrfs RAID Automatically on Boot
To mount a Btrfs RAID automatically at boot time using the /etc/fstab file, you will need to know the UUID of the Btrfs filesystem.
You can find the UUID of a Btrfs filesystem with the following command:
$ sudo blkid --match-token TYPE=btrfs
As you can see, the UUID of the storage devices that are added to the Btrfs filesystem for configuring the RAID is the same.
In my case, it is c69a889a-8fd2-4571-bd97-a3c2e4543b6b. It will be different for you. So, be sure to replace this UUID with yours from now on.

Now, open the /etc/fstab file with the nano text editor, as follows:
$ sudo nano /etc/fstab
Add the following line to the end of the /etc/fstab file.
UUID=c69a889a-8fd2-4571-bd97-a3c2e4543b6b /data btrfs defaults 0 0Once you are finished, press
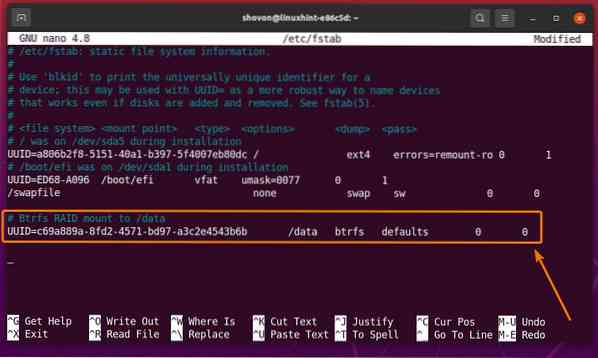
For the changes to take effect, restart your computer, as follows:
$ sudo reboot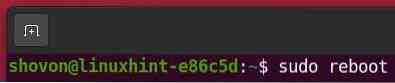
As you can see, the Btrfs RAID is correctly mounted in the /data directory.
$ df -h /data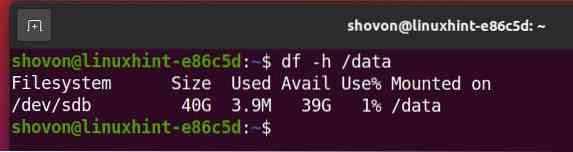
As you can see, the Btrfs RAID mounted in the /data directory is working just fine.
$ sudo btrfs filesystem usage /data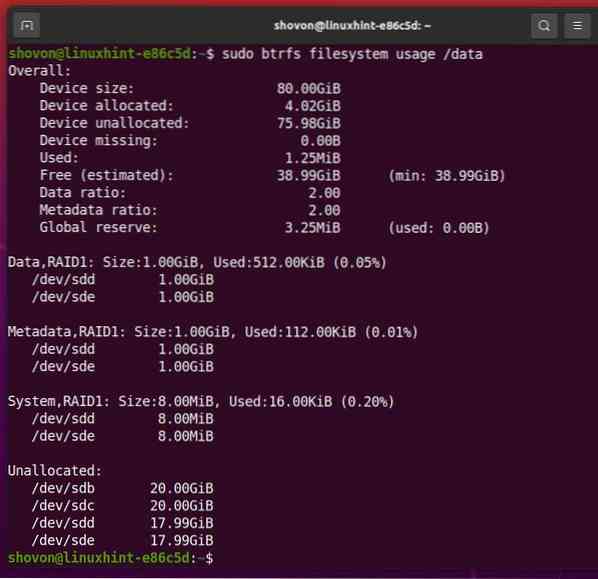
Conclusion
This article explained various Btrfs RAID profiles in detail. The article showed you how to set up a Btrfs RAID in the RAID-0, RAID-1, RAID-1C3, RAID-1C4, RAID-10, RAID-5, and RAID-6 configurations. You also learned about some of the problems with the Btrfs RAID-5 and RAID-6 configurations, as well as how to mount the Btrfs RAID automatically at boot time.
References
- [1] Using Btrfs with Multiple Devices - btrfs Wiki - https://btrfs.wiki.kernel.org/index.php/Using_Btrfs_with_Multiple_Devices
- [2] Btrfs manpage PROFILE LAYOUT - https://btrfs.wiki.kernel.org/index.php/Manpage/mkfs.btrfs#PROFILE_LAYOUT
- [3] Btrfs hilights in 5.5: 3-copy and 4-copy block groups - https://kdave.github.io/btrfs-hilights-5.5-raid1c34/
- [4] Standard RAID levels - Wikipedia - https://en.wikipedia.org/wiki/Standard_RAID_levels


