
NFS or Network File System is a distributed file protocol that allows you to share a file or even an entire directory with others over a network. It establishes a server-client environment, where a client machine can access data shared by the NFS server as if they were locally mounted.
In this tutorial, we will go over detailed installation instructions for setting up NFS Server on CentOS. The step-by-step guide will cover how to set up the NFS server on the server-side as well as the client-side. Let's get started.
Setting up NFS Server on CentOS
Our Testing Environment
NFS Server IP address: 10.0.2.15 NFS Client IP address: 10.0.2.16
To start, here is a step-by-step guide on setting up the NFS server on your CentOS 8 system.
Step 1: Install the NFS Server
First, we will need to install nfs-utils on our system. It is the NFS server package that functions as the NFS daemon. To install it, you need to enter the following command in the terminal:
$ sudo dnf install nfs-utils -y
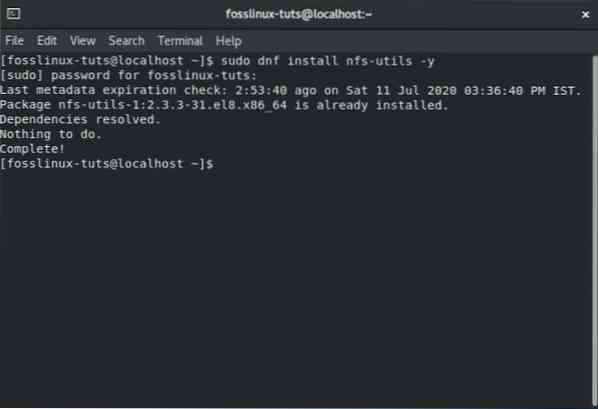
We are running a clean install of CentOS 8 and nfs-utils is already installed on our system. It might be the same on your machine as well. If not, then the package will get installed, following which we move on to the next step.
Now that you have nfs-utils installed on your system, you will need to start the nfs-server service, configure it to start automatically at system boot, and finally verify its status to check if everything is working as intended.
To do this, you will need to enter the following commands in your terminal:
$ sudo systemctl start nfs-server.service $ sudo systemctl enable nfs-server.service $ sudo systemctl status nfs-server.service
The output should be similar to, as shown in the image below:
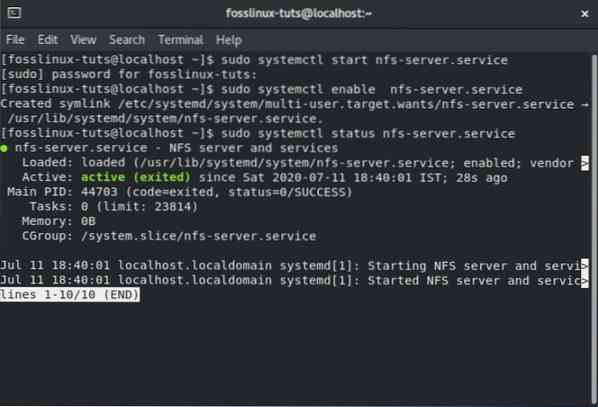
The active sign means that the NFS server is working perfectly. You should note that all the associated services that are necessary to run an NFS server or mounting NFS shares are also activated via the above command. These services include nfsd, nfs-idmapd, rpcbind, rpc.mountd, locked, rpc.statd, rpc.rquotad, and rpc.idmapd.
Also, in case you are interested, here is the address for the NFS server configuration files:
- /etc/nfs.conf - This is the main configuration file for the NFS daemon and tools.
- /etc/nfsmount.conf - This is the NFS mount configuration file.
Step 2: Create and Export an NFS File System
Now that you have set up your NFS server, it is time to create a shared file system on the server that is going to be accessible from the client system. For this tutorial, we will create the directory /mnt/nfs_share/docs by using the following command:
$ sudo mkdir -p /mnt/nfs_share/docs
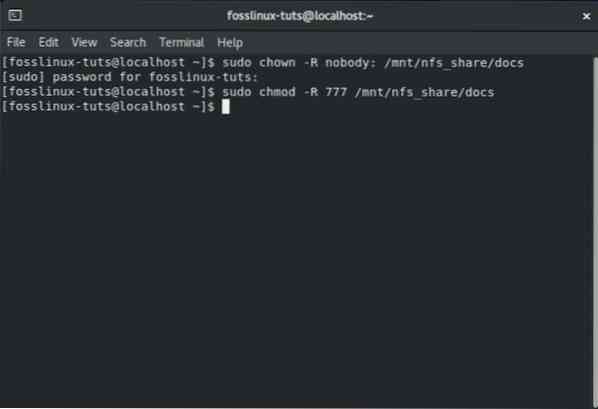
Next, to avoid any file restrictions on the NFS shared directory, we will configure the directory ownership using the following command:
$ sudo chown -R nobody: /mnt/nfs_share/docs
This allows the client system to create any files in the shared directory without facing any permission issues. Also, if you wish to enable all permissions - read, write, and execute to the NFS shared folder, then you can do so using the following command:
$ sudo chmod -R 777 /mnt/nfs_share/docs
For the changes to take place, you will need to restart the NFS daemon using this command:
$ sudo systemctl restart nfs-utils.service
It is time to export it so that the client system can have access to it. To do this, we will need to edit the /etc/exports file. While editing the file, you can grant access to a single client only, or multiple clients, as well as the entire subnet.
If you wish to grant access to the entire subnet, then you will need to use the following syntax:
/mnt/nfs_share/docs subnet (rw,sync,no_all_squash,root_squash)
Here “subnet” needs to be replaced with the system's subnet. Otherwise, you can specify multiple clients one at a time, on a separate line using this syntax:
/mnt/nfs_share/docs client_IP_1 (rw,sync,no_all_squash,root_squash)
/mnt/nfs_share/docs client_IP_1 (rw,sync,no_all_squash,root_squash)
Here is a look at the other parameters using in the command and what they mean:
- rw - This parameter gives read and write permissions to the NFS shared file/folder.
- sync - This parameter requires the changes on the disk to be made first before they are applied.
- no_all_squash - This parameter will map all the UIDs & GIDs from the client requests that are identical to the UIDS and GIDs on the NFS server.
- root_squash - The parameter will map requests from the root user on the client-side to an anonymous UID / GID.
Using our setup, we will grant access to our client machine with the IP 10.0.2.16. To do this, you will first need to open the /etc/exports file using this command.
$ sudo vi /etc/exports
Next, you will need to add the following line inside the file:
/mnt/nfs_share/docs 10.0.2.16(rw,sync,no_all_squash,root_squash)
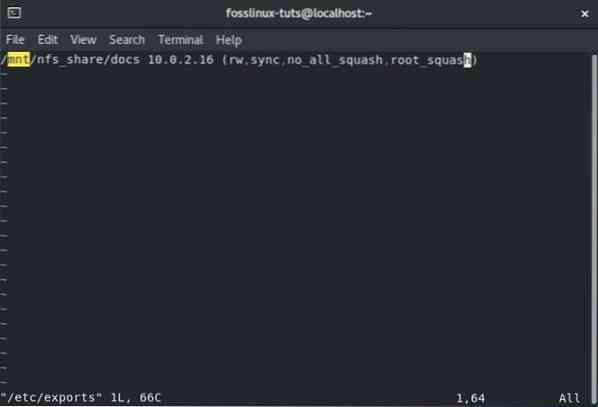
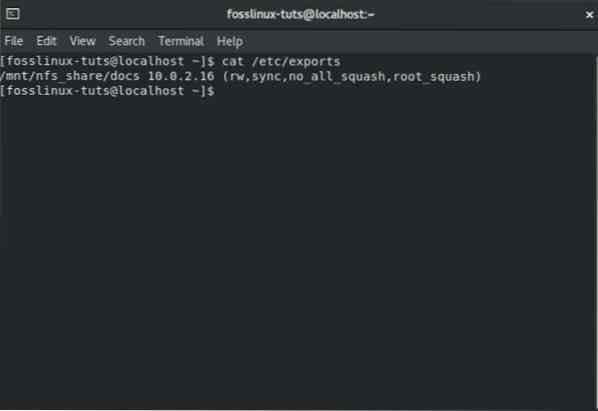
Once done, save and exit the file. Now, using the cat command, confirm that the entry was registered. To do this, enter the following command in your terminal:
cat /etc/exports
You should see something similar to the following image:
Now it is time that we export the above-created folder, so it becomes available to client systems. To do this, we will need to use the following command:
$ sudo exportfs -arv
Here, the -a option means that all the directories will be exported. The -r option will re-export all the directories. And finally, the -v option will display a verbose output.
However, just to be sure that the export list is a-okay, we will run this command as well:
$ sudo exportfs -s
And that's it! We have successfully created and exported our NFS shared files. Now its time to move on to the next step.
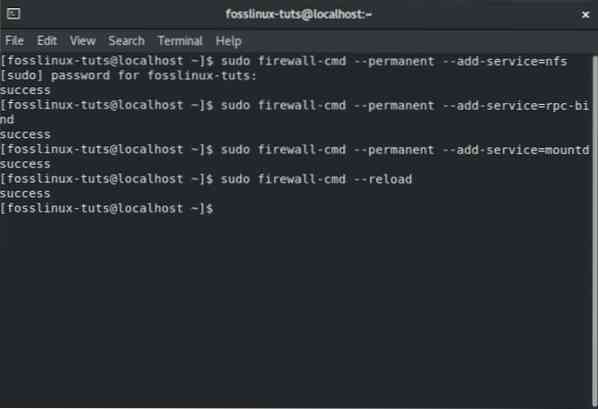
Step 3: Set Up Firewall Rules for the NFS Server
Our NFS server set-up is complete. The only thing left to do is to configure the firewall rules such that it allows the NFS services.
This includes the following three services - nfs, rpc-bind, and mountd. And to allow these services through the firewall, we need to enter the following commands in the terminal:
$ sudo firewall-cmd --permanent --add-service=nfs $ sudo firewall-cmd --permanent --add-service=rpc-bind $ sudo firewall-cmd --permanent --add-service=mountd
Once done, make sure to reload the firewall for the changes to take effect. To reload the firewall, use this command:
$ sudo firewall-cmd --reload
With the firewall configured, it is time to set up the NFS client system.
How to Set Up the NFS Client System on CentOS 8
Here is a step by step procedure on how to set up the NFS client system on CentOS 8.
Step 1: Install the NFS Client Packages
First, we will need to install the necessary packages for accessing the NFS share folder that's in the NFS server. To do this, enter the following command in the terminal:
$ sudo dnf install nfs-utils nfs4-acl-tools -y
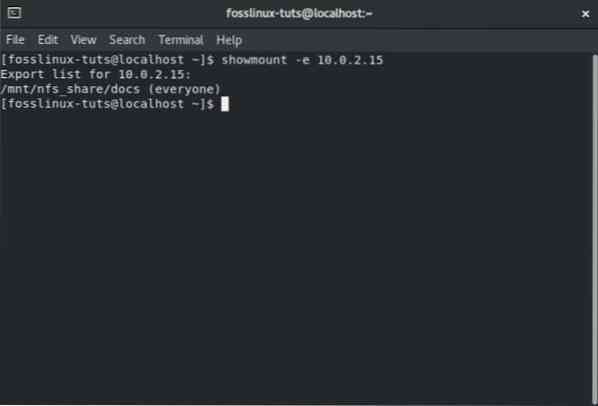
Next, we will display the mounted NFS shared folder on the server using this command:
$ showmount -e 10.0.2.15
Step 2: Mount the remote NFS share on the server
We will need to create a directory that we will use to mount the NFS share. To do this, use the following command:
$ sudo mkdir p /mnt/client_share
To mount the remote NFS shared directory that's on the local client system, we will need to use the following command.
$ sudo mount -t nfs 10.0.2.15 :/mnt/nfs_shares/docs /mnt/client_share
Where 10.0.2.15 is the IP address of the NFS server. To verify that the remote NFS share has been mounted, you can use the following command:
$ sudo mount | grep -i nfs
Finally, to make the mount share stable even after a reboot, we will need to edit the /etc/fstab file and then add the following entry:
192.168.2.102:/mnt/nfs_shares/docs /mnt/client_share nfs defaults 0 0
Once done, save and close the file, and you are good to go.
Step 3: Test the NFS Server & Client Setup
After going through all the above steps, we have successfully configured a client-server connection using NFS. However, we need to check if the setup is working before we can call it a day.
To do this, we will first need to create a test file in the NFS server share directory and then check to see if it's present in the client NFS mounted directory. So first, let's create the test file in the NFS server directory using the following command:
$ sudo touch /mnt/nfs_shares/docs/server_nfs_file.txt
Head on to the client-side and enter this command in the terminal to check if the test file is available.
$ ls -l /mnt/client_share/
If you see the file, then it means that the NFS connection is working correctly.
Conclusion
That was our in-depth guide on how to set up the NFS server on CentOS 8. We hope you found this tutorial to be useful and that it helped you in sharing files and directories with your client systems. You may be interested in setting up an FTP server on your CentOS machine.

