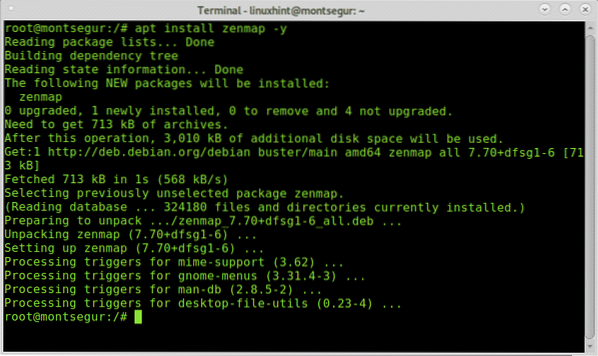
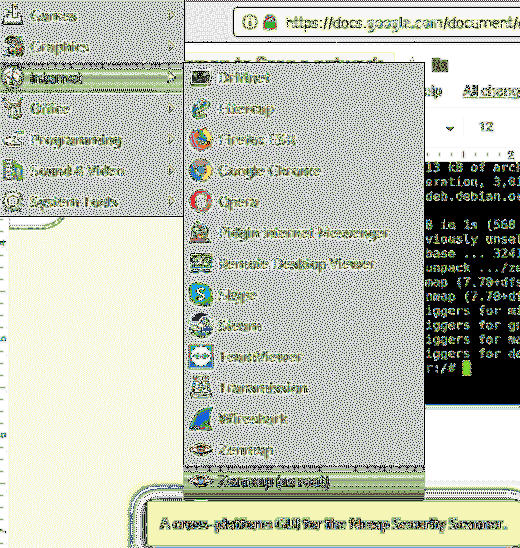
 Once installed you'll find Zenmap on the apps menu, depending on the scan type you want to carry out it is recommended to run Zenmap as root, for example, Nmap SYN or raw scans requires special privileges to be executed.
Alternatively, you can run Zenmap from the console, but since a graphical interface is mandatory to get it installed this tutorial focused on graphical management.
Once executed you'll see Zenmap main window including a drop down menu to select the profile. For the first example select the Regular Scan.

On the “Target” box, fill the field with the IP address, domain name, IP range or subnet to scan. Once selected, press on the “Scan” button, next to the drop down menu to select the desired Profile.
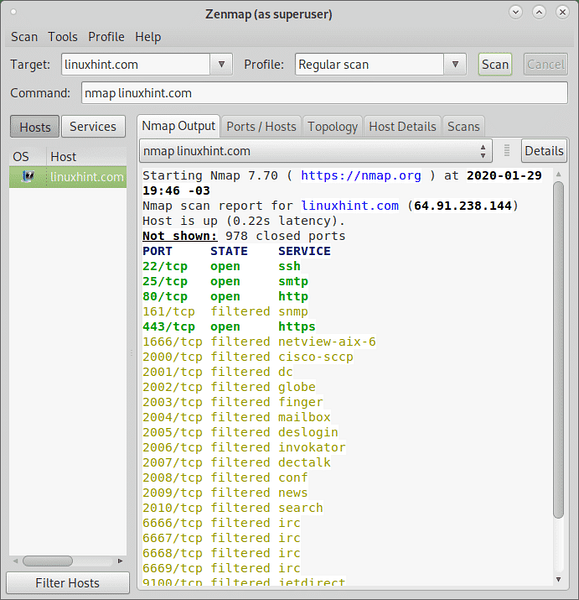
Below you will see the following tabs: Nmap Output, Ports / Hosts, Topology, Host Details and Scans.
Where:
Nmap Output: this output shows the regular Nmap output, this is the default screen when running scans.
Ports / Hosts: this tab prints services or ports with additional information sorted by hosts, if a single host is selected then it will list the status of scanned ports.
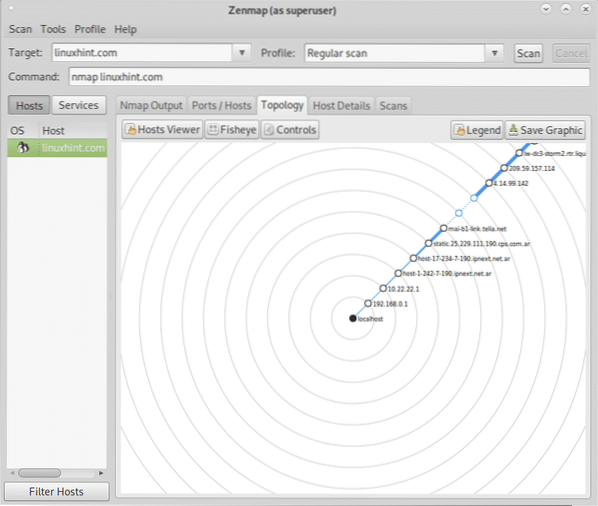
Topology: this tab shows the path packets go through until reaching the target, in other words it shows the hops between us and the target similarly to a traceroute (see https://linuxhint.com/traceroute_nmap/) displaying the network structure based on the path.
Host Details: this tab prints the information on the scanned host as a tree. The information printed in this tab includes the host name and its OS, if its online or down, the status of the scanned ports, the uptime and more. It also display vulnerability estimation based on available services on the target.
Scans: this tab shows an history of all executed scans, including running scans, you can also add scans by importing a file.
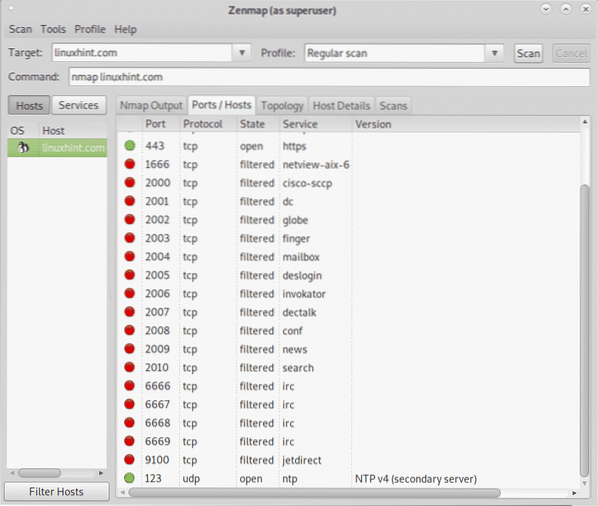
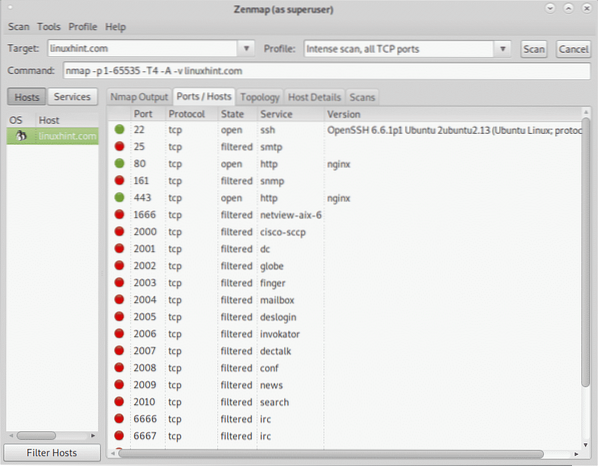
The following screenshot shows the Ports / Hosts tab:
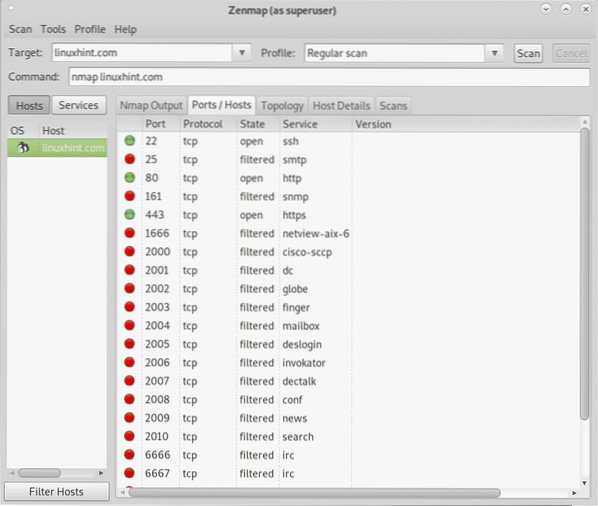
As you can see the screenshot above lists all ports, their protocol, their state and service, when available if instructed by the type of scan it will also print the software version running behind each port.
The next tab shows the Topology or traceroute:
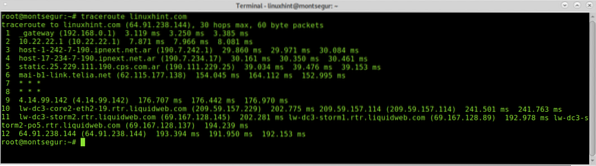
You can check this tab displays the traceroute by running a traceroute against linuxhint.com, of course, despite this is not the case take in consideration traceroute results may variate depending on hops availability.
You can check this tab displays the traceroute by running a traceroute against linuxhint.com, of course, despite this is not the case take in consideration traceroute results may variate depending on hops availability.
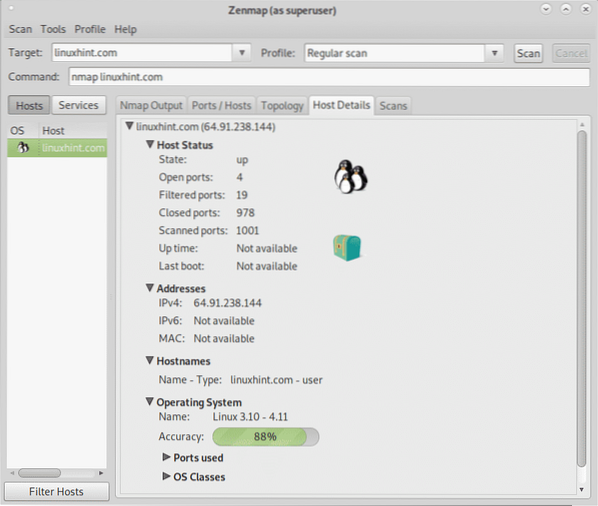
The following screenshots displays the Host Details tab, there you can see the OS identified with an icon, the state (up), number of open, filtered, closed and scanned ports, the uptime isn't available, IP address and hostname.
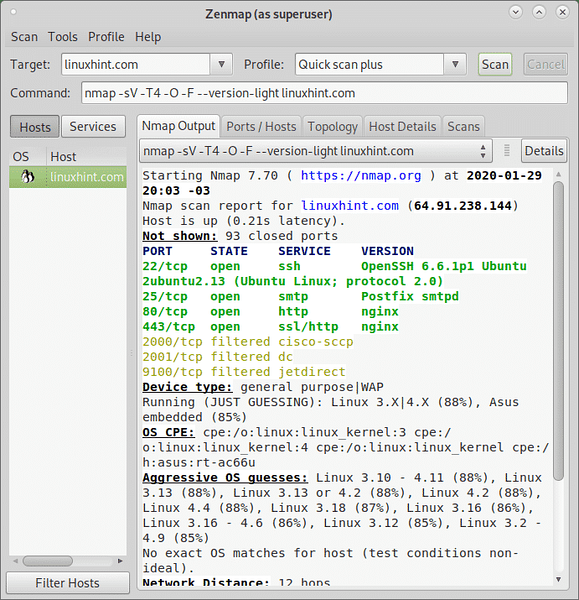
To continue with the tutorial, lets check the Quick Scan mode by selecting it in the Profile drop down menu:

Once selected press on “Scan”. As you'll see in the Command field you'll see the flags -T4 and -F.
The -T4 refers to the timing template. Timing templates are:
Paranoid: -T0, extremely slow, useful to bypass IDS (Intrusion Detection Systems)
Sneaky: -T1, very slow, also useful to bypass IDS (Intrusion Detection Systems)
Polite: -T2, neutral.
Normal: -T3, this is the default mode.
Aggressive: -T4, fast scan.
Insane: -T5, faster than Aggressive scan technique.
(Source: https://linuxhint.com/nmap_xmas_scan/)
The -F flag instructs Zenmap (and Nmap) to carry out a fast scan.
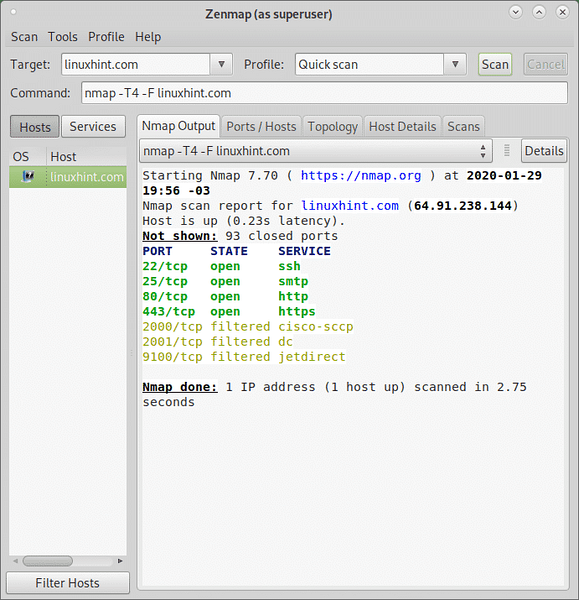
As you can see above, the result is shorter than the Regular scan, fewer ports were scanned and the result was ready after 2.75 seconds.
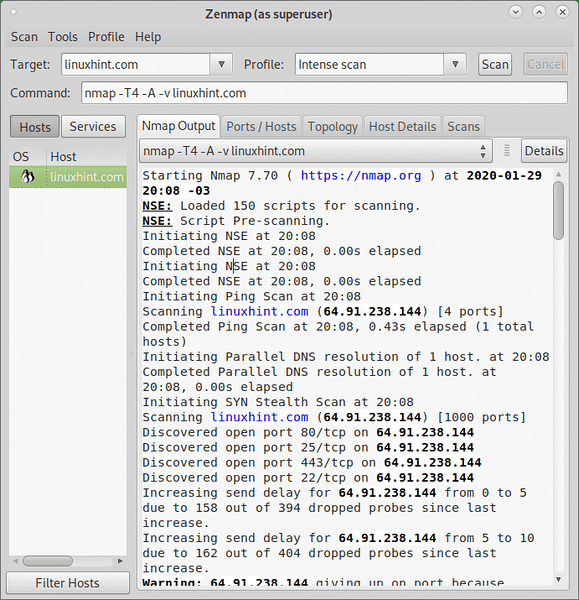
For the following example, on the Profile field select the intense scan, this time we will focus on the output.
When selecting this type of scan you'll notice, additionally to the -T4 flag the -A flag.
The -A flag enables OS and version detection, script scanning and traceroute.
The -v flag increases the verbosity of the output.
Understanding the output:
The first lines show the characteristics of the scan process, the first line shows the Nmap version followed by information on the pre scan scripts to be executed, in this case 150 scripts from the Nmap Scripting Engine (NSE) were loaded:
Starting Nmap 7.70 ( https://nmap.org ) at 2020-01-29 20:08 -03 NSE: Loaded 150 scripts for scanning. NSE: Script Pre-scanning. Initiating NSE at 20:08 Completed NSE at 20:08, 0.00s elapsed Initiating NSE at 20:08 Completed NSE at 20:08, 0.00s elapsed
Following the prescan scripts, which are executed before carrying out the scan the Output will display information on the ping scan, the second step previous to the DNS resolution to gather the IP address (or the hostname if you provided an IP as target). The aim of the ping scan step is to discover the availability of the host.
Once the DNS resolution ends, a SYN scan is executed in order to run a Stealth scan (see https://linuxhint.com/nmap_stealth_scan/).
Initiating Ping Scan at 20:08 Scanning linuxhint.com (64.91.238.144) [4 ports] Completed Ping Scan at 20:08, 0.43s elapsed (1 total hosts) Initiating Parallel DNS resolution of 1 host. at 20:08 Completed Parallel DNS resolution of 1 host. at 20:08, 0.00s elapsed Initiating SYN Stealth Scan at 20:08 Scanning linuxhint.com (64.91.238.144) [1000 ports] Discovered open port 80/tcp on 64.91.238.144 Discovered open port 25/tcp on 64.91.238.144 Discovered open port 443/tcp on 64.91.238.144 Discovered open port 22/tcp on 64.91.238.144 Increasing send delay for 64.91.238.144 from 0 to 5 due to 158 out of 394 dropped probes since last increase. Increasing send delay for 64.91.238.144 from 5 to 10 due to 162 out of 404 dropped probes since last increase. Warning: 64.91.238.144 giving up on port because retransmission cap hit (6). Completed SYN Stealth Scan at 20:08, 53.62s elapsed (1000 total ports)
Following the port scan, the intense scan will proceed with services and OS discovery:
Initiating Service scan at 20:08 Scanning 4 services on linuxhint.com (64.91.238.144) Completed Service scan at 20:09, 13.25s elapsed (4 services on 1 host) Initiating OS detection (try #1) against linuxhint.com (64.91.238.144) adjust_timeouts2: packet supposedly had rtt of -88215 microseconds. Ignoring time. adjust_timeouts2: packet supposedly had rtt of -88215 microseconds. Ignoring time. adjust_timeouts2: packet supposedly had rtt of -82678 microseconds. Ignoring time. adjust_timeouts2: packet supposedly had rtt of -82678 microseconds. Ignoring time. Retrying OS detection (try #2) against linuxhint.com (64.91.238.144)
A traceroute is then executed to print us the network topology, or the hops between us and our target, it reported 11 hosts as you can see below, more information will be available at the Topology tab.
Initiating Traceroute at 20:09 Completed Traceroute at 20:09, 3.02s elapsed Initiating Parallel DNS resolution of 11 hosts. at 20:09 Completed Parallel DNS resolution of 11 hosts. at 20:09, 0.53s elapsed
Once the scan process ends, post scan scripts will be executed:
NSE: Script scanning 64.91.238.144. Initiating NSE at 20:09 Completed NSE at 20:09, 11.02s elapsed Initiating NSE at 20:09 Completed NSE at 20:09, 5.22s elapsed
And finally you will have the report output for each step.
The first part of the report focuses on ports and services, showing the host is up, the number of closed ports which aren't shown and detailed information on open or fileted ports:
Nmap scan report for linuxhint.com (64.91.238.144) Host is up (0.21s latency). Not shown: 978 closed ports PORT STATE SERVICE VERSION 22/tcp open ssh OpenSSH 6.6.1p1 Ubuntu 2ubuntu2.13 (Ubuntu Linux; protocol 2.0) | ssh-hostkey: | 1024 05:44:ab:4e:4e:9a:65:e5:f2:f4:e3:ff:f0:7c:37:fe (DSA) | 2048 10:2f:75:a8:49:58:3e:44:21:fc:46:32:07:1d:3d:78 (RSA) | 256 a3:d5:b9:2e:e4:49:06:84:b4:bb:e6:32:54:73:72:49 (ECDSA) |_ 256 21:ab:6c:2c:76:b7:5c:f4:0f:59:5c:a7:ab:ed:d5:5c (ED25519) 25/tcp open smtp Postfix smtpd |_smtp-commands: zk153f8d-liquidwebsites.com, PIPELINING, SIZE 10240000, ETRN, STARTTLS, ENHANCEDSTATUSCODES, 8BITMIME, DSN, |_smtp-ntlm-info: ERROR: Script execution failed (use -d to debug) |_ssl-date: TLS randomness does not represent time 80/tcp open http nginx | http-methods: |_ Supported Methods: GET HEAD POST OPTIONS |_http-server-header: nginx |_http-title: Did not follow redirect to https://linuxhint.com/ 161/tcp filtered snmp 443/tcp open ssl/http nginx |_http-favicon: Unknown favicon MD5: D41D8CD98F00B204E9800998ECF8427E |_http-generator: WordPress 5.3.2 | http-methods: |_ Supported Methods: GET HEAD POST |_http-server-header: nginx |_http-title: Linux Hint - Exploring and Master Linux Ecosystem |_http-trane-info: Problem with XML parsing of /evox/abou | ssl-cert: Subject: commonName=linuxhint.com | Subject Alternative Name: DNS:linuxhint.com, DNS:www.linuxhint.com | Issuer: commonName=Let's Encrypt Authority X3/organizationName=Let's Encrypt/countryName=US | Public Key type: rsa | Public Key bits: 4096 | Signature Algorithm: sha256WithRSAEncryption | Not valid before: 2019-11-30T11:25:40 | Not valid after: 2020-02-28T11:25:40 | MD5: 56a6 1899 0a73 c79e 2db1 b407 53a6 79ec |_SHA-1: a6b4 fcf9 67c2 4440 6f86 7aab 7c88 2608 674a 0303 1666/tcp filtered netview-aix-6 2000/tcp filtered cisco-sccp 2001/tcp filtered dc 2002/tcp filtered globe 2003/tcp filtered finger 2004/tcp filtered mailbox 2005/tcp filtered deslogin 2006/tcp filtered invokator 2007/tcp filtered dectalk
The following part of the report focuses on the OS detection:
Device type: general purpose|WAP Running (JUST GUESSING): Linux 3.X|4.X (88%), Asus embedded (85%) OS CPE: cpe:/o:linux:linux_kernel:3 cpe:/o:linux:linux_kernel:4 cpe:/o:linux:linux_kernel cpe:/h:asus:rt-ac66u Aggressive OS guesses: Linux 3.10 - 4.11 (88%), Linux 3.13 (88%), Linux 3.13 or 4.2 (88%), Linux 4.2 (88%), Linux 4.4 (88%), Linux 3.18 (87%), Linux 3.16 (86%), Linux 3.16 - 4.6 (86%), Linux 3.12 (85%), Linux 3.2 - 4.9 (85%) No exact OS matches for host (test conditions non-ideal).
The next part shows uptime, the total hops between you and the target and the final host detailing response time information on each hop.
Uptime guess: 145.540 days (since Fri Sep 6 07:11:33 2019) Network Distance: 12 hops TCP Sequence Prediction: Difficulty=257 (Good luck!) IP ID Sequence Generation: All zeros Service Info: Host: zk153f8d-liquidwebsites.com; OS: Linux; CPE: cpe:/o:linux:linux_kernel TRACEROUTE (using port 256/tcp) HOP RTT ADDRESS 1 47.60 ms 192.168.0.1 2 48.39 ms 10.22.22.1 3 133.21 ms host-1-242-7-190.ipnext.net.ar (190.7.242.1) 4 41.48 ms host-17-234-7-190.ipnext.net.ar (190.7.234.17) 5 42.99 ms static.25.229.111.190.cps.com.ar (190.111.229.25) 6 168.06 ms mai-b1-link.telia.net (62.115.177.138) 7 186.50 ms level3-ic-319172-mai-b1.c.telia.net (213.248.84.81) 8 … 9 168.40 ms 4.14.99.142 10 247.71 ms 209.59.157.114 11 217.57 ms lw-dc3-storm2.rtr.liquidweb.com (69.167.128.145) 12 217.88 ms 64.91.238.144
Finally you'll be reported on post scan scripts execution:
NSE: Script Post-scanning. Initiating NSE at 20:09 Completed NSE at 20:09, 0.00s elapsed Initiating NSE at 20:09 Completed NSE at 20:09, 0.00s elapsed Read data files from: /usr/bin/… /share/nmap OS and Service detection performed. Please report any incorrect results at https://nmap.org/submit/ . Nmap done: 1 IP address (1 host up) scanned in 94.19 seconds Raw packets sent: 2272 (104.076KB) | Rcvd: 2429 (138.601KB)
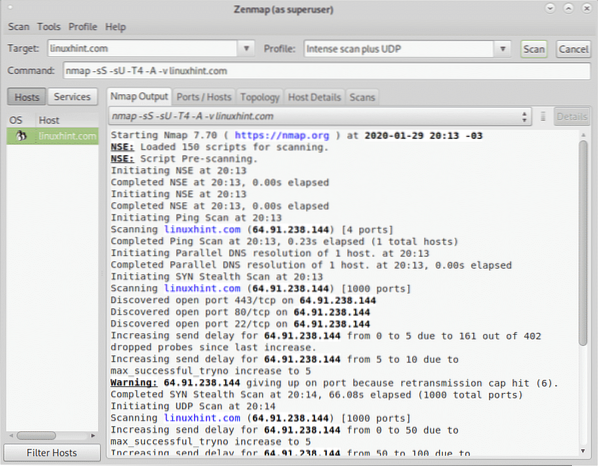
Now lets test the Intense scan plus UDP you can select from the Profile drop down menu:
With the Intense Scan plus UDP you'll see the flags -sS, -sU, -T4, -A and -v.
Where as said before, -T refers to timing template, -A to OS, version detection, NSE and traceroute and:
-sS: enables SYN scan.
-sU: enables UDP scan.
An UDP scan may lead us to interesting discoveries in widely used services such as DNS, SNMP or DHCP.
To end this tutorial let's see the Intense scan, all TCP ports.
This scan adds the flag -p to specify a ports range, in this case the port range is -p 1-65535, covering all existing TCP ports:
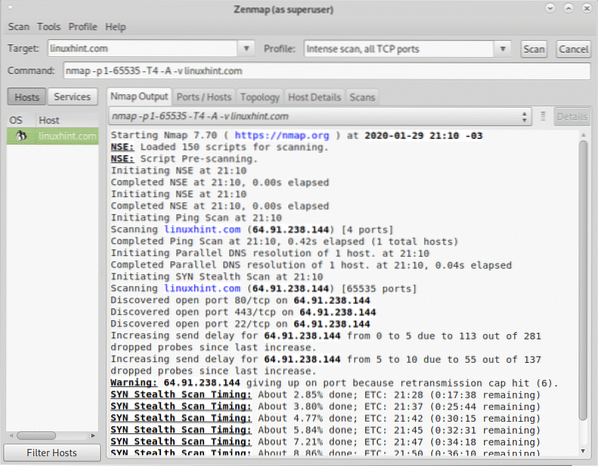
You can see the output including open and filtered ports on the Ports / Hosts tab:
I hope you found this tutorial on Zenmap useful, keep following LinuxHint for more tips and updates on Linux and networking.


