Although this nifty piece of software looks quite unremarkable at first, anyone who has any idea what they're doing (as far as sound manipulation goes) will notice that they have quite the toolset at the tip of their fingers.
In this article we'll look at:
- Installing Audacity on Linux Mint
- Recording with Audacity
- Getting rid of background noise (Nose Reduction)
- Slowing down or speeding up
- Splitting and moving tracks
- Exporting to lossless formats
- MP3 encoding
So without further ado, let's dive straight into the Swiss army knife of audio editing that every single professional and hobbyist knows.
Installing Audacity on Linux Mint 19
Installing from the official repositories
The software can be found in the official repositories, although what you download and install from there might not be the latest version.
If you want to check whether or not you can install the program via Aptitude, run:
apt-cache search audacityIf the program is in the repositories, it will return the name and description of the matching package.
To install Audacity from the repository, simply run:
sudo apt-get install audacityWhich will download the software and all dependencies. Don't worry - it doesn't take much space.
Additionally, you could download and build Audacity from source but that is obviously not recommended for beginner users. In case you like a challenge, though, you can find an extensive walkthrough of building the software from source on its official Wiki.
Recording with Audacity
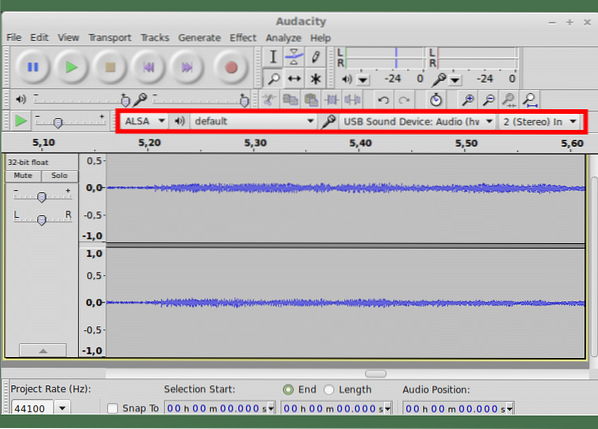
Before recording, you will need to select the appropriate sound device from the drop-down menu.
Then it is highly recommended you check on the recording levels by clicking on the monitoring meter. It will show you how loud your signal is.
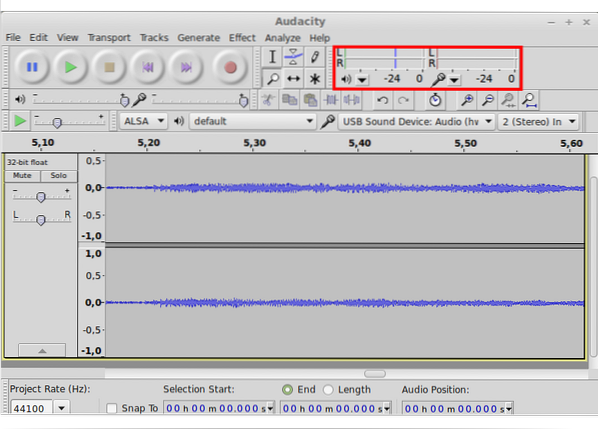
The loudest parts of your signal (you loudest talking, if you are recording your voice and your loudest strumming if you're recording guitar) should not pass the 0db on the scale. This is called peaking - the portions of your sound stream that are the loudest are peaks and they should reach about 0 ideally. To be on the conservative side, you can adjust the microphone slider down so your sound peaks at -6 to -3.
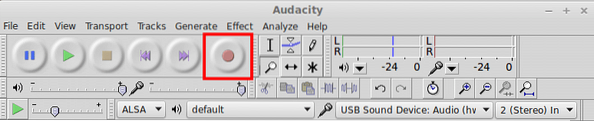
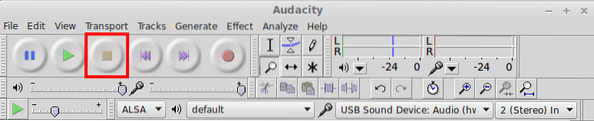
The recording process itself is quite simple - you only need to press the well-familiar big red button on the main toolbar of the window (shown below).
Once you're done recording, press STOP twice to stop the recording and to reset the cursor to the beginning of your audio file to-be.
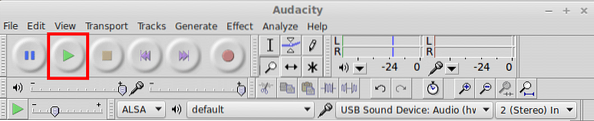
To listen back to it, press PLAY or the Space button on your keyboard. Do you hear anything that shouldn't be there - the hiss of your microphone or the hum of your computer fans? Well, worry not - we're about to delve into one of Audacity's most popular uses - Noise Removal
Using the Noise Reduction Plugin
Now that you have your file recorded, you can go ahead and click on Effects > Noise Reduction. At this point, worry not - the plugin will do absolutely nothing.
That is because you need to first acquire a Noise Profile
To do that:
- Select a few seconds of sound that only have the noise you want to remove. If you select any of the actual sound you recorded, you will get a lot of nasty artifacts or a completely different sounding recording
- Once you have done that, click again on Effects > Noise Reduction
- Click the “Get Noise Profile” button and let the plugin calculate the adjustments it needs to do. For most intents and purposes, this should work for you without further adjustment.
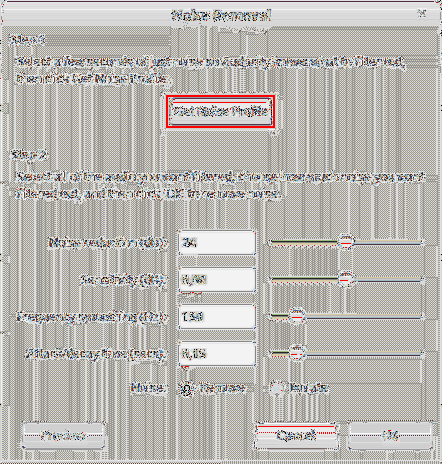
- After that, select your whole file (or just the portion you want to clean) by dragging with your mouse or pressing Ctrl+A (to select all).
- Navigate again to Effects > Noise Reduction (yes, once again)
- Click “Preview” to listen to what your audio will sound like after the operation
- If you like that, click “Ok” to complete the noise reduction. If not - play around with the different parameters or try again.
Slowing Down and Speeding Up
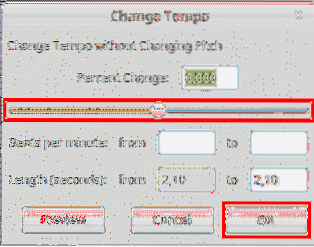
The “speed” at which any musical work goes, we call “Tempo”. In this case, whether you're recording music or not, we can use the Change Tempo effect to achieve slower or faster playback.
To do that, you need to:
- Select the portion of the audio file which you want to speed up or slow down
- Click on Effects > Change Tempo
- Use the slider to dial in a change in percentage or input an exact BPM (beats per minute) measure
- Use the Preview button to listen to the expected results
- Once you're happy with what you hear, press OK to complete the operation
Splitting and Moving Clips
You might need to separate your audio file (called a clip) or move a portion of it to another track. In this case, you can easily use the built-in controls to do that.
To split a track at the cursor:
- Click where you want to split the track
- Click Edit > Clip Boundaries > Split OR Ctrl+I
You now have a separate clip, which you can move along the timeline.
To move a clip along the timeline/track:
- Click on the Timeshift tool and then use it to drag your clip along the timeline or onto another track

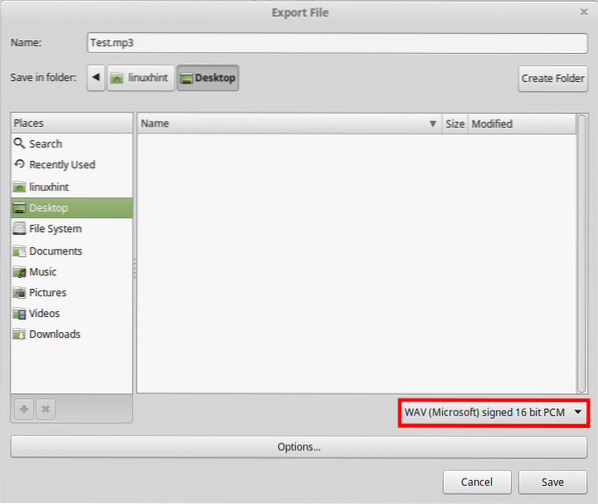
Exporting to lossless formats
The different audio formats all have their quirks but they can mainly be split into two categories - lossless and lossy. The difference is that lossless audio formats tend to compress the digitally represented sound stream as little as possible. This also makes the resulting files take a lot of disk space.
Lossless audio formats include WAV, FLAC and OGG Vorbis. You may have already seen them around if you've worked with audio before. In Audacity, you can export your audio in one of these formats. WAV is the format of choice for most people when quality is a concern.
To export to one of them:
- Select the portion of your clip you want to export (or the entire thing)
- Click File > Export
- From the file dialog that has just popped up, you can choose the file format
- Give your file a name and let the exporting process complete before doing anything else
MP3 Encoding
A common problem that beginners run into is not being able to export to .mp3 - the most widespread audio format in the world today.
This is because up until months ago, the mp3 standard was a proprietary and licensed technology and Audacity relied on 3rd part libraries in order to handle .mp3 encoding.
Today, however, Audacity comes with built-in .mp3 encoding that works like a charm. The only thing you should consider is using the right settings to achieve optimal quality.
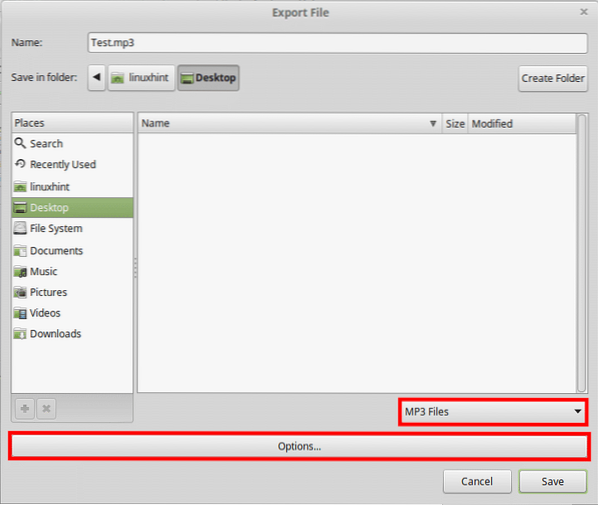
To export to .mp3, just do as above:
- Select the portion of your clip you want to export (or the entire thing)
- Click File > Export
- From the file dialog that has just popped up choose “MP3 File”
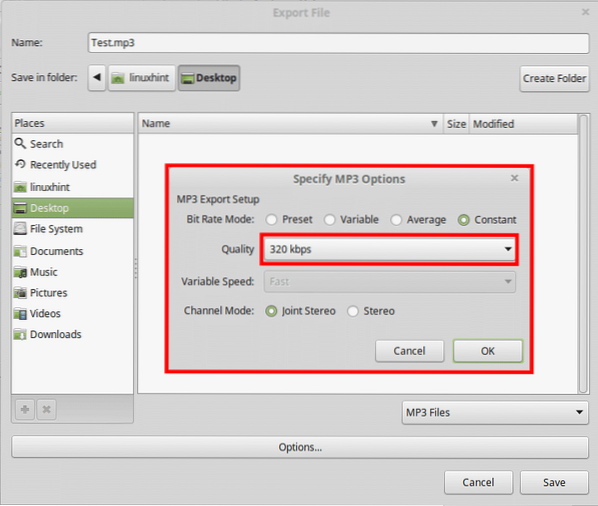
- Click the “Options” button below the file name text field
- From there pick your bitrate (320kbps being the highest and 128 - average)
- Save your file and you're good to go!
Conclusion
All in all, if you work with audio in a not-so demanding environment, Audacity can be a life save once you get used to the couple of quirks it has. Although it doesn't look too convincing at first, Audacity has a rich and capable toolset that you can employ in any sort of setting - from your bedroom to a studio.


