Zip is a popular cross-platform command used for compressing and archiving data. Compression saves space by shrinking the size of data while archiving makes the transfer of data easier by combining multiple files or directories into a single file. Consider, if we have to transfer 5 files over the internet, each with size 50 megabytes; transferring all the files one by one could take a long time. Compressing the files to reduce the size up to 25MB, and then archiving all of them in a single file will make it much quicker to transfer the files than when they are uncompressed. Zip is the most widely used utility for archiving and compressing files, while the unzip is used for extracting and decompressing the zipped files.
In this article, we will look at the zip and unzip commands in Linux, along with their command-line options and examples.
Prerequisites
- Ubuntu or Debian system
- Zip and unzip utilities installed
Note: The commands mentioned in this article have been tested on Ubuntu 20.04 LTS (Focal Fossa). The same commands are also applicable to Debian distribution.
Installing Zip and Unzip
By default, zip and unzip packages are installed in Ubuntu systems. In case these are missing from your system, you can install them easily. Launch the Terminal using the Ctrl+Alt+T keyboard. Then to install zip, issue the following in Terminal:
$ sudo apt install zipTo install unzip, issue the below command in Terminal:
$ sudo apt install unzipThere are some scenarios where you may be required to zip files:
- To save storage space, as zipping compresses the file size
- Transferring large files over e-mail
- Uploading or downloading files at a quicker speed
- To save bandwidth
ZIP Command in Linux
To create a zip file, you will need to provide the name for the zipped archive and the files that need to be included in the zip.
$ zip options zip_file file1 file2…Zip single file
To zip a single file named testfile.txt; to a zip file named test.zip, the command would be:
$ zip test.zip testfile.txt
The above command will compress the specified file in the current directory while leaving the original file behind.
To confirm if the zip file has been created, issue the command in the Terminal below:
$ ls -l
Zip multiple files
You can also zip multiple files with the zip command. Let's create some files named testfile1.txt, testfile2.txt, testfile3.txt, and testfile4.txt using the following command in the Terminal:
$ sudo touch testfile1.txt testfile2.txt testfile3.txt testfile4.txtNow to zip these files in a single file, named files.zip, issue the following command in the Terminal:
$ zip files.zip testfile1.txt testfile2.txt testfile3.txt testfile4.txt
 You can also use the wildcard to specify multiple files having the same extension. For instance, to zip all the files ending with .txt extension in a zip file, named files1.zip, issue the following command in the Terminal:
Zip a file to a different directory
If you need to zip a file to some directory other than the current directory, use the following syntax:
$ zip /path/to/directory.zip_file filenameFor instance, to zip testfile.txt file to Documents/docs/ directory named as test.zip, the command would be:
$ zip Documents/docs/test.zip testfile.txt
Add file to an existing zip
You can also add a file to a pre-existing zip file. Use the following syntax to do so:
$ zip -u zip_file filenameLet's say you have a zip file (files1.zip), and you want to include one more file (testfile4.txt) in it, the command, in this case, would be:
$ zip -u files1.zip testfile4.txt
Remove a file from a zip file
Similarly, you can also remove a file from an already existing zip file. Use the following syntax to do so:
$ zip -d zip_file filenameLet's say you have a zip file (files1.zip), and you want to remove a file (testfile1.txt) from it, the command, in this case, would be:
$ zip -d files1.zip testfile1.txt
Zip files in quiet mode
If you do not want to display the output of the zip command, use the -q (quiet) option with the zip command as follows:
$ zip -q zip_file filenameFor instance, while zipping testfile.txt, you can suppress the output with the following command:
$ zip -q test.zip testfile.txtIn the following screenshot, you can see the zip command output that has not been displayed on the Terminal.

Deleting original files after zipping
By default, zip keeps the original file along with the compressed file. However, using the -m option with the zip command, you can delete the original files after creating their zipped file.
$ zip -m zip_file filenameFor instance, the following command will delete the testfile.txt after creating its zipped file, test.zip.
$ zip -m test.zip testfile.txt
Zip directories
To zip directories in your Linux system, use the -r (recursive) option with the zip command. The -r option will zip the directories recursively, i.e., including contents of subdirectories.
$ zip -r zip_file directorynameFor instance, to zip the Documents directory recursively to the test.zip file, the command would be:
$ zip -r test.zip Documents/This command will zip the Documents directory, along with all the subdirectories and the files included within it.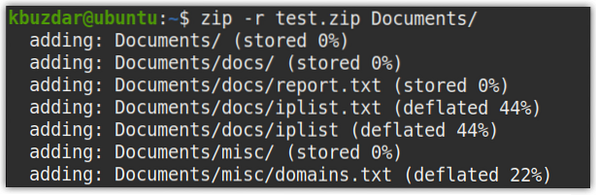
Setting the level of compression
You can also set the level of compression to apply to the files being zipped. The level of compression ranges from 0 to 9, where 6 is the default value, 0 is the lowest value, and 9 is the highest value of compression.
For instance, to zip all text files to files1.zip using the highest compression value , the command would be:
$ zip -9 files1.zip *.txt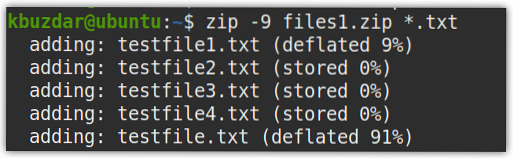
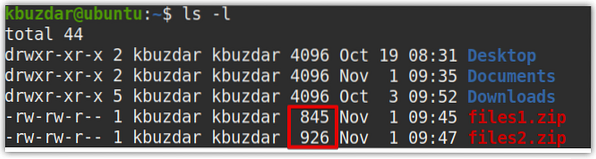
Similarly, to zip all text files to files2.zip using the lowest compression value -0, the command would be:

The following is the output of the ls command after creating the zip files. If we compare the sizes of both zip files, you can see files1.zip, which was compressed using compression level 9, has less size as compared to files2.zip, which was compressed using compression level 0.
Create a password-protected zip file
You can also create password-protected zip files using the -e option with the zip command as follows:
$ zip -e zip_file filenameFor instance, the following command will zip all text files in files3.zip, then ask for a password. Set any password and press Enter. Then verify this password by re-typing it and pressing Enter.
$ zip -e files3.zip *.txt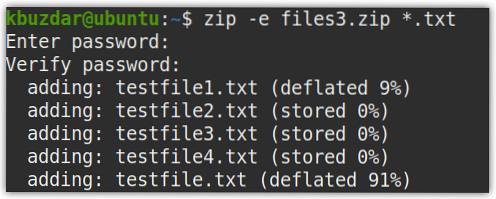
Adding passwords to zip files with the zipcloak
In the previous example, we have created a password-protected zip file. But what if you have created a zip file and forgot to set the password. With zipcloak command, you can set a password to a zip file at any time.
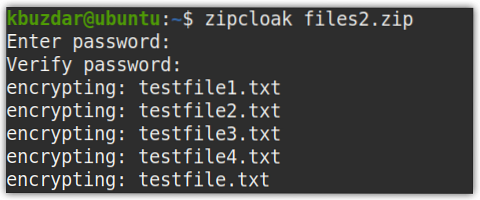
$ zipcloak zip_fileFor instance, to set a password to an already created zip file named files.zip, the command would be:
$ zipcloak files.zipYou will be asked for a password. Type any password and press Enter. Then verify this password by re-typing it and pressing Enter.
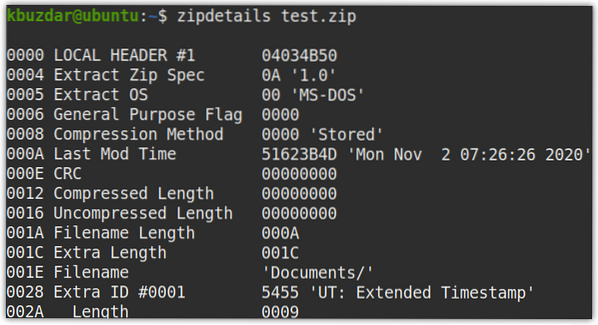
View file details with the zipdetails command
Zipdetails command shows detailed information about the zipped file. The information it displays is about record structure rather than of the compressed data. To find detailed information about the zipped file, type zipdetails followed by the zipped file name, as shown below:
$ zipdetails zip_fileFor instance, to find detailed information about a zipped file, test.zip, the command would be:
$ zipdetails test.zipIn the output, you will see a lot of information about your zipped file.
Search inside the file with the zipgrep command
The zipgrep command allows us to search for a given text within files inside the zipped file without extracting it. If a zip file is password-protected, then you will have to first enter the password for it. To search for text inside the zip file, use the following syntax:
$ zipgrep expression zip_fileFor instance, to search which files inside the zip file test.zip contains the word gateway, the command would be:
$ zipgrep gateway test.zipThe output is as follows. You can see two files iplist.text and iplist inside the test.zip contains the word gateway.

To search for a text from a specific file inside the zip file, you can also add it:
For instance, the following command will search for the word gateway from only a specific file iplist inside the zip file test.zip:
$ zipgrep gateway test.zip Document/docs/iplist
View information with the zipinfo command
The zipinfo command in Linux lists the files contained within a zip file along with their permissions, compression type, original size, date, and time stamp. To view information about a specific zip file, type zipinfo followed by the file name, as shown below:
$ zipinfo filenameThe following command will display information about the zip file files1.zip:
$ zipinfo files1.zip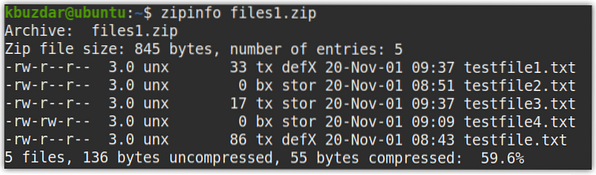
Split the file with the zipsplit command
Sometimes, the size of the zip file is too large that you are unable to upload it or send it as an attachment because of size restrictions. With the zipsplit command, you can split the zip files into smaller files that are easier to transfer. To split a zip file into smaller files, with size no longer than
The
For instance, the command below will split test.zip into smaller files with size no longer than 104857600 bytes (104 MB).
$ zipsplit -n 104857600 test.zipHere is the output of the above command. The test.zip file is split into three files, which are sequentially named as test1.zip, test2.zip, and test3.zip, respectively.
If you run the ls command, you will see all the three split zip files, along with the original zip file.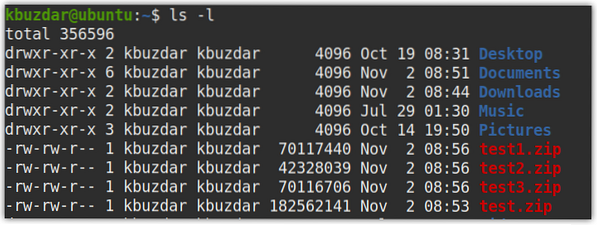
Add or view comments in a zip file with zipnote
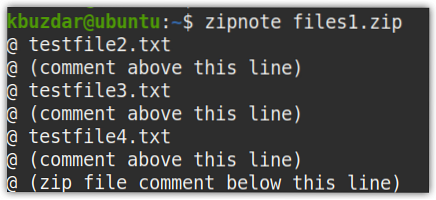
With the zipnote command, you can add, view, and edit the comments in your zip file. To view comments, use the following command:
$ zipnote zip_fileReplace the zip file with your actual zip file name.
If there are no comments, you will see the following default view:
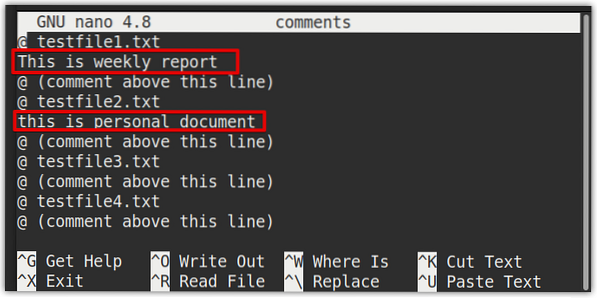
To add comments, first, you will need to redirect the output of zipnote to the comments file. Use the following command to do so:
For instance, to add comments to files1.zip, the command would be:
$ zipnote files1.zip > commentsNow, edit the comments file using the following command:
$ sudo nano commentsFor each file, add your comments above the lines that say @ (comment above this line),then save and exit the file. We have added two comments in the comments file, as seen highlighted in the screenshot below.
Now write the comments to your zip file with the following command:
In our case, the command would be;
$ zipnote -w files1.zip < commentsNow, you can verify if the comments have been added by issuing the following command in Terminal:
$ zipnote zip_file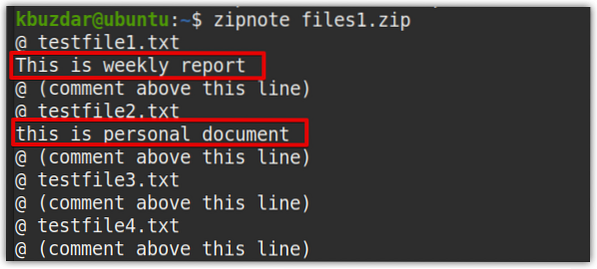
View help
To view help regarding zip command, use the following command:
$ zip --helpYou can also visit the zip utility man page using the following command:
$ man zipUnzip Command in Linux
With the unzip command, you can easily extract content from a zip file. To unzip a file, use the following syntax:
$ unzip options zip_fileUnzip single zip files
To unzip a single zip file, let's say test.zip, the command would be:
$ unzip test.zipIt will unzip the file in the current directory.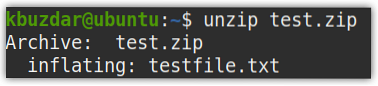
Unzip a file to a different directory
You can also unzip a file to some other directory rather than the current directory using the -d option as follows:
$ unzip zip_file -d /path/to/directoryTo unzip a zip file, test.zip to Documents, directory, the command would be:
$ unzip test.zip -d Documents/
Unzip multiple files
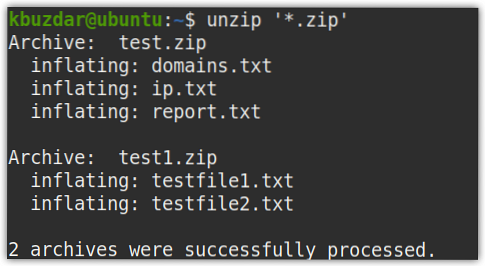
Consider there are multiple zip files in a current directory that you want to unzip. You can unzip all of them using a single command as follows:
$ unzip '*.zip'This command will unzip all the zip files residing in your current directory.
Suppress output when using unzip
Similar to the zip command, you can also hide the output of the unzip command using the -q option as follows:
$ unzip -q zip_file
Exclude files using unzip
If you want to unzip a zip file but do not want to extract a specific file, use the -x option below:
$ unzip zip_file -x filenameFor instance, we have a zip filetest.zip containing three files within it. The following command will unzip all files except the one file report.txt:
$ unzip test.zip -x report.txt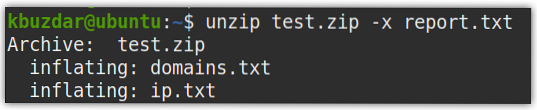
Unzip password-protected zip files
To unzip a password-protected zip file without prompting, use -P option, followed by the password for the file:
$ unzip -PFor instance, we have a zip file, test.zip, that is protected by the password “tin”. To extract this file, the command would be:
$ unzip -P tin test.zip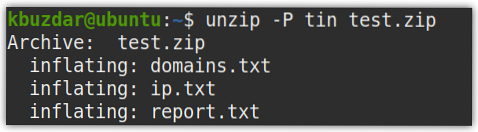
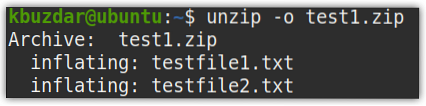
Overwriting zip files
If you are unzipping a file to a location where the extracted files already existed, then you will be prompted to: overwrite the current file, skip unzipping of the current file, overwrite all files, skip unzipping of all files, or rename the file.

To overwrite all existing files without prompting, use the -o option as follows:
List the content of a zip
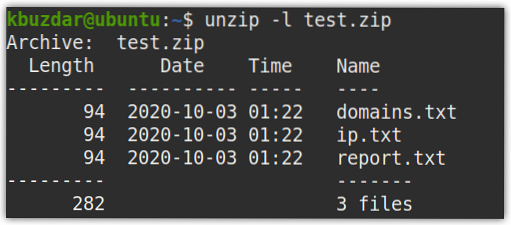
Using the -l option with the unzip command, you can list the content of a zip file without extracting it.
$ unzip -l zip_fileExample:
$ unzip -l test.zipThe following is the output of the above command that lists the files contained within the zip file test.zip, along with their names, original file size, date, and timestamps.
View verbose information
In order to view verbose information without extracting the zip file, use the -v option as follows:
$ unzip -v zip_fileExample:
$ unzip -v test.zipThe following is the output of the above command that lists the files contained within the test.zip, along with their names, original file size, compressed size, compression method, compression ratio, date, and timestamps.

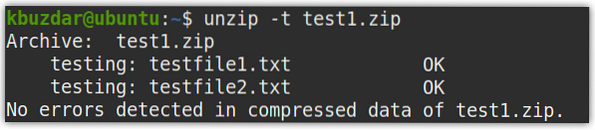
Checking for errors in an archive
With the -t option in the unzip command, you can check whether a zip file is valid and does not contain any errors.
$ unzip -t test1.zipExample:
$ unzip -t test1.zipThe above command check for errors in the test1.zip file and displays results. The following output shows there is no error in the compressed file.
View help
To view help regarding the unzip command, use the following command:
$ unzip --helpYou can also visit the unzip utility man page using the following command:
$ man unzipConclusion
That is all you need to know to master zip and unzip commands in Linux. In this article, we have discussed in detail the use of zip and unzip commands in Linux along with various command-line options and examples.


