MongoDB Database
MongoDB is one of the most popular NoSQL databases which is used to store and query schemaless data.
Today's data has undefined number of properties. New properties of an object are added everyday and those properties might not be present in all the Objects which currently exist. MySQL databases store these properties even for Objects which doesn't have them. Let's see an example:
| Name | Address Line 1 | Address Line 2 | Address Line 3 |
| John | A-17 | 17th Street | Florida |
| Sam | B-46 | California | - |
If we had saved this data in a NoSQL database, it would have looked like:
["name" : "John",
"address_line1" : "A-17",
"address_line2" : "17th Street",
"address_line3" : "Florida"
,
"name" : "John",
"address_line1" : "B-46",
"address_line2" : "California"
]
See the difference, the field which is not applicable for an object is not even present as a column.
Installing MongoDB
Now, installing MongoDB is just a matter of few commands. To start, let's allow Ubuntu to ensure the authenticity of the software we are trying to install:
sudo apt-key adv --keyserver hkp://keyserver.ubuntu.com:80 --recv EA312927Once we run this command, we will get following output:
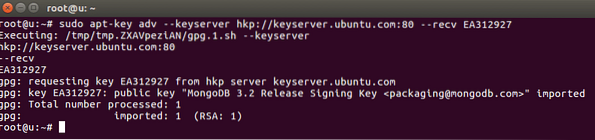
Ubuntu imported the MongoDB key into its package manager. Next, run the next command to create a list file for MongoDB:
echo "deb http://repo.mongodb.org/apt/ubuntu xenial/mongodb-org/3.2 multiverse"|sudo tee /etc/apt/sources.list.d/mongodb-org-3.2.list
Once we run this command, we will get following output:

Let's finally update the package list:
sudo apt-get updateNow, we are ready to install MongoDB now:
sudo apt-get install -y mongodb-orgOnce you run this command, it might take a few minutes to install MongoDB packages.
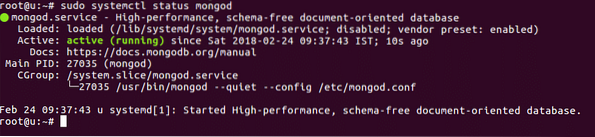
Now, run these two commands to start the MongoDB service and check its status:
sudo systemctl status mongod
Once we run this command, we will get following output:
We will also enable MongoDB to start automatically when the system starts:
sudo systemctl enable mongodOnce we run this command, we will get following output:

Queries with mongoDB
Now that we have installed and started MongoDB, we can also query data using it. Let's try some sample commands here.
Using Mongo Shell
To start running MongoDB queries, we can open Mongo shell by just typing:
mongoShell will open:

Inserting Data
Now, we can make a new database:

And we can insert data into it:

Note that we didn't have to make the platforms collection and it was made automatically.
Getting Data
We can run a simple command to get the data we saved:

In the second query above, we also printed the number of documents present in the collection.
Further Study
In this quick post, we learned how we can install MongoDB and run basic queries on it. To go deeper into MongoDB check out these excellent resources below:
- MongoDB: The Definitive Guide: Powerful and Scalable Data Storage
- MongoDB in Action: Covers MongoDB version 3.0
- Mastering MongoDB 3.x: An expert's guide to building fault-tolerant MongoDB applications


